Android Code : เปลี่ยนฟอร์นในแอป และทำ Custom Font

บทความนี้บันทึเกี่ยวกับการเปลี่ยนฟอร์นในแอปของเราครับ การเปลี่ยนฟอร์นเหมือนเป็นการเปลี่ยนสิ่งเล็กๆแต่ก็เพิ่มความสวยงามให้กับแอปได้มากทีเดียว ถ้าเราใช้ให้เหมาะสม ดังนั้นไม่แลปกที่แทบจะทุกแอปจะมีการใช้ฟอร์นของตัวเอง
เริ่มต้น เตรียมฟอร์นให้เรียบร้อยก่อนนะ
สร้างโฟลเดอร์เก็บไฟล์ Fonts
ขั้นตอนแรกเลย สร้างที่เก็บฟอร์นก่อน โดยเราจะเก็บไว้ที่ Asset ถ้าไม่มีก็ให้สร้างใหม่
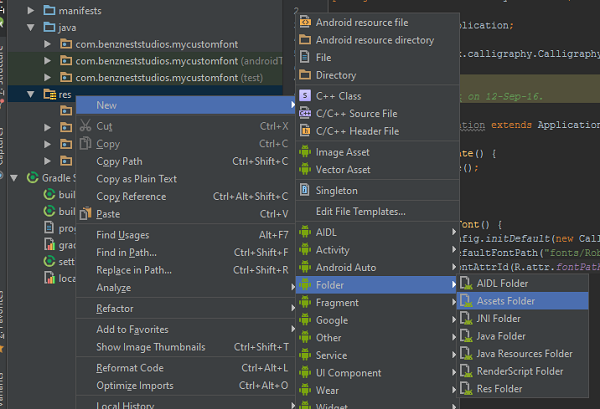
คลิกขวาที่ res > New > Folder > Assets Folder และกด next
จากนั้นก็ copy ไฟล์ฟอร์นมาวางไว้ และเพื่อความเป็นระเบียบก็สร้างโฟลเดอร์ย่อยว่า fonts ไว้จะได้เข้าใจง่าย

เปลี่ยนฟอร์นแบบทั้งแอป
จะใช้ไลบรารี่ชื่อ Calligraphy โดยจะเปลี่ยน font default ของแอปเป็นตัวฟอร์นที่เรากำหนด
ก่อนอื่น เพิ่ม dependeocies
dependencies {
    compile 'uk.co.chrisjenx:calligraphy:2.2.0'
}
ทำการ Custom Appliction โดยการสร้าง Class ใหม่

ตั้งชื่ออะไรก็ได้ ผมตั้งว่า MyApplication ละกัน

จะได้ไฟล์ MyApplication.java ให้ทำการ extends Application
และ override onCreate() ขึ้นมา
public class MyApplication extends Application {
    @Override
    public void onCreate() {
        super.onCreate();
        // do something when app start.
    }
}
onCreate ใน Application นี้จะทำงาน ตอนแอปเปิดขึ้นนั่นเอง เมื่อเปิดแอปเราก็จะตั้งค่า font ในนี้
public class MyApplication extends Application {
    @Override
    public void onCreate() {
        super.onCreate();
        initFont();
    }

    private void initFont() {
        CalligraphyConfig.initDefault(new CalligraphyConfig.Builder()
                .setDefaultFontPath("fonts/junegull.ttf")
                .setFontAttrId(R.attr.fontPath)
                .build()
        );
    }
}
สังเกตว่า ชื่อคลาส MyApplication เป็นสีเทา และขึ้น never used มันคือยังไม่ได้ถูกใช้เราต้องกำหนดทำให้มันทำงานด้วย

ให้ไปที่ไฟล์ AndroidManifest.xml เพิ่ม name ให้กับ tag <application>
 <application
        android:name=".MyApplication"
        ..
        ..
มาที่ฝั่งของ activity บ้าง
MainActivity.java ต้อง override ตัว attachBaseContext ให้เพิ่มตัวนี้ลงไป ทีนี้ฝั่ง java ก็เรียบร้อยละ
    @Override
    protected void attachBaseContext(Context base) {
        super.attachBaseContext(CalligraphyContextWrapper.wrap(base));
    }
มาทำ layout ใน Activity ให้มี TextView แสดงข้อความ
activity_main.xml
<?xml version="1.0" encoding="utf-8"?>
<RelativeLayout xmlns:android="http://schemas.android.com/apk/res/android"
    xmlns:tools="http://schemas.android.com/tools"
    android:layout_width="match_parent"
    android:layout_height="match_parent"
    tools:context="com.benzneststudios.mycustomfont.MainActivity"
    android:padding="16dp">

    <TextView
        android:layout_width="wrap_content"
        android:layout_height="wrap_content"
        android:text="Hello World!!"
        android:layout_centerHorizontal="true"
        android:textSize="36sp"/>
</RelativeLayout>
ลองรันดู ตัวหนังสือเปลี่ยน font แล้ว แม้แต่ action bar ก็ยังเปลี่ยนด้วย

หรือแม้แต่พวก dialog ต่างๆ editText button และอื่นๆ ก็เปลี่ยนด้วยทั้งหมด สะดวกมากๆ

Custom TextView Font
ทีนี้ ถ้าอยากทำแบบทีละ TextView เพราะบางที เราอาจจะอยากใช้ในบางตัวเท่านั้นก็ทำได้
โดยผมจะเพิ่มฟอร์นใหม่ไปอีกตัวใน Asset

เพิ่ม fontPath ใน Style ถ้าจะแก้จะได้มาแก้ที่เดียว
<style name="MyFont">
        <item name="fontPath">fonts/orange juice 2.0.ttf</item>
</style>
เพิ่ม TextView อีกตัวนึง
โดย textView ตัวนั้นเพิ่ม Atrribute ชื่อว่า textApperance
android:textAppearance="@style/MyFont"
จะได้ลักษณะประมาณนี้
<?xml version="1.0" encoding="utf-8"?>
<RelativeLayout xmlns:android="http://schemas.android.com/apk/res/android"
    xmlns:tools="http://schemas.android.com/tools"
    android:layout_width="match_parent"
    android:layout_height="match_parent"
    xmlns:app="http://schemas.android.com/apk/res-auto"
    tools:context="com.benzneststudios.mycustomfont.MainActivity"
    android:padding="16dp">

    <TextView
        android:id="@+id/tv_hello"
        android:layout_width="wrap_content"
        android:layout_height="wrap_content"
        android:text="Hello World!!"
        android:layout_centerHorizontal="true"
        android:textSize="36sp"/>

    <TextView
        android:text="I am developer."
        android:layout_width="wrap_content"
        android:layout_height="wrap_content"
        android:layout_below="@+id/tv_hello"
        android:textSize="36dp"
        android:layout_centerHorizontal="true"
        android:textAppearance="@style/MyFont"/>
</RelativeLayout>

หรือจะกำหนดไปกับ Theme ก็ทำได้เช่นกัน
หรือสามารถกำหนดเองใน Java ก็ใช้โค้ดดังนี้
        TextView tv = (TextView) findViewById(R.id.tv_title);
        Typeface font = Typeface.createFromAsset(getAssets(), "fonts/orange juice 2.0.ttf");
        tv.setTypeface(font);
การทำ Multi Typeface
คือใน 1 textView มีหลาย font ซึ่งตัวไลบรารี่นี้ก็สามารถทำได้ แต่ว่ารองรับบน API 21 ขึ้นไปเท่านั้น โดยปกติไม่ค่อยได้ใช้เท่าไหร่
        TextView tv = (TextView) findViewById(R.id.tv_title);

        SpannableStringBuilder sBuilder = new SpannableStringBuilder();
        CalligraphyTypefaceSpan typeface1 = new CalligraphyTypefaceSpan(TypefaceUtils.load(getAssets(), "fonts/orange juice 2.0.ttf"));
        CalligraphyTypefaceSpan typeface2 = new CalligraphyTypefaceSpan(TypefaceUtils.load(getAssets(), "fonts/junegull.ttf"));
        CalligraphyTypefaceSpan typeface3 = new CalligraphyTypefaceSpan(TypefaceUtils.load(getAssets(), "fonts/orange juice 2.0.ttf"));
        CalligraphyTypefaceSpan typeface4 = new CalligraphyTypefaceSpan(TypefaceUtils.load(getAssets(), "fonts/junegull.ttf"));

        sBuilder.append("my "      , typeface1, Spanned.SPAN_EXCLUSIVE_EXCLUSIVE);
        sBuilder.append("name "    , typeface2, Spanned.SPAN_EXCLUSIVE_EXCLUSIVE);
        sBuilder.append("is "      , typeface3, Spanned.SPAN_EXCLUSIVE_EXCLUSIVE);
        sBuilder.append("Benznest.", typeface4, Spanned.SPAN_EXCLUSIVE_EXCLUSIVE);

        tv.setText(sBuilder, TextView.BufferType.SPANNABLE);

ตัวอย่าง Source Code
https://gist.github.com/benznest/fc13fd5299797c0311bf28eefe36b577
รายละเอียดเพิ่มเติมของไลบรารี่ที่ github
https://github.com/chrisjenx/Calligraphy
ลองนำไปใช้งานดูครับ
(:
 Previous Post
 Next Post