Android Code : Custom Viewgroup บน Android เบื้องต้น

สวัสดีครับ บทความนี้จะพูดถึงเรื่องของ การทำ Custom viewgroup บน Android เป็นอีกเรื่องที่ผมอยากเขียนเป็นบทความเอาไว้ทบทวนตัวเองด้วย และเป็นเรื่องที่เคยไม่เข้าใจมาก่อน ต้องความเข้าใจระยะนึงเลยละ แต่ไม่ใช่ปัญหา การฝึกฝนและอยู่กับมันเท่านั้นที่ทำให้เราผ่านไปได้
โดยบทความนี้จะพูดเรื่องของ custom viewgroup มี workshop เป็นตัวอย่างเล็กน้อย ซึ่งบทความถัดไปจะนำไปใช้ต่อในเรื่องของ Recyclerview
บทความนี้อาจจะจะขอละเอียดๆนิดนึงนะ
Custom Viewgroup คืออะไร
Custom Viewgroup คือการนำ view มารวมกันเป็นกลุ่ม ให้เป็น layout ที่ต้องการอันเดียวและ “นำไปใช้ต่อ” และนี่เองคือเหตุผลสำคัญว่าทำไมต้องมี custom viewgroup คือ การนำไปใช้ต่อ (Reuse) นั่นเอง ไม่เพียงทำให้ code อ่านง่าย ไม่ซ้ำซ้อนกัน ทำความเข้าใจง่าย แล้วยัง maintain ง่ายอีกด้วย ซึ่ง custom viewgroup ใช้กันในแทบทุกแอปแอนดรอยด์เลย
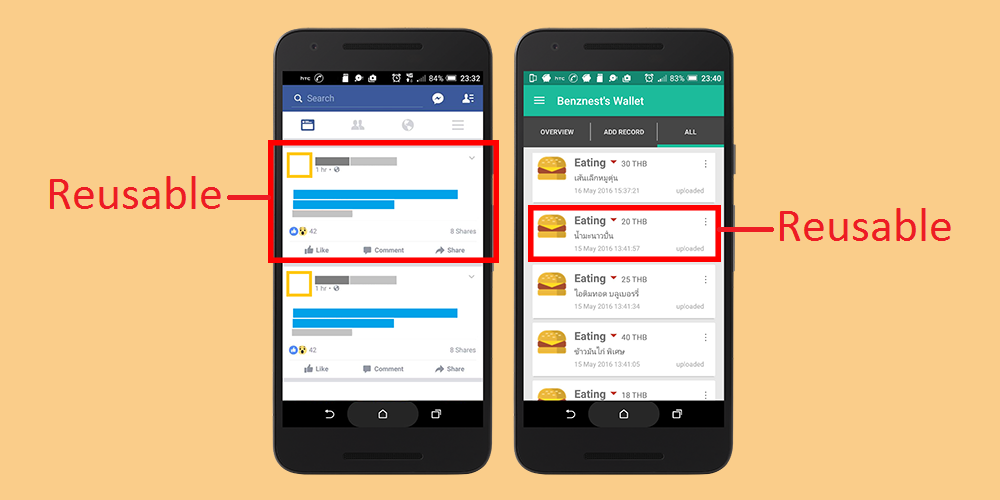
ลองดูตัวอย่าง อย่างเช่นแอป Facebook ในหน้า news feed จะเห็นว่ามีกล่องที่แสดงในรูปแบบ list view ละมีรูปแบบซ้ำๆเดิมๆ แต่ข้อมูลต่างกัน แบบนี้คือการทำ Viewgroup นั่นเอง หรือแม้แต่แอป Benznest wallet ก็ใช้การทำลักษณะนี้เช่นกัน (โฆษณาๆ ทั้งๆที่ยังทำไม่เสร็จ)
เริ่มทำ
จะเห็นว่าเป้าหมายของเรื่องนี้คือการสร้าง Layout และนำไปใช้ต่อได้ (Reuse) ดังนั้นเราจะต้องมาสร้าง Layout กันก่อน ซึ่งผมจะขอเอาแบบง่ายๆ เป็นตัวอย่างคลาสสิคก่อน หากเข้าใจแล้วสามารถนำไปต่อยอดได้แน่นอน
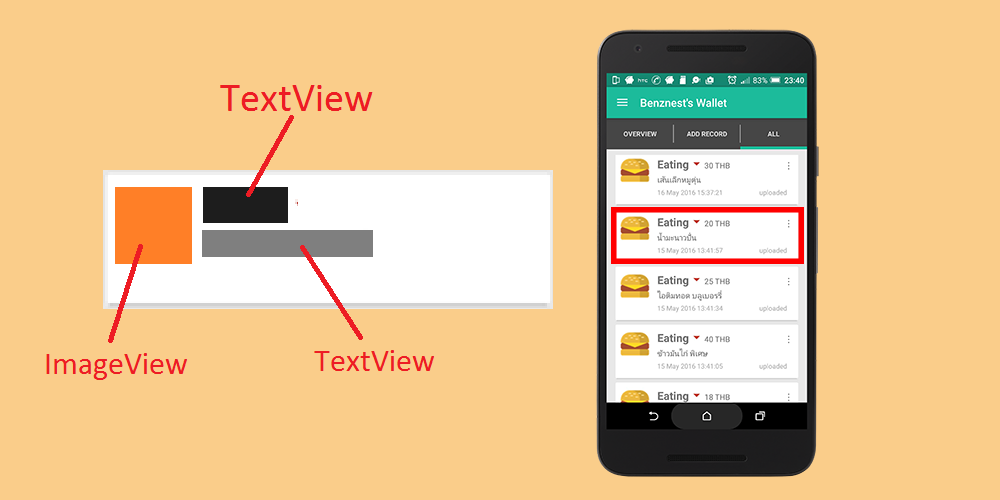
โจทย์คือ สร้าง Custom Viewgroup ที่มีลักษณะแถวนึงมีรูปในด้านซ้าย ด้านขวาแบ่งเป็นสองแถวเป็นข้อความ พูดง่ายๆ มันคือ ชื่อบนสถานเฟสบุ๊คนั่นเอง ตอนนี้เราจะเอาแสดงแค่ 3 แถวก็พอ ยังไม่ทำแบบ Scroll ได้นะ
ไม่พูดถึงเรื่องสร้าง Project ละนะ
สร้าง Layout สำหรับในแต่ละแถว
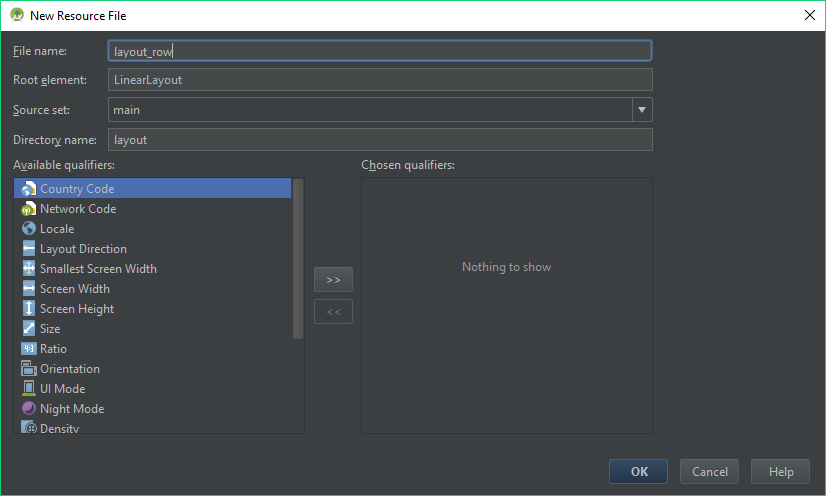
คลิกขวาที่ โฟลเดอร์ layout เลือก New > Layout resource file

ตั้งชื่อ layout ได้เลย ผมขอตั้งว่า layout_row
เขียน XML ให้ได้ตามที่ต้องการ ออกแบบเต็มที่ เอาสวยงามแค่ไหน ตกแต่งได้เลย
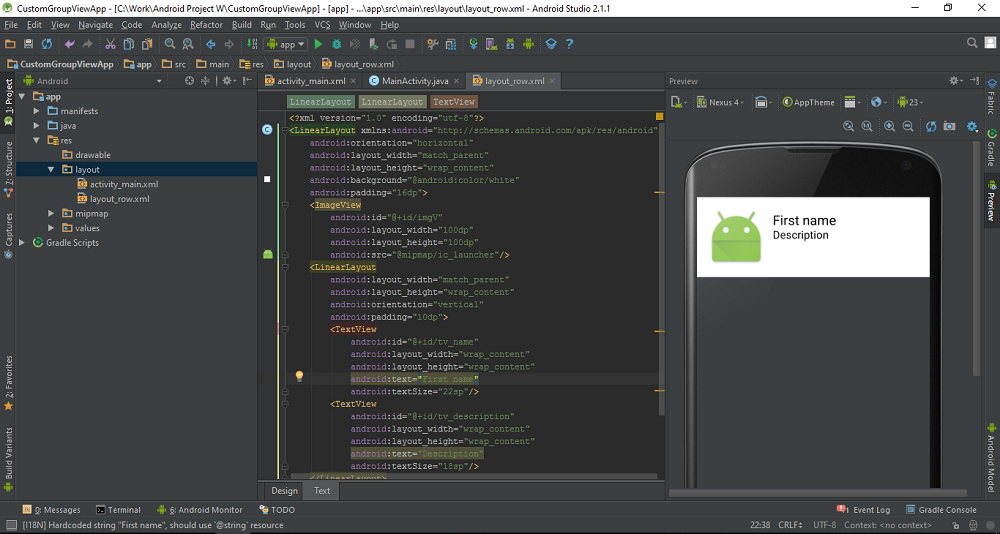
จะได้โค้ด xml หน้าตาประมาณนี้ อย่าลืมตั้ง id ให้มันด้วย
<?xml version="1.0" encoding="utf-8"?>
<LinearLayout xmlns:android="http://schemas.android.com/apk/res/android"
    android:orientation="horizontal"
    android:layout_width="match_parent"
    android:layout_height="wrap_content"
    android:background="@android:color/white"
    android:padding="16dp">
    <ImageView
        android:id="@+id/imgV"
        android:layout_width="100dp"
        android:layout_height="100dp"
        android:src="@mipmap/ic_launcher"/>
    <LinearLayout
        android:layout_width="match_parent"
        android:layout_height="wrap_content"
        android:orientation="vertical"
        android:padding="10dp">
        <TextView
            android:id="@+id/tv_name"
            android:layout_width="wrap_content"
            android:layout_height="wrap_content"
            android:text="First name"
            android:textSize="22sp"/>
        <TextView
            android:id="@+id/tv_description"
            android:layout_width="wrap_content"
            android:layout_height="wrap_content"
            android:text="Description"
            android:textSize="18sp"/>
    </LinearLayout>
</LinearLayout>
ทีนี้ลองคิดดูว่าถ้าเราทำแบบที่แสดงใน preview นั่นสัก 10 แถวโดยการทำแบบถึกๆ ก็คือก็อปปี้ XML โค้ดมาแปะๆเลย ก็จะได้แถวตามที่ต้องการ แต่โค้ดจะมหาศาลมาก ใช่มัยละ อีกทั้ง layout ข้างบนนี่มัน basic ง่ายมากๆเมื่อเทียบกับที่เค้าใช้งานกันจริงๆ ถ้าเจออันที่ซับซ้อนกว่านี้ละ แค่คิดก็เหนื่อยแล้ว นี่แหละ คือการ reuse
สร้าง Java Class สำหรับ Custom Viewgroup
เราได้ layout แล้วทีนี้มาสร้าง Java สำหรับจัดการ layout ที่เราสร้างไป
คลิกขวาที่โฟลเดอร์ ชื่อ package name ในโฟลเดอร์ java เลือก New > Java Class
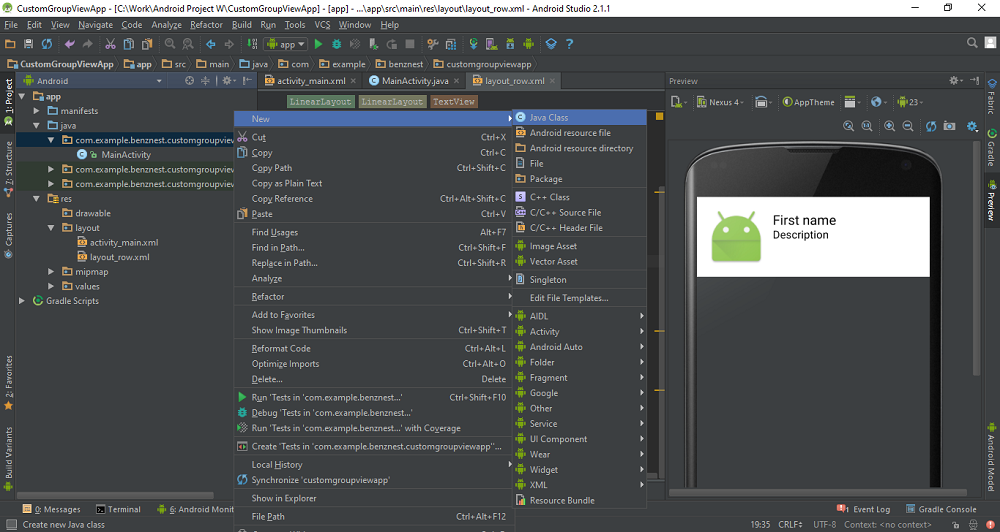
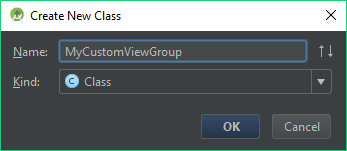
ตั้งชื่อ Class ได้เลย ผมขอตั้งชื่อว่า MyCustomViewGroup ละกัน ชื่อคลาส ตัวแรกพิมพ์ใหญ่นะ
ก็จะได้ class ปล่าวๆมา ทีนี้เราจะมา implement กัน

เริ่มจาก เขียนให้ class ของเราไป extends FrameLayout มา แล้วก็จะมีขีดแดงๆขึ้นมา ให้กด Alt+Enter (เม้าไปจิ้มที่มันแดงๆก่อน) แล้วเลือก Create constructor matching super มันคือการที่เราไป extends คลาสอื่นมา แต่ว่าตัวที่ extends มา มันจำเป็นต้องมี constructor หรือ method ที่เราต้องดึงมาด้วย จากนั้นจะปรากฏหน้าต่างให้เลือกว่าจะเอาอันไหนบ้าง ก็ให้เลือกทุกอันไปเลย
ตอนนี้ไฟล์ MyCustomViewGroup.java มีลักษณะแบบนี้
public class MyCustomViewGroup extends FrameLayout{

    public MyCustomViewGroup(Context context) {
        super(context);
    }

    public MyCustomViewGroup(Context context, AttributeSet attrs) {
        super(context, attrs);
    }

    public MyCustomViewGroup(Context context, AttributeSet attrs, int defStyleAttr) {
        super(context, attrs, defStyleAttr);
    }

    public MyCustomViewGroup(Context context, AttributeSet attrs, int defStyleAttr, int defStyleRes) {
        super(context, attrs, defStyleAttr, defStyleRes);
    }
}
เอาไฟล์ Layout มาใช้งานที่ Java
ขั้นตอนต่อมาคือ เราต้องทำการ เรียก Layout ที่เราเขียนไปมาลงที่ class นี้
ให้เราสร้าง method ชื่อว่า initInflate() ขึ้นมา ในคลาสของเรา แล้วข้างในเรียกใช้ inflate() มันคือการนำ Layout มาจุติลงบน class นั่นเอง ซึ่งพารามิเตอร์มี 3 ตัว
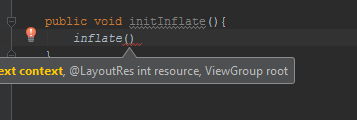
ก็ให้ทำการใส่ให้ครบ ดังนี้ ตัวแรกคือ context เราสามารถใช้ getContext() มาได้เลย อีกอันคือ Layout ของเรา และสุดท้ายคือ ที่ๆ ต้องการให้เอา layout ไปวาง ซึ่งมันก็คือ คลาสนี้นี่แหละ ให้ใส่ this ไปเป็นอันเสร็จ
    public void initInflate(){
        inflate(getContext(),R.layout.layout_row,this);
    }
จากนั้นเราก็นำ initInflate() ไปใส่ไว้ที่ constructor ทุกตัวที่เราได้มาเลย เพราะเราไม่รู้ว่า constructor ตัวไหนจะถูกเรียกเมื่อมันทำงาน
public class MyCustomViewGroup extends FrameLayout{

    public MyCustomViewGroup(Context context) {
        super(context);
        initInflate();
    }

    public MyCustomViewGroup(Context context, AttributeSet attrs) {
        super(context, attrs);
        initInflate();
    }

    public MyCustomViewGroup(Context context, AttributeSet attrs, int defStyleAttr) {
        super(context, attrs, defStyleAttr);
        initInflate();
    }

    @TargetApi(Build.VERSION_CODES.LOLLIPOP)
    public MyCustomViewGroup(Context context, AttributeSet attrs, int defStyleAttr, int defStyleRes) {
        super(context, attrs, defStyleAttr, defStyleRes);
        initInflate();
    }

    public void initInflate(){
        inflate(getContext(),R.layout.layout_row,this);
    }
}
นำ Custom Viewgroup มาแสดงผล
ต่อมาเราจะลองนำ ที่เราสร้างไปมาแสดงผลกัน โดยผมจะแปะลงบน Activity
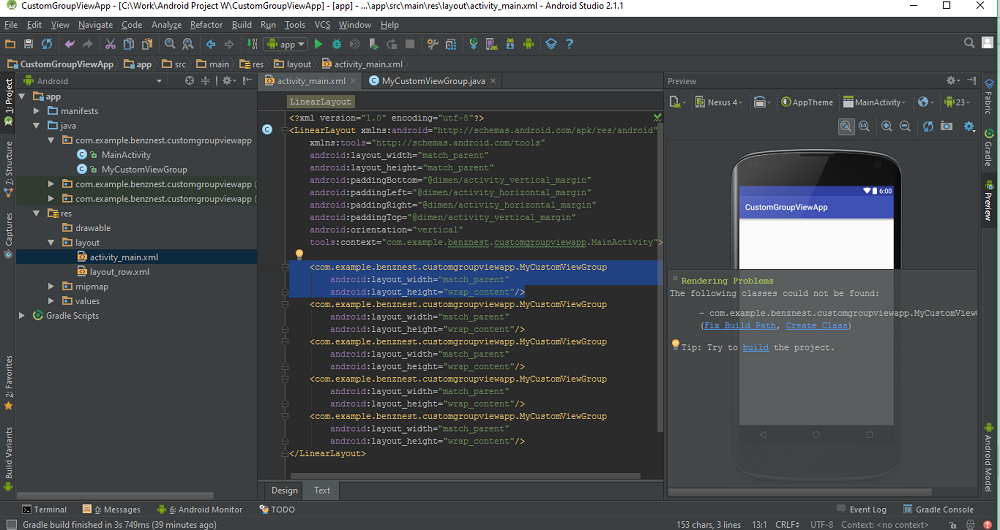
มาที่ activity_main.xml ในโฟลเดอร์ res ให้เราทำการแปะ view จาก คลาสที่เราสร้างเมื่อกี้ โดยการ พิมพ์ชื่อคลาสลงไป เช่น MyCustomViewGroup แล้วกำหนดความกว้า ความสูงให้เรียบร้อย เพื่อให้ชัดเจนให้ปรับจาก RelativeLayout เป็น LinearLayout แบบ vertical พอเสร็จแล้วตัว Preview มันจะขึ้น ให้ Build 1 ครั้ง
<LinearLayout xmlns:android="http://schemas.android.com/apk/res/android"
    xmlns:tools="http://schemas.android.com/tools"
    android:layout_width="match_parent"
    android:layout_height="match_parent"
    android:paddingBottom="@dimen/activity_vertical_margin"
    android:paddingLeft="@dimen/activity_horizontal_margin"
    android:paddingRight="@dimen/activity_horizontal_margin"
    android:paddingTop="@dimen/activity_vertical_margin"
    android:orientation="vertical"
    tools:context="com.example.benznest.customgroupviewapp.MainActivity">

    <com.example.benznest.customgroupviewapp.MyCustomViewGroup
        android:layout_width="match_parent"
        android:layout_height="wrap_content"/>
    <com.example.benznest.customgroupviewapp.MyCustomViewGroup
        android:layout_width="match_parent"
        android:layout_height="wrap_content"/>
    <com.example.benznest.customgroupviewapp.MyCustomViewGroup
        android:layout_width="match_parent"
        android:layout_height="wrap_content"/>
    <com.example.benznest.customgroupviewapp.MyCustomViewGroup
        android:layout_width="match_parent"
        android:layout_height="wrap_content"/>
    <com.example.benznest.customgroupviewapp.MyCustomViewGroup
        android:layout_width="match_parent"
        android:layout_height="wrap_content"/>
</LinearLayout>
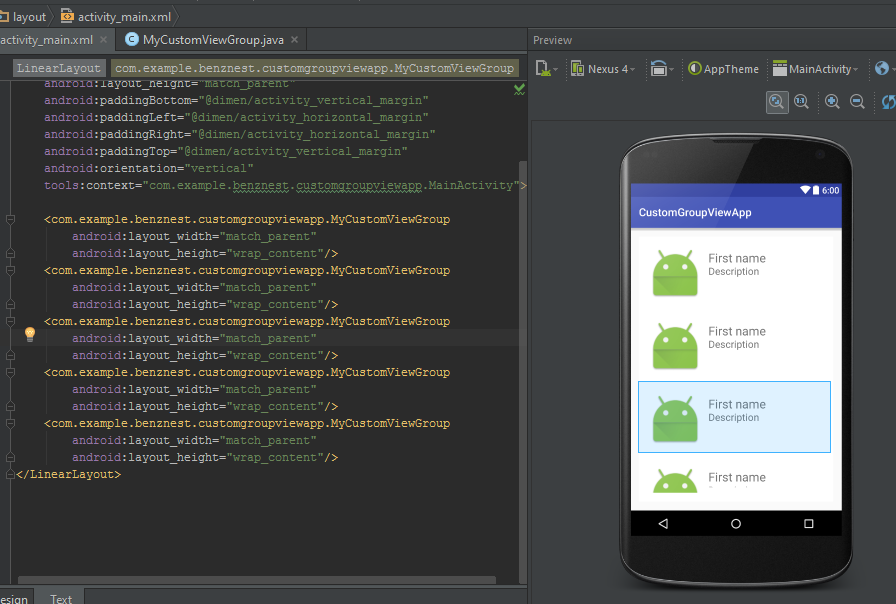
เสร็จแล้วเราก็จะพบกับ Custom Viewgroup ที่เราได้ออกแบบไว้
การกำหนดค่าให้กับ Custom viewgroup
ต่อไปเราจะนำไปใช้งานจริงดูนะ เอาละผมจะลองสมมุติว่า เรามีข้อมูล 2 แถวมีชื่อ รายละเอียดแตกต่างกัน โดยจะกำหนดค่าให้ชื่อกับ รายละเอียด ส่วนรูปก็แสดงไว้แบบนั้น ถ้าทำเปลี่ยน text ได้ รูปก็ไม่ใช่ปัญหา
ก่อนอื่น ไปกำหนด id ให้ ตัว custom viewgroup ของเราก่อน
<com.example.benznest.customgroupviewapp.MyCustomViewGroup
        android:id="@+id/my_row_1"
        android:layout_width="match_parent"
        android:layout_height="wrap_content"/>
    <com.example.benznest.customgroupviewapp.MyCustomViewGroup
        android:id="@+id/my_row_2"
        android:layout_width="match_parent"
        android:layout_height="wrap_content"/>
    <com.example.benznest.customgroupviewapp.MyCustomViewGroup
        android:id="@+id/my_row_3"
        android:layout_width="match_parent"
        android:layout_height="wrap_content"/>
    <com.example.benznest.customgroupviewapp.MyCustomViewGroup
        android:id="@+id/my_row_4"
        android:layout_width="match_parent"
        android:layout_height="wrap_content"/>
    <com.example.benznest.customgroupviewapp.MyCustomViewGroup
        android:id="@+id/my_row_5"
        android:layout_width="match_parent"
        android:layout_height="wrap_content"/>
ไปที่ MainActivity เพื่อประกาศตัวแปร ใช้งาน ตัวแปรจะเป็นประเภท Class ที่เราสร้างไว้นั่นเอง ส่วน initInstance() จะเอาไว้ไป findViewById มาจาก Layout ลองเอาแค่ 2 ตัวก่อนละกัน
public class MainActivity extends AppCompatActivity {

    MyCustomViewGroup myCustomViewGroup1;
    MyCustomViewGroup myCustomViewGroup2;

    @Override
    protected void onCreate(Bundle savedInstanceState) {
        super.onCreate(savedInstanceState);
        setContentView(R.layout.activity_main);

        initInstance();
    }

    private void initInstance() {
        myCustomViewGroup1 = (MyCustomViewGroup) findViewById(R.id.my_row_1);
        myCustomViewGroup2 = (MyCustomViewGroup) findViewById(R.id.my_row_2);
    }
}
อ่าวแล้วเราจะ set ชื่อ รายละเอียด ในแต่ละแถวยังไง ??
เราก็ต้องไปสร้างช่องทางให้ Activity สามารถโยนค่าเข้ามา แล้ว Class ของเราก็เอาค่าไป set ให้กับ TextView อีกที
ก่อนอื่นต้องไป implement ใน CustomViewGroup ให้เสร็จก่อน ประกาศตัวแปร TextView หรือตัวที่อยู่ใน Layout ขึ้นมา แล้วก็ส้าง method ที่ชื่อว่า initInstance() ให้ไป findViewById มาใส่ในตัวแปร จากนั้นก็เอา initInstance() ไปใส่ต่อจาก initInflater() ใน constructor (ต้องใส่ต่อท้ายนะ เพราะ หากไม่ inflate มาก่อน มันจะพังเน้อ)
แล้วก็อย่าลืมสร้าง setName() กับ setDescription ไว้ด้วย เราจะใช้มันในการกำหนดค่า จาก Activity
public class MyCustomViewGroup extends FrameLayout{

    TextView tvName;
    TextView tvDescription

    public MyCustomViewGroup(Context context) {
        super(context);
        initInflate();
        initInstance();
    }

    public MyCustomViewGroup(Context context, AttributeSet attrs) {
        super(context, attrs);
        initInflate();
        initInstance();
    }

    public MyCustomViewGroup(Context context, AttributeSet attrs, int defStyleAttr) {
        super(context, attrs, defStyleAttr);
        initInflate();
        initInstance();
    }

    @TargetApi(Build.VERSION_CODES.LOLLIPOP)
    public MyCustomViewGroup(Context context, AttributeSet attrs, int defStyleAttr, int defStyleRes) {
        super(context, attrs, defStyleAttr, defStyleRes);
        initInflate();
        initInstance();
    }

    public void initInflate(){
        inflate(getContext(),R.layout.layout_row,this);

    }

    public void initInstance(){
        tvName = (TextView) findViewById(R.id.tv_name);
        tvDescription = (TextView) findViewById(R.id.tv_description);

    }

    public void setName(String name){
        tvName.setText(name);
    }

    public  void setDescription(String des){
        tvDescription.setText(des);
    }
}
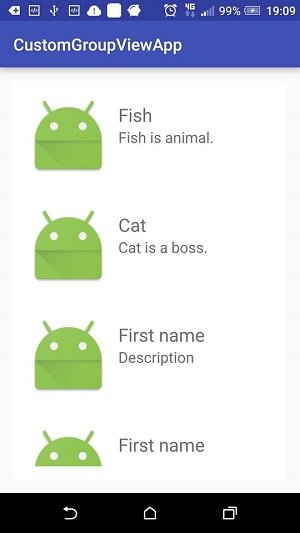
ไปที่ Activity ตอนนี้ เราสามารถกำหนดค่าให้กับ Custom viewgroup ได้แล้ว
        myCustomViewGroup1.setName("Fish");
        myCustomViewGroup1.setDescription("Fish is animal.");

        myCustomViewGroup2.setName("Cat");
        myCustomViewGroup2.setDescription("Cat is a boss.");
เสร็จแล้วลองรันดู
ทีนี้จะลองกำหนดรูปก็ไม่อยากแล้ว ใช่มัยละ ทำคล้ายๆกันนี่แหละ หรือมี View ที่ซับซ้อนกว่าก็ใช้หลักการนี้เหมือนกัน
จบแล้ว
การทำ Custom viewgroup เป็นเรื่องที่ไม่ยาก ทำความเข้าใจกับมันได้ ตรงไปตรงมาใช่มัยละ แค่นี้เราก็นำ layout ไปใช้ได้หลายๆที่ที่ต้องการแล้วละ แถมยังใช้งานง่ายอีกด้วย ขั้นตอนมีไม่เยอะ คือ สร้าง layout แล้วมาสร้าง class ทำการ inflate layout แล้วก็ไปแปะได้เลย ตอนกำหนดค่าก็ไปประกาศตัวแปร แล้ว findViewById ให้เรียบร้อยแล้วกำหนดค่าได้เลย ผ่าน method
เดี๋ยวบทความหน้า ผมจะมาต่อเรื่อง Recyclerview โดยนำโปรเจคจากบทความนี้ไปทำต่อครับ จะพยายามเขียนเรื่อยๆ ทบทวนไปในตัว สนุกดีเหมือนกันครับ
 Previous Post
 Next Post