Flutter Project : สร้างเกม Tertis ด้วย Flutter ตอนที่ 1
สวัสดีครับ จากบล็อกตอนก่อนหน้านี้ ผมได้ลองทำแอปเล็กๆ ลักษณะเป็นเกม sudoku , เกมงู , เกม XO ด้วย Flutter ครับ เพื่อเป็นการคลายเครียดแล้วก็ฝึกเขียน flutter แบบสนุกๆครับ โดยบล็อกนี้ผมจะบันทึกทำเกม Teris ด้วย Flutter ครับ
บล็อกทำเกม sudoku
เริ่มต้น
เกม tertis เป็นเกมต่อบล็อกจากบนลงล่าง ลักษณะการทำงานจะรันไปเรื่อยๆ ดังนั้นผมจึงใช้หลักการคล้ายๆกับที่ใช้ในเกมงูครับ
เริ่มต้นโปรเจคเปล่าๆ
import 'package:flutter/material.dart';

void main() => runApp(MyApp());

class MyApp extends StatelessWidget {
  @override
  Widget build(BuildContext context) {
    return MaterialApp(
      title: 'Tertis Game',
      theme: ThemeData(
        primarySwatch: Colors.red,
      ),
      home: MyHomePage(title: 'Tertis Game'),
    );
  }
}

class MyHomePage extends StatefulWidget {
  MyHomePage({Key key, this.title}) : super(key: key);

  final String title;

  @override
  _MyHomePageState createState() => _MyHomePageState();
}

class _MyHomePageState extends State<MyHomePage> {

  @override
  Widget build(BuildContext context) {
    return Scaffold(

      body: Container(color: Color(0xff34495e),
          child: Center(
          child: Column(
            mainAxisAlignment: MainAxisAlignment.center,
            children: <Widget>[
              Text(
                'Tertis Game',
                style: TextStyle(fontSize: 32,color: Colors.white),
              ),
              Text(
                'using Flutter',
                style: TextStyle(fontSize: 18,color: Colors.white),
              ),
            ],
          )
      )),
    );
  }
}
ก่อนอื่นขอกำหนดขนาดตารางก่อน ประมาณ 14×10 ช่อง ช่องละ 36
  int COUNT_ROW = 14;
  int COUNT_COL = 10;
  double SIZE_AREA_UNIT = 36;
กำหนดสีคร่าวๆ
const colorBackgroundGameArea = Colors.black;
const colorBorderGameArea = Colors.blue;
const colorBorderAreaUnit = Color(0xff2c3e50);
const colorBackgroundApp = Color(0xff2c3e50);
สร้างตาราง
พื้นที่ของเกม ที่บล็อกจะเคลื่อนที่จะเป็นลักษณะแบบตาราง โดยผมจะเรียกมันว่า Game Area
class _MyHomePageState extends State<MyHomePage> {
  int COUNT_ROW = 14;
  int COUNT_COL = 10;
  double SIZE_AREA_UNIT = 36;

  @override
  Widget build(BuildContext context) {
    return Scaffold(
      body: Container(color:colorBackgroundApp ,
          child: Center(
              child: Container(
                  decoration: BoxDecoration(border: Border.all(width: 12, color: colorBackgroundGameArea ),
                      borderRadius: BorderRadius.all(Radius.circular(8))),
                  child: Column(
                      mainAxisSize: MainAxisSize.min,
                      mainAxisAlignment: MainAxisAlignment.center,
                      children: buildGameArea()
                  ))
          )),
    );
  }

  List<Widget> buildGameArea() {
    List<Widget> list = List();
    for (int i = 0; i < COUNT_ROW; i++) {
      list.add(buildRow());
    }
    return list;
  }

  Row buildRow() {
    List<Widget> list = List();
    for (int i = 0; i < COUNT_COL; i++) {
      list.add(buildAreaUnit());
    }
    return Row(
        mainAxisSize: MainAxisSize.min,
        mainAxisAlignment: MainAxisAlignment.center,
        children: list);
  }

  Widget buildAreaUnit() {
    return Container(width: SIZE_AREA_UNIT, height: SIZE_AREA_UNIT,
        decoration: BoxDecoration(color: colorBorderAreaUnit ,
                       border: Border.all(width: 1, color: colorBorderAreaUnit )));
  }
}
วาดตาราง ขนาดตามที่กำหนดแล้วใส่ขอบ
สร้างบล็อก
ลองสร้างบล็อก แล้ววาดลงไปที่ Game Area ครับ
ก่อนอื่นนิยาม คลาส AreaUnit ซึ่งจำเก็บตำแหน่งย่อยๆในตาราง ว่ามีสีอะไร มีบล็อกอยู่หรือไม่
class AreaUnit {
  Color color;
  bool available;

  AreaUnit({this.color = colorBackgroundGameArea, this.available = true});
}
ประกาศตัวแปร gameArea ซึ่งมันคือ AreaUnit 2 มิติ
List<List<AreaUnit>> gameArea;
ทีนี้ที่ initState กำหนดค่าให้กับ AreaUnit ลงไป โดยกำหนด ว่าสมมุติมีบล็อกนึงอยู่ใน Game Area
โดยลอง hardcode ลงไป
  @override
  void initState() {
    initGameArea();
    super.initState();
  }

  void initGameArea() {
    gameArea = List();

    for (int i = 0; i < COUNT_ROW; i++) {
      List<AreaUnit> list = List();
      for (int j = 0; j < COUNT_COL; j++) {
        list.add(AreaUnit());
      }
      gameArea.add(list);
    }

    gameArea[1][1] = AreaUnit(available: false, color: Colors.yellow);
    gameArea[2][1] = AreaUnit(available: false, color: Colors.yellow);
    gameArea[2][2] = AreaUnit(available: false, color: Colors.yellow);
    gameArea[3][2] = AreaUnit(available: false, color: Colors.yellow);
  }
กลับไปที่ build() เชื่อมตัวแปร gameArea กับ Widget
ก็คือถ้าใน AreaUnit มีค่า available=false ก็เอาสีจาก AreaUnit มาใส่ แต่ถ้าไม่ใส่สีดำ
  List<Widget> buildGameArea() {
    List<Widget> list = List();
    for (int i = 0; i < COUNT_ROW; i++) {
      list.add(buildRow(i));
    }
    return list;
  }

  Row buildRow(int row) {
    List<Widget> list = List();
    for (int i = 0; i < COUNT_COL; i++) {
      list.add(buildAreaUnit(row, i));
    }
    return Row(
        mainAxisSize: MainAxisSize.min,
        mainAxisAlignment: MainAxisAlignment.center,
        children: list);
  }

  Widget buildAreaUnit(int row, int col) {
    return Container(width: SIZE_AREA_UNIT, height: SIZE_AREA_UNIT,
        decoration: BoxDecoration(color: gameArea[row][col].color,
            border: Border.all(width: 1, color: colorBorderAreaUnit)));
  }
ลองรัน บล็อกมาแล้วจ้า อันนี้คือหลักการวาดบล็อกลงบน Game Area นั่นเอง ง่ายๆเท่านี้เลย
ทำให้บล็อกเลื่อนลงมา
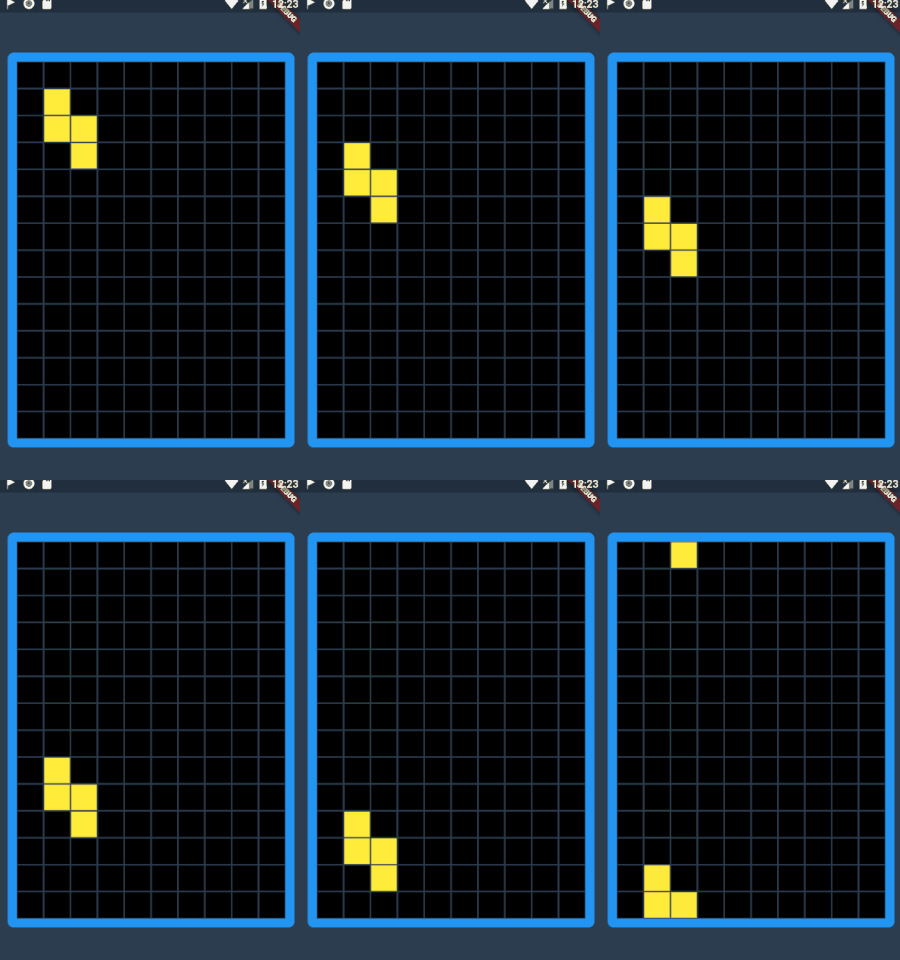
ตอนนี้เราเอาบล็อกมาวาดใน Game Area ได้แล้ว ตอนนี้เราจะทำให้บล็อกขยับลงมา
ทฤษฎีที่ผมจะลองใช้ตอนนี้คือ สร้าง timer มาเพื่อรันแอปทุกๆ 0.5 วินาที
โดยหลักการขยับองบล็อก ตัว game area มันคือ list ดังนั้นมันสามารถลบและแทรกได้ง่ายๆ เราก็นำแถวล่างสุดออกไปแล้วไปแทรกแถวใหม่ด้านบน จากนั้นก็วาดหน้าจอใหม่ เท่านี้บล็อกก็ขยับลงมาแถว และทุกๆ 0.5 วินาทีมันก็จะขยับลงมา 1 แถว
สร้างตัวแปร timer กำหนดค่าตัวแปร
baseRowAvailable คือแถวที่เราจะเอาออก
  Timer timer;
  int baseRowAvailable = COUNT_ROW - 1;
  int speed = 500;
เรียกตัวแปร timer ให้ทำงาน ที่ initState โดยจะทำงานทุกๆครั้งจะเรียก method ชื่อว่า process()
  @override
  void initState() {
    initGameArea();
    timer = Timer.periodic(Duration(milliseconds: speed), (Timer t) => process());
    super.initState();
  }


  @override
  void dispose() {
    timer?.cancel();
    super.dispose();
  }
ที่ process() เราก็ทำตามทฤษฎี คือ copy list แถวนึงมา ตอนนี้คือแถวล่างสุด แล้วลบแถวนั้นทิ้ง จากนั้นก็ไปแทรกด้านบนสุด
  void process() {
    setState(() {
      List<AreaUnit> list = List.of(gameArea[baseRowAvailable]);
      gameArea.removeAt(baseRowAvailable);
      gameArea.insert(0, list);
    });
  }
ลองรัน บล็อกเลื่อนแล้ว
ลองเพิ่มบล็อกบนพื้น
บล็อกที่ลงมาล่างสุดอยู่มันจะไม่ขยับไปไหน ผมขอเรียกมันว่า Ground
โดยผมจะสมมุติว่ามีบล็อกอยู่บน ground อยู่ 2 แถวล่างสุด เป็นบล็อกสีแดง
 void initGameArea() {
    ...

    gameArea[COUNT_ROW-2][2] = AreaUnit(available: false, color: Colors.red);
    gameArea[COUNT_ROW-1][1] = AreaUnit(available: false, color: Colors.red);
    gameArea[COUNT_ROW-1][2] = AreaUnit(available: false, color: Colors.red);
  }
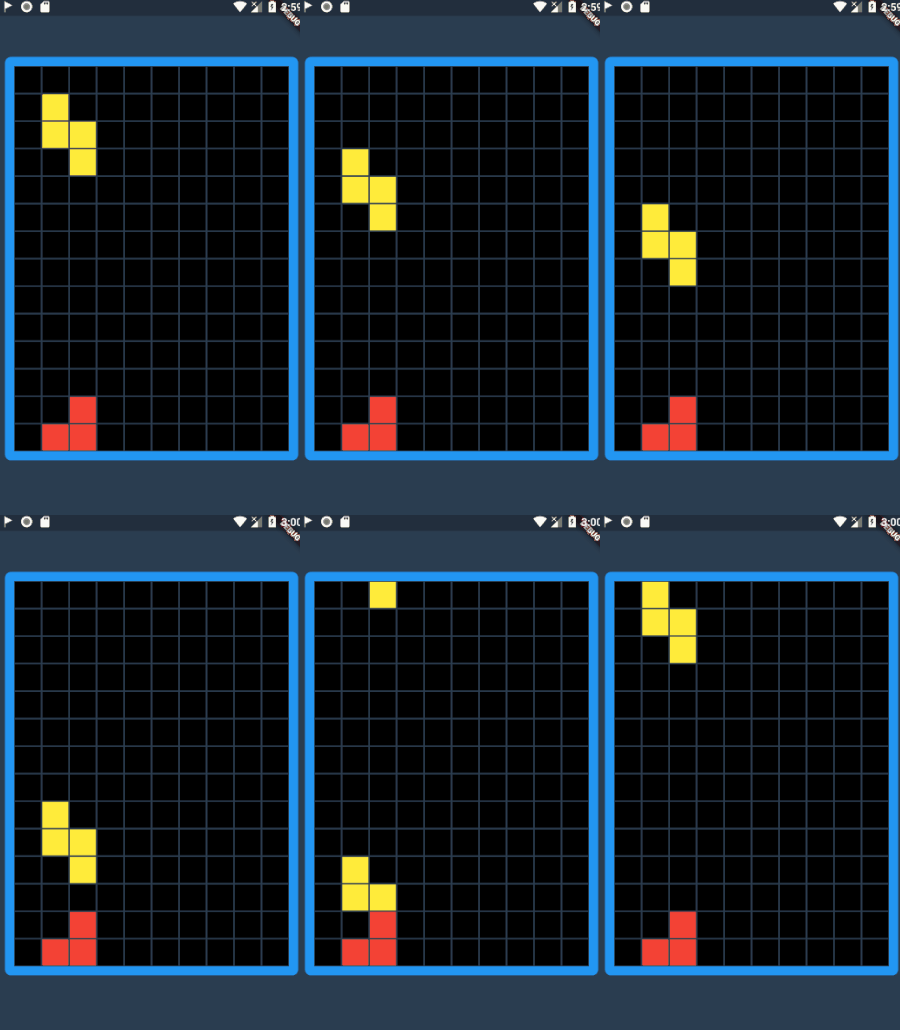
จากทฤษฎีของเรา ที่ว่าจะลบแถวล่างสุดออก แล้วไปแทรกบนสุดจะใช้ไม่ได้ เพราะถ้าลบล่างสุดบล็อกบน ground จะหายไป
ดังนั้น แถวที่เราควรจะลบคือแถวเปล่าๆ ก่อนจะถึง ground มันคือ index count_row – 3
int baseRowAvailable = COUNT_ROW -3;
ลองรัน ก็พอได้อยู่นะ
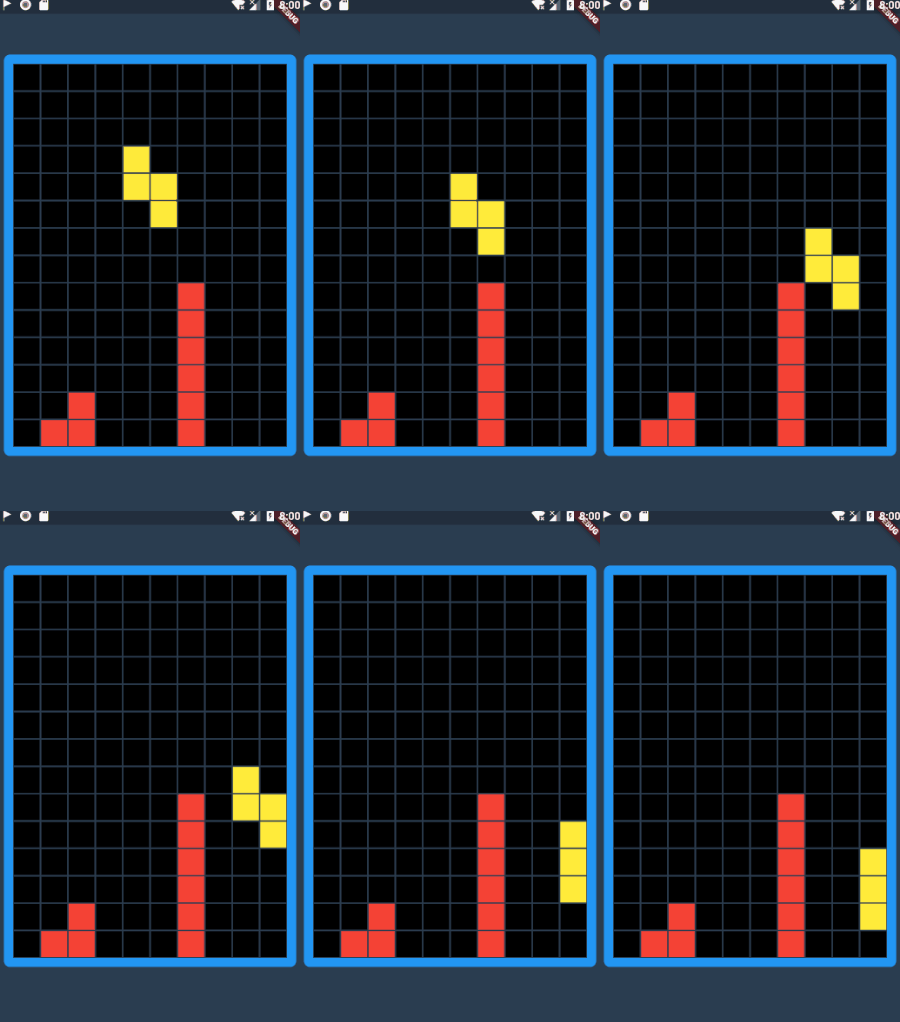
ทีนี้ปัญหาคือ เมื่อลองเพิ่มบล็อกบน ground แบบที่ฝั่งขวาอยู่สูงกว่าที่เราจะวาง บล็อกมันไม่สามารถลงไปที่ ground ที่เราต้องการได้ ดังนั้นวิธีใช้ baseRowAvailable จึงใช้ไม่ได้
ทำ Game Area คู่ขนาน
วิธีที่ดีกว่า คือ สร้างอีก game area คู่ขนานโดย ตัวนี้จะเก็บค่าเฉพาะตำแหน่งของบล็อกเท่านั้น ผมจะเรียกมันว่า Game Area Temp
ส่วน Game Area ก่อนหน้านี้จะเก็บเฉพาะ block บน ground
  List<List<AreaUnit>> gameArea;
  List<List<AreaUnit>> gameAreaTemp;
ดังนั้น เราจะต้อง init ค่าเพิ่มอีกตัว โดยจะลองสมมุติค่าลงไปด้วย
  void initGameAreaTemp(){
    gameAreaTemp = List();
    for (int i = 0; i < COUNT_ROW; i++) {
      List<AreaUnit> listAreaTemp = List();
      for (int j = 0; j < COUNT_COL; j++) {
        listAreaTemp.add(AreaUnit());
      }
      gameAreaTemp.add(listAreaTemp);
    }
  }

  void mockUpBlockOnGameAreaTemp(){
     gameAreaTemp[0][1] = AreaUnit(available: false, color: Colors.yellow);
     gameAreaTemp[1][1] = AreaUnit(available: false, color: Colors.yellow);
     gameAreaTemp[1][2] = AreaUnit(available: false, color: Colors.yellow);
     gameAreaTemp[2][2] = AreaUnit(available: false, color: Colors.yellow);
  }

  void initGameArea() {
    gameArea = List();
    for (int i = 0; i < COUNT_ROW; i++) {
      List<AreaUnit> listArea = List();
      for (int j = 0; j < COUNT_COL; j++) {
        listArea.add(AreaUnit());
      }
      gameArea.add(listArea);
    }
  }

  void mockUpGameArea(){
      gameArea[COUNT_ROW-2][2] = AreaUnit(available: false, color: Colors.red);
      gameArea[COUNT_ROW-1][1] = AreaUnit(available: false, color: Colors.red);
      gameArea[COUNT_ROW-1][2] = AreaUnit(available: false, color: Colors.red);
      gameArea[COUNT_ROW-1][1] = AreaUnit(available: false, color: Colors.red);
      gameArea[COUNT_ROW-1][6] = AreaUnit(available: false, color: Colors.red);
      gameArea[COUNT_ROW-2][6] = AreaUnit(available: false, color: Colors.red);
      gameArea[COUNT_ROW-3][6] = AreaUnit(available: false, color: Colors.red);
      gameArea[COUNT_ROW-4][6] = AreaUnit(available: false, color: Colors.red);
      gameArea[COUNT_ROW-5][6] = AreaUnit(available: false, color: Colors.red);
      gameArea[COUNT_ROW-6][6] = AreaUnit(available: false, color: Colors.red);
  }
ที่ initState ก็เรียก init ทั้ง 2 Game Area
  @override
  void initState() {
    // init and mockup game area about ground.
    initGameArea();
    mockUpGameArea();

    // init and mockup game area about block.
    initGameAreaTemp();
    mockUpBlockOnGameAreaTemp();
    ...
  }
เพื่อแยกการทำงานเป็นสัดส่วนมากขึ้น สร้าง method moveGameAreaTempDown() แล้วย้ายการทำงานส่วนของเลื่อนบล็อกมาที่นี่ โดยเราจะใช้หลักการเดิมคือ ย้ายแถวล่างสุดไปไว้ด้านบน แต่ทำที่ gameAreaTemp เพราะมันเก็บแค่ตำแหน่งบล็อกที่กำลังเลื่อนลงมาเท่านั้น
  void process() {
    setState(() {
      moveGameAreaTempDown();
    });
  }

  void moveGameAreaTempDown() {
    List<AreaUnit> list = List.of(gameAreaTemp[COUNT_ROW -1]);
    gameAreaTemp.removeAt(COUNT_ROW -1);
    gameAreaTemp.insert(0, list);
  }
ต่อมาทำการเชื่อม Game Area Temp เข้ากับ Area Unit
โดยทำการเช็ค ถ้าใน GameArea ไม่มีบล็อกก็ไปเช็คใน GameAreaTemp แต่ถ้าไม่มีอีกก็ใส่สีดำนั่นเอง
  Widget buildAreaUnit(int row,int col) {

    AreaUnit areaUnit = gameArea[row][col];
    AreaUnit areaUnitTemp = gameAreaTemp[row][col];

    if(areaUnit.available){
      if(areaUnitTemp.available){
        return buildAreaUnitView(colorBackgroundGameArea);
      }else{
        return buildAreaUnitView(areaUnitTemp.color);
      }
    }else{
      return buildAreaUnitView(areaUnit.color);
    }
  }

  Container buildAreaUnitView(Color color) {
    return Container(width: SIZE_AREA_UNIT, height: SIZE_AREA_UNIT,
        decoration: BoxDecoration(color: color,
            border: Border.all(width: 1, color: colorBorderAreaUnit)));
  }
แก้ปัญหาไปได้ 1 อัน เริ่มเข้าใจไอเดียแล้วนะ
สร้างคลาสของบล็อก
ตอนนี้บล็อกของเรา hardcode ใน method แต่ทว่าในเกมจริงๆมีบล็อกหลายแบบ ดังนั้นเราควรสร้าง class มาจัดการ บล็อกไปเลย
กำหนด class ชื่อว่า Coordinate จะเก็บตำแหน่ง row,col
class Block ก็เก็บตำแหน่ง และสีของบล็อกตัวเอง
class Coordinate{
  int row;
  int col;

  Coordinate({this.row, this.col});
}

class Block{
  Color color;
  List<Coordinate> currentCoordinatesOnGameArea = List();
}
ดังนั้นเราต้องอัพเดทตำแหน่งของบล็อก ใน object ของบล้อกนั้นทุกครั้งที่ขยับ
  void moveBlockDown(Block block) {
    for (Coordinate c in block.currentCoordinatesOnGameArea) {
      if (c.row + 1 < COUNT_ROW) {
        c.row = c.row + 1;
      }
    }
  }
สร้าง method createBlock() ก็นิยามบล็อกคร่าวๆ เช่น สีและตำแหน่ง
  Block createBlock() {
    Block block = Block();
    block.color = Colors.yellow;
    block.currentCoordinatesOnGameArea.add(Coordinate(row: 0, col: 1));
    block.currentCoordinatesOnGameArea.add(Coordinate(row: 1, col: 1));
    block.currentCoordinatesOnGameArea.add(Coordinate(row: 1, col: 2));
    block.currentCoordinatesOnGameArea.add(Coordinate(row: 2, col: 2));
    return block;
  }
ประกาศตัวแปร block
Block block;
ตอนเริ่มเกม ก็ให้สร้าบล็อก กำหนดค่าให้ block
  @override
  void initState() {
    initGameArea();
    initGameAreaTemp();
    block = createBlock();  // Add here.
    timer = Timer.periodic(Duration(milliseconds: speed), (Timer t) => process());
    super.initState();
  }
ทีนี้ เราก็ต้องเชื่อม object block กับ Game Area Temp ด้วย เพราะจะได้นำไปแสดงได้ถูกต้อง
ก็คือ copy ค่าใน object block ไปอัพเดทใน Gae Area Temp
  void copyBlockToGameAreaTemp(Block block) {
    for (Coordinate c in block.currentCoordinatesOnGameArea) {
      gameAreaTemp[c.row][c.col] = AreaUnit(color: block.color, available: false);
    }
  }
ที่ process() ก็เรียก
initGameAreaTemp() เพื่อล้างค่า
moveBlockDown() เพื่อเลื่อนบล็อกลง 1 ตำแหน่ง
copyBlockTogameAreaTemp() คัดลอกตำแหน่งบล็อก
  void process() {
    setState(() {
      initGameAreaTemp(); // clear game area temp
      moveBlockDown();
      copyBlockToGameAreaTemp(block); //copy block to game area temp.
    });
  }
ลองรันได้ผลลัพธ์เดิม แต่การทำงานเป็นคลาสและเป็นสัดส่วนมากขึ้น พร้อม scale แล้ว
ทำบล็อกกระทบพื้น
ต่อมา ทำให้บล็อกเลื่อนลงมาถึง ground หรือถึงบล็อกที่อยู่บน ground ก็ให้มันไม่ขยับและกลายเป็น ground พร้อมส่งบล็อกใหม่ลงมา
วิธีการก็คือ เมื่อบล็อกใน Game Area Temp เลื่อนลงมาถึง ground ก็แค่ย้ายค่ามันไปใส่ใน Game Area ก็จบเกม
สร้าง method สำหรับเช็คว่ามันชน ground หรือยัง
  bool isBlockCrashOnGround(Block block) {
    for (Coordinate c in block.currentCoordinatesOnGameArea) {
      if (c.row + 1 < COUNT_ROW) {
        if (!gameArea[c.row + 1][c.col].available) {
          return true;
        }
      }else{
        return true;
      }
    }
    return false;
  }
ที่ process() หลังจากขยับบล็อกก็เช็คว่ามันชน ground หรือไม่ ถ้าชนก็ copy ค่าไปใส่ใน Game Area
พร้อมกับสร้าง block ใหม่
  void process() {
    setState(() {
      initGameAreaTemp();   // clear game area temp
      moveBlockDown();
      copyBlockToGameAreaTemp(block); //copy block to game area temp.

      if(isBlockCrashOnGround(block)){
        copyBlockToGameArea(block);
        block = createBlock();
      }
    });
  }
ลองรัน
ทำบล็อกขยับซ้าย-ขวา
การขยับบล็อกก็คืออัพเดทค่าตำแหน่งใน object ของบล็อกแล้ว copy ค่าไปใส่ใน gameAreaTemp
ขยับขวาก็ col+1 ทุกอัน ขยับซ้ายก็ col-1
  void moveBlockRight(Block block) {
    for (Coordinate c in block.currentCoordinatesOnGameArea) {
      if (c.col + 1 < COUNT_COL {
        c.col = c.col + 1;
      }
    }
  }

  void moveBlockLeft(Block block) {
    for (Coordinate c in block.currentCoordinatesOnGameArea) {
      if (c.col - 1 >= 0) {
        c.col = c.col - 1;
      }
    }
  }
ลองให้มันเลื่อขวาพร้อมกับเลื่อนลง ที่ process
  void process() {
    setState(() {
      initGameAreaTemp();
      moveBlockDown(block);
      moveBlockRight(block);
      ...
    });
  }
ลองรัน ก็เลื่อนแล้วนะ แต่ปัญหาคือมันเลื่อนถึงขอบขวาสุดแล้ว ก็พัง

นั้นก็เพราะ เราควรจะไม่ขยับ ถ้ามีตำแหน่งไหนในบล็อกออกนอก GameArea ดังนั้นเราก็วนลูปเช็คก่อน ถ้าผ่านทุกตำแหน่งค่อยขยับ
  bool moveBlockRight(Block block) {
    for (Coordinate c in block.currentCoordinatesOnGameArea) {
      if (c.col + 1 >= COUNT_COL) {
        return false;
      }
    }

    for (Coordinate c in block.currentCoordinatesOnGameArea) {
      c.col = c.col + 1;
    }
    return true;
  }

  bool moveBlockLeft(Block block) {
    for (Coordinate c in block.currentCoordinatesOnGameArea) {
      if (c.col - 1 < 0) {
        return false;
      }
    }

    for (Coordinate c in block.currentCoordinatesOnGameArea) {
      c.col = c.col - 1;
    }
    return true;
  }
ลองรัน ได้แล้วฮะ บล็อกเลื่อนไปชนขอบก็เลื่อนลงมาแบบสวยงาม
ปัญหาต่อมา คือบล็อกเลื่อนขวาไปชนบล็อกอื่น แล้วดันขยับเข้าไป
ปัญหานี้เกิดจากเราเช็คแต่ขอบข้าง เราไม่ได้เช็คว่า ถ้ามันมีบล็อกกั้นอยู่แล้วก็ไม่ควรขยับ
ก็เพิ่มเงื่อนไขให้มัน ทำทั้ง moveBlockDown() , moveBlockRight() , moveBlockLeft()
  bool moveBlockDown(Block block) {
    for (Coordinate c in block.currentCoordinatesOnGameArea) {
      if (c.row + 1 >= COUNT_ROW || !gameArea[c.row + 1][c.col].available) {
        return false;
      }
    }

    for (Coordinate c in block.currentCoordinatesOnGameArea) {
      c.row = c.row + 1;
    }
    return true;
  }

  bool moveBlockRight(Block block) {
    for (Coordinate c in block.currentCoordinatesOnGameArea) {
      if (c.col + 1 >= COUNT_COL || !gameArea[c.row][c.col + 1].available) {
        return false;
      }
    }

    for (Coordinate c in block.currentCoordinatesOnGameArea) {
      c.col = c.col + 1;
    }
    return true;
  }

  bool moveBlockLeft(Block block) {
    for (Coordinate c in block.currentCoordinatesOnGameArea) {
      if (c.col - 1 < 0 || !gameArea[c.row][c.col - 1].available) {
        return false;
      }
    }

    for (Coordinate c in block.currentCoordinatesOnGameArea) {
      c.col = c.col - 1;
    }
    return true;
  }
ลองรัน ผลออกมาสวยงาม
ทำบล็อกให้ขยับที่ต้องการ
ต่อมาเราจะขยับบล็อกด้วยการลากของเราเอง ก็คือลากนิ้วไปทางซ้ายบล็อกก็เลื่อนมาทางซ้าย
วิธีการคือใช้ Widget GestureDetector จะมีลุกเล่นชื่อว่า onHorizontalDragUpdate(detail)
เมื่อเราลากนิ้วไปทางแนวนอน method นี้จะถูกเรียกพร้อม argument 1 ตัว ชื่อว่า detail
ใน detail จะมีค่าหลายตัวเช่นความเร็ว พื้นที่ แต่ที่เราสนใจคือ primaryData โดยมันจะมีค่า
+ ถ้าเราลากนิ้วไปด้านขวา
– ถ้าลากนิ้วไปด้านซ้าย
เราก็เช็คจากค่านี้เราไปเรียก method move ที่ทำไว้นั่นเอง
  @override
  Widget build(BuildContext context) {
    return Scaffold(
      body: Container(color: colorBackgroundApp,
          child: Center(
              child: GestureDetector(
                  onHorizontalDragUpdate: (detail) {
                      setState(() {
                        bool isMove = false;
                        if (detail.primaryDelta > 0) {
                          isMove = moveBlockRight(block);
                        } else {
                          isMove = moveBlockLeft(block);
                        }

                        if (isMove) {
                          initGameAreaTemp();
                          copyBlockToGameAreaTemp(block);
                        }
                      });
                  },
                  child: Container(
                      ...
          )),
    );
  }
ลองรัน ตอนนี้เราลากบล็อกได้เล้ว
ปัญหาต่อมาคือ บล็อกที่เราลาก มันตอบสนองไวมาก นั่นก็เพราะ method onHorizontalDragUpdate มันถูกเรียกบ่อยมากๆ ถี่เกินจำเป็นสำหรับเรา ดังนั้น เราควรจะหน่วงเวลาสักหน่อย สัก 0.1 วินาที
ประกาศตัวแปร
bool draging = false;
int delayDrag = 100;
ถ้า เวลายังอยู่ระหว่างหน่วงอยู่ เราจะไม่สนใจ
  @override
  Widget build(BuildContext context) {
    return Scaffold(
      body: Container(color: colorBackgroundApp,
          child: Center(
              child: GestureDetector(
                  onHorizontalDragUpdate: (detail) {
                    if (!draging) {
                      draging = true;
                      moveBlockHorizontal(detail);

                      Future.delayed(Duration(milliseconds: delayDrag), () {
                        draging = false;
                      });
                    }
                  },
                  child: Container(
                      ...
          )),
    );
  }

  void moveBlockHorizontal(DragUpdateDetails detail) {
    setState(() {
      bool isMove = false;
      if (detail.primaryDelta > 0) { // right
        isMove = moveBlockRight(block);
      } else {  // left
        isMove = moveBlockLeft(block);
      }

      if (isMove) {
        initGameAreaTemp();
        copyBlockToGameAreaTemp(block);
      }
    });
  }
ลองรัน ดูดีขึ้นมาหน่อยนึงแล้ว
ทำบล็อกรูปแบบอื่นๆ
ในเกมจริงๆจะมีบล็อกหลายสี หลายรูปแบบ เรามาเพิ่มบล็อกให้หลากหลายกัน
สร้าง class BlockProvider คลาสนี้จะทำการสุ่มบล็อกขึ้นมา
โดยตอนนี้ผมจะทำ block 4 แบบ
class BlockProvider {

  static const int COUNT_BLOCK_TYPE = 4;
  static const int BLOCK_S = 0;
  static const int BLOCK_T = 1;
  static const int BLOCK_L = 2;
  static const int BLOCK_O = 3;

  static Block randomBlock() {
    Random random = Random();
    int id = random.nextInt(COUNT_BLOCK_TYPE);
    if (id == BLOCK_S) {
      return BlockS.create();
    } else if (id == BLOCK_T) {
      return BlockT.create();
    } else if (id == BLOCK_L) {
      return BlockL.create();
    }else if (id == BLOCK_O) {
      return BlockO.create();
    }
    return BlockS.create();
  }

}
โดยเราก็ต้องไปสร้าง class สำหรับแต่ละบล็อก เช่น Block S
class BlockS {
  static Block create() {
    Block block = Block();
    block.color = Colors.yellow;
    block.currentCoordinatesOnGameArea.add(Coordinate(row: 0, col: 1));
    block.currentCoordinatesOnGameArea.add(Coordinate(row: 1, col: 1));
    block.currentCoordinatesOnGameArea.add(Coordinate(row: 1, col: 2));
    block.currentCoordinatesOnGameArea.add(Coordinate(row: 2, col: 2));
    return block;
  }
}
ที่ createBlock ของเกม ก็เรียกใช้ BlockProvider
  Block createBlock() {
    return BlockProvider.randomBlock();
  }
ลองรัน บล็อกมีหลายตัวแล้ว
ติดตามตอนต่อไป
เนื่องจากบล็อกนี้ค่อนข้างยาวแล้ว เลยขอยกไปเขียนต่อในตอนถัดไปครับ


 Previous Post
 Next Post