Flutter Project : สร้างเกม Tertis ด้วย Flutter ตอนที่ 2

สวัสดีครับ บล็อกนี้ต่อตอน ทำ tertis ด้วย Flutter ตอนที่ 1
ลากบล็อกในแนวดิ่ง
เราสามารถลากบล็อกในแนวตั้ง เพื่อให้บล็อกลงมาด้านล่างที่ ground ก็ได้
โดยใช้ onVerticalDragEnd() จากนั้นก็เลื่อนให้บล็อกลงมาที่ ground
  @override
  Widget build(BuildContext context) {
    return Scaffold(
      body: Container(color: colorBackgroundApp,
          child: Center(
              child: GestureDetector(
                  onVerticalDragEnd: (details) {
                    moveBlockToGround();
                  },
                  onHorizontalDragUpdate: (detail) {
                    ...
}
วิธีการง่ายๆของการเลื่อนบล็อก ลงมาที่ ground คือวนลูปเรียก moveBlockDown() ที่เราทำไว้แล้วในตอนที่แล้ว
เลื่อนจนกว่า มันจะเลื่อนไม่ได้
  void moveBlockToGround() {
    while(moveBlockDown(block)){
      setState(() {
        initGameAreaTemp();
        copyBlockToGameAreaTemp(block);
      });
    }
  }
ลองรัน

การหมุนบล็อก
มาทำสว่นของการหมุนบล็อกบ้าง น่าจะเรียกได้ว่าเป็นส่วนที่ยากที่สุดของเกมนี้
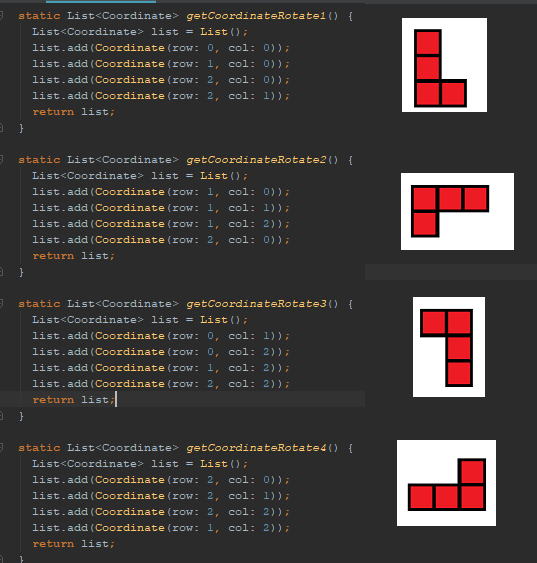
โดยบล็อกของผมตอนนี้มี 4 แบบ แต่ละแบบหมุนได้ประมาณนี้

เพิ่มตัวแปรให้กับ class Block
coordinatesBlockAreaStart คือ เก็บตำแหน่งมุมซ้ายบนของบล็อก ใน Game Area
List<List<Coordinate>> coordinates คือ ตำแหน่งของบล็อกที่หมุนในแต่ละแบบ
int currentRotateIndex คือ index ที่บอกว่า ตอนนี้บล็อกหมุนอยู่มุมอันไหน
แล้วก็มี method สำหรับ get ค่า block ที่มุมปัจจุบัน แล้วก็บล็อกมุมถัดไป
ส่วน rotate() จะเรียกเมื่อต้องการหมุนบล็อก ขอจะเว้นไว้ก่อนนะ
class Block {
  Color color;
  Coordinate coordinatesBlockAreaStart;
  List<Coordinate> currentCoordinatesOnGameArea = List();
  List<List<Coordinate>> coordinates = List();
  int currentRotateIndex = 0;

  List<Coordinate> getBlockCurrentRotate() {
    return coordinates[currentRotateIndex];
  }

  List<Coordinate> getBlockNextRotate() {
    if (currentRotateIndex + 1 < coordinates.length) {
      return coordinates[currentRotateIndex + 1];
    }
    return coordinates[0];
  }

  rotate() {
      //
  }
}
พอเรามีความสามารถการหมุน ดังนั้นเวลาเราจะเข้าถึงตำแหน่งของบล็อกต้องใช้จากตำแหน่งของบล็อกมุมปัจจุบัน
  bool moveBlockDown(Block block) {
    for (Coordinate c in block.getBlockCurrentRotate()) {
      ...
    }

    for (Coordinate c in block.getBlockCurrentRotate()) {
      ...
    }
    ...
  }
ทีนี้ก็ต้องมานิยามว่า บล็อกแต่ละอันมี การหมุนได้กี่แบบ แต่ละแบบเป็นแบบไหน เช่น Block S มี 2 แบบ
โดยการเก็บตำแหน่งต้นแบบของบล็อกในแต่ละมุมจะเก็บเป็นขนาด 4×4
import 'package:flutter/material.dart';
import 'package:tertis_game_flutter/block.dart';
import 'package:tertis_game_flutter/coordinate.dart';

class BlockS {
  static Block create() {
    Block block = Block();
    block.color = Colors.yellow;
    block.coordinatesBlockAreaStart = Coordinate(row: 0, col: 0);
    block.currentCoordinatesOnGameArea = getCoordinateRotate1();

    //coordinate about rotation in area 4x4
    block.coordinates.add(getCoordinateRotate1());
    block.coordinates.add(getCoordinateRotate2());

    return block;
  }


  static List<Coordinate> getCoordinateRotate1() {
    List<Coordinate> list = List();
    list.add(Coordinate(row: 0, col: 0));
    list.add(Coordinate(row: 1, col: 0));
    list.add(Coordinate(row: 1, col: 1));
    list.add(Coordinate(row: 2, col: 1));
    return list;
  }

  static List<Coordinate> getCoordinateRotate2() {
    List<Coordinate> list = List();
    list.add(Coordinate(row: 0, col: 1));
    list.add(Coordinate(row: 0, col: 2));
    list.add(Coordinate(row: 1, col: 0));
    list.add(Coordinate(row: 1, col: 1));
    return list;
  }
}

กลับมาที่ rotate() ที่ค้างไว้ ที่นี่เราจะทำการหมุนบล็อกกัน โดยการหมุนก็คือเรียก มุมถัดไปแล้วเอาตำแหน่งของมุมซ้ายบนใน Game Area บวกด้วยตำแหน่งต้นแบบ แล้วอะพเดทตำแหน่งบน Game Area
class Block {
  ...

   rotate() {
    List<Coordinate> coordinatesNextBlock = getBlockNextRotate();
    List<Coordinate> listNewCoordinateOnGameArea = List();
    for (Coordinate c in coordinatesNextBlock) {
      Coordinate newCoordinate = Coordinate(
          row: coordinatesBlockAreaStart.row + c.row,
          col: coordinatesBlockAreaStart.col + c.col);
      listNewCoordinateOnGameArea.add(newCoordinate);
    }

    currentCoordinatesOnGameArea = listNewCoordinateOnGameArea;
    if(currentRotateIndex+1 < coordinates.length) {
      currentRotateIndex++;
    }else{
      currentRotateIndex = 0;
    }
}
แน่นอนว่า เราจะต้องอัพเดทค่าของ coordinatesBlockAreaStart ด้วยทุกครั้งที่บล็อกเลื่อน
bool moveBlockDown(Block block) {
    for (Coordinate c in block.currentCoordinatesOnGameArea) {
      if (c.row + 1 >= COUNT_ROW || !gameArea[c.row + 1][c.col].available) {
        return false;
      }
    }

    block.coordinatesBlockAreaStart.row++;

    for (Coordinate c in block.currentCoordinatesOnGameArea) {
      c.row = c.row + 1;
    }

    return true;
  }
กรณีของการเลื่อน ซ้าย ขวาก็ต้องอัพเดทค่า coordinatesBlockAreaStart ของบล็อกด้วย
  bool moveBlockRight(Block block) {
    for (Coordinate c in block.currentCoordinatesOnGameArea) {
      if (c.col + 1 >= COUNT_COL || !gameArea[c.row][c.col + 1].available) {
        return false;
      }
    }

    block.coordinatesBlockAreaStart.col++;

    for (Coordinate c in block.currentCoordinatesOnGameArea) {
      c.col = c.col + 1;
    }


    return true;
  }

  bool moveBlockLeft(Block block) {
    for (Coordinate c in block.currentCoordinatesOnGameArea) {
      if (c.col - 1 < 0 || !gameArea[c.row][c.col - 1].available) {
        return false;
      }
    }

    block.coordinatesBlockAreaStart.col--;

    for (Coordinate c in block.currentCoordinatesOnGameArea) {
      c.col = c.col - 1;
    }


    return true;
  }
สุดท้ายการหมุมบล็อก จะใช้วิธีกดคลิกที่หน้าจอเกมได้เลย วิธีการคือเพิ่ม onTap
แล้วเรียก rotateBlock() จากนั้น ก็ copy ค่าอัพเดทไปที่ Game Area Temp ด้วย
  @override
  Widget build(BuildContext context) {
    return Scaffold(
      body: Container(
          color: colorBackgroundApp,
          child: Center(
              child: GestureDetector(
                  onTap: () {
                    rotateBlock(block);
                  },
                  ...
}

void rotateBlock(Block block) {
    setState(() {
      block.rotate();
      initGameAreaTemp();
      copyBlockToGameAreaTemp(block);
    });
}
ทีนี้ เนื่องจากตอนนี้ มีบล็อกที่หมุนได้อยู่รูปแบบเดียว คือแบบ S
ดังนั้น ขอสร้างมาแค่ แบบเดียวก่อน
  Block createBlock() {
    //    return BlockProvider.randomBlock();
    return BlockS.create();
  }
ลองรัน

ปุ่มควบคุม
จริงเกม Tertis เราจะถนัดเล่นกับจอย ที่มีปุ่มกดมากกว่า ดังนั้นผมเลยอยากทำปุ่มให้กดเลื่อนซ้ายขวาบ้าง
ทำแป้นสำหรับควบคุม ใส่ไว้ด้านล่าง ส่วน method เลื่อน เราก็ทำไว้หมดแล้ว
  @override
  Widget build(BuildContext context) {
    return Scaffold(
      body: Container(
          color: colorBackgroundApp,
          child: Column(children: <Widget>[
            ... ,
            Container(
                decoration: BoxDecoration(
                    color: colorBorderGameArea,
                    borderRadius: BorderRadius.all(Radius.circular(8))),
                margin: EdgeInsets.only(left: 32, right: 32, bottom: 16),
                padding: EdgeInsets.all(6),
                child: Row(mainAxisSize: MainAxisSize.min, children: <Widget>[
                                    buildButtonControl(Icons.keyboard_arrow_left, () {
                    moveBlockLeft(block);
                  }),
                  buildButtonControl(Icons.keyboard_arrow_down, () {
                    moveBlockToGround(block);
                  }),
                  buildButtonControl(Icons.keyboard_arrow_right, () {
                    moveBlockRight(block);
                  }),
                ]))
          ])),
    );
  }

  Expanded buildButtonControl(IconData icon, Function() onTap) {
    return Expanded(
        child: GestureDetector(
            onTap: onTap,
            child: Container(
              child: Icon(icon, size: 36, color: Colors.white),
            )));
  }

ทำบล็อกหมุนแบบอื่นๆ
มาเขียนคลาสอื่นๆเพิ่มเติมกัน เพื่อทำบล็อกรูปแบบที่เหลือให้หมุนได้ เช่นบล็อก L หมุนได้ 4 แบบ
class BlockL {
  static Block create() {
    Block block = Block();
    block.color = Colors.red;
    block.coordinatesBlockAreaStart = Coordinate(row: 0, col: 0);
    block.currentCoordinatesOnGameArea = getCoordinateRotate1();

    //coordinate about rotation in area 4x4
    block.coordinates.add(getCoordinateRotate1());
    block.coordinates.add(getCoordinateRotate2());
    block.coordinates.add(getCoordinateRotate3());
    block.coordinates.add(getCoordinateRotate4());

    return block;
  }

  static List<Coordinate> getCoordinateRotate1() {
    List<Coordinate> list = List();
    list.add(Coordinate(row: 0, col: 0));
    list.add(Coordinate(row: 1, col: 0));
    list.add(Coordinate(row: 2, col: 0));
    list.add(Coordinate(row: 2, col: 1));
    return list;
  }

  static List<Coordinate> getCoordinateRotate2() {
    List<Coordinate> list = List();
    list.add(Coordinate(row: 1, col: 0));
    list.add(Coordinate(row: 1, col: 1));
    list.add(Coordinate(row: 1, col: 2));
    list.add(Coordinate(row: 2, col: 0));
    return list;
  }

  static List<Coordinate> getCoordinateRotate3() {
    List<Coordinate> list = List();
    list.add(Coordinate(row: 0, col: 2));
    list.add(Coordinate(row: 1, col: 2));
    list.add(Coordinate(row: 2, col: 2));
    list.add(Coordinate(row: 2, col: 1));
    return list;
  }

  static List<Coordinate> getCoordinateRotate4() {
    List<Coordinate> list = List();
    list.add(Coordinate(row: 2, col: 0));
    list.add(Coordinate(row: 2, col: 1));
    list.add(Coordinate(row: 2, col: 2));
    list.add(Coordinate(row: 1, col: 2));
    return list;
  }
}
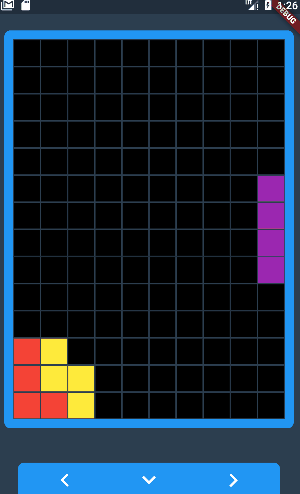
ลองทดสอบเฉพาะบล็อก L

เมื่อเขียนคลาสนิยามการหมุนของทุกแบบจะสามารถเล่นเกมได้แล้ว แต่ยังลบแถวที่บล็อกเต็มแล้วไม่ได้

ลบแถวที่บล็อกเต็ม
เมื่อบล็อกลงมาที่ ground จนเต็มแล้ว เราจะต้องลบแถวนั้นออก ผมเรียกว่า clear complete line
วิธีการคือทุกครั้งที่บล็อกลงมาที่ ground ต้องเช็คเงื่อนไข ว่าแถวนั้นมีบล็อกเต็มหรือไม่
  void process() {
    setState(() {
      ...

      if (isBlockCrashOnGround(block)) {
        copyBlockToGameArea(block);
        clearCompleteLine();  // Add here
        block = createBlock();
      }
    });
  }
แล้วก็ตอนที่เราบังคับลากในแนวดิ่งให้มันลงมาที่พื้นก็เช็คด้วย
  void onBlockToGround() {
    copyBlockToGameArea(block);
    initGameAreaTemp();
    clearCompleteLine();
    block = createBlock();
  }
การเช็คเงื่อนไขของแถวก็คือวนลูปเช็คแถวใน Game Area ว่า แถวไหนที่ไม่มีที่ว่างเลย แสดงว่าแถวนั้นต้องลบออก พอลบออกแล้วต้องเพิ่มแถวเปล่าๆด้านบน
  void clearCompleteLine() {
    int row = 0;
    while (row < COUNT_ROW) {
      print("check complete line row = $row");
      int countBlock = 0;
      for (int col = 0; col < COUNT_COL; col++) {
        if (!gameArea[row][col].available) {
          countBlock++;
        } else {
          break;
        }
      }

      if (countBlock == COUNT_COL) {
        print("remove complete line row = $row");
        removeLineOnGameArea(row);
        row--;
      }

      row++;
    }
  }
ลองรัน

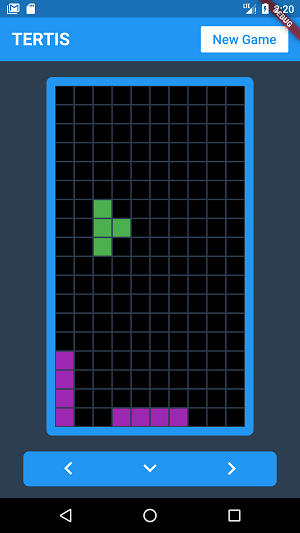
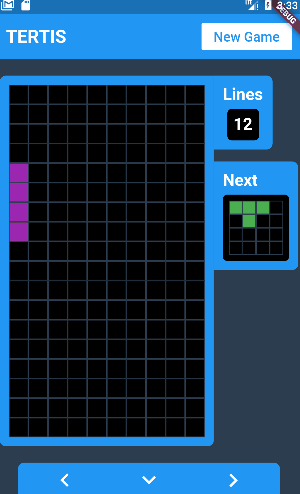
เพิ่มบล็อกแท่งยาว
มาเพิ่มบล็อกอีกตัว ผมขอเรียกว่า l small block
ก่อนอื่นสร้างคลาสนิยามตามปกติ ซึ่งมันหมุนได้ 2 แบบ
import 'package:flutter/material.dart';
import 'package:tertis_game_flutter/block.dart';
import 'package:tertis_game_flutter/coordinate.dart';

class BlockLs {
  static Block create() {
    Block block = Block();
    block.color = Colors.purple;
    block.coordinatesBlockAreaStart = Coordinate(row: 0, col: 0);
    block.currentCoordinatesOnGameArea = getCoordinateRotate1();

    //coordinate about rotation in area 4x4
    block.coordinates.add(getCoordinateRotate1());
    block.coordinates.add(getCoordinateRotate2());

    return block;
  }

  static List<Coordinate> getCoordinateRotate1() {
    List<Coordinate> list = List();
    list.add(Coordinate(row: 0, col: 0));
    list.add(Coordinate(row: 1, col: 0));
    list.add(Coordinate(row: 2, col: 0));
    list.add(Coordinate(row: 3, col: 0));
    return list;
  }

  static List<Coordinate> getCoordinateRotate2() {
    List<Coordinate> list = List();
    list.add(Coordinate(row: 2, col: 0));
    list.add(Coordinate(row: 2, col: 1));
    list.add(Coordinate(row: 2, col: 2));
    list.add(Coordinate(row: 2, col: 3));
    return list;
  }

}
เพิ่มมันใน BlockProvider เพื่อให้สุ่มได้
class BlockProvider {
  static const int COUNT_BLOCK_TYPE = 5;
  static const int BLOCK_S = 0;
  static const int BLOCK_T = 1;
  static const int BLOCK_L = 2;
  static const int BLOCK_O = 3;
  static const int BLOCK_LS = 4;

  static Block randomBlock() {
    ...
    }else if (id == BLOCK_LS) {
      return BlockLs.create();
    }
    ...
  }

}
มาแล้วจ้า

แต่พอเลื่อนๆไปด้านขวาสุดแล้วกดหมุน จะเจอปัญหาหมุนไม่ได้ เพราะมันหมุนแล้ว index มันเลยขอบ Game Area

วิธีแก้คือ ก่อนหมุมต้องเช็คก่อนว่ามันหมุนแล้วมันเกินขอบของ Game Area หรือไม่ ถ้าเกินก็ปรับให้มันเข้ามาซะ
โดยเราใช้บล็อกต้นแบบ 4×4 ดังนั้นถ้ามันเลยขอบขวา ก็ปรับให้มัน -4 ช่อง มันก็จะหมุนได้แล้ว
แต่ถ้าเกินขอบด้านซ้ายก็กำหนด col=0
class Block {
  ...
  rotate() {
    List<Coordinate> coordinatesNextBlock = getBlockNextRotate();
    List<Coordinate> listNewCoordinateOnGameArea = List();

    for (Coordinate c in coordinatesNextBlock) {
      if (coordinatesBlockAreaStart.col + c.col >= COUNT_COL) {
        coordinatesBlockAreaStart.col = COUNT_COL - 4;
      } else if (coordinatesBlockAreaStart.col - c.col < 0) {
        coordinatesBlockAreaStart.col = 0;
      }
    }

    for (Coordinate c in coordinatesNextBlock) {
      Coordinate newCoordinate = Coordinate(
          row: coordinatesBlockAreaStart.row + c.row,
          col: coordinatesBlockAreaStart.col + c.col);
      listNewCoordinateOnGameArea.add(newCoordinate);
    }

    ...
  }
จะได้ประมาณนี้
ทำเมนูเริ่มเกมใหม่
มาเพิ่มเมนู restart เกมกันครับ
  @override
  Widget build(BuildContext context) {
    return Scaffold(
      body: Container(
          color: colorBackgroundApp,
          child: Column(children: <Widget>[
            buildMenu(),
            ...
โดยเมนูก็ไม่มีอะไรมาก คือมีชื่อเกมแล้วก็ปุ่ม NEW GAME พอกดปุ่มแล้วจะเรียก restart()
ตนนี้ขอค้าง method restart() ไว้ก่อน
  Container buildMenu() {
    return Container(
      padding: EdgeInsets.only(top: 30, bottom: 6, right: 16, left: 16),
      color: Colors.blue[500],
      child:
          Row(mainAxisSize: MainAxisSize.max,
              mainAxisAlignment: MainAxisAlignment.center,
              children: <Widget>[
        Text("TERTIS",
            style: TextStyle(
                color: Colors.white,
                fontSize: 24,
                fontWeight: FontWeight.bold)),
        Expanded(child: Container()),
        FlatButton(
          color: Colors.white,
          child: Text("New Game",
              style: TextStyle(color: Colors.blue[500], fontSize: 18)),
          onPressed: () {
            //restart();
          },
        )
      ]),
    );
  }
ตอนนี้ พอมีเมนูเกมขึ้นมาพื้นที่เกมก็จะลดลงทำให้ผมคิดว่าควรจะปรับ Area unit ให้พื้นที่เกมเล็กลงเล็กน้อย แต่จำนวนแถวมากขึ้น
const int COUNT_ROW = 18;
const int COUNT_COL = 10;
const double SIZE_AREA_UNIT = 26;
ทำช่องแสดงคะแนน
เพิ่มช่องคะแนน เช่น ถ้าเราปิดแถวที่เต็มได้ เราก็จะได้คะแนน โดยจะขอ Hardcode ไว้ก่อน ยังไม่เอาค่ามาแสดงจริง
ก่อนอื่นวาด Widget ขึ้นมา ผมให้มันแสดงอยู่ด้านขวาของ Game Area อีกช่องคือส่วนที่บอกว่าบล็อกต่อไปคือบล็อกอะไร
  Expanded buildGameAreaContainer() {
    return Expanded(
        child: Center(
           ... ,
          Column(mainAxisSize: MainAxisSize.min,crossAxisAlignment: CrossAxisAlignment.start, children: <Widget>[
            Container(
              decoration: BoxDecoration(
                  color: Colors.blue[500],
                  border: Border.all(width: 12, color: colorBorderGameArea),
                  borderRadius: BorderRadius.only(
                      topRight: Radius.circular(8),
                      bottomRight: Radius.circular(8))),
              child: Column(mainAxisSize: MainAxisSize.min, children: <Widget>[
                Text(
                  "Lines",
                  style: TextStyle(
                      fontSize: 22,
                      fontWeight: FontWeight.bold,
                      color: Colors.white),
                ),
                Container(
                    margin: EdgeInsets.only(top: 6),
                    decoration: BoxDecoration(
                        color: Colors.black,
                        borderRadius: BorderRadius.circular(6)),
                    padding: EdgeInsets.all(8),
                    child: Text(
                      "12",
                      style: TextStyle(
                          fontSize: 22,
                          fontWeight: FontWeight.bold,
                          color: Colors.white),
                    ))
              ]),
            ),
            Container(
              margin: EdgeInsets.only(top: 16),
              decoration: BoxDecoration(
                  color: Colors.blue[500],
                  border: Border.all(width: 12, color: colorBorderGameArea),
                  borderRadius: BorderRadius.only(
                      topRight: Radius.circular(8),
                      bottomRight: Radius.circular(8))),
              child: Column(mainAxisSize: MainAxisSize.min, children: <Widget>[
                Text(
                  "Next",
                  style: TextStyle(
                      fontSize: 22,
                      fontWeight: FontWeight.bold,
                      color: Colors.white),
                ),
                Container(
                    margin: EdgeInsets.only(top: 6),
                    decoration: BoxDecoration(
                        color: Colors.black,
                        borderRadius: BorderRadius.circular(6)),
                    padding: EdgeInsets.all(8),
                    child: Container())
              ]),
            )
          ])
        ])));
  }
ได้แบบนี้

ใบ้บล็อกถัดไป
อีกอันที่ต้องมีคือคำใบ้บล็อกถัดไป ว่าบล็อกอะไร
ดังนั้นมันคือ GameArea อีกตัวนึง โดยมีขนาด 4×4 ตามต้นแบบ ผมเรียกว่า Game Area Next Block
แล้วก็มี object Block อีกอันสำหรับเก็บค่าบล็อกต่อไป
List<List<AreaUnit>> gameAreaNextBlock;
Block blockNext;
กำหนดขนาด Area unit ของ Game Area Next Block
const double SIZE_AREA_UNIT_NEXT_BLOCK = 18;
init ค่าให้ GameAreaNextBlock ขนาด 4×4
ส่วน copyBlockToGameAreaNextBlock คือคัดลอดค่าตำแหน่งต้นแบบของ Block ใส่ให้ GameAreaNextBlock
  void initGameAreaNextBlock() {
    gameAreaNextBlock = List();
    for (int i = 0; i < 4; i++) {
      List<AreaUnit> listAreaTemp = List();
      for (int j = 0; j < 4; j++) {
        listAreaTemp.add(AreaUnit());
      }
      gameAreaNextBlock.add(listAreaTemp);
    }
  }

  void copyBlockToGameAreaNextBlock(Block block) {
    for (Coordinate c in block.coordinates.first) {
      gameAreaNextBlock[c.row][c.col] =
          AreaUnit(color: block.color, available: false);
    }
  }
จากนั้นก็เพิ่มใน initState
initGameAreaNextBlock() เรียกเพื่อเคลียค่าของ GameAreaNextBlock
แล้วก็สร้างบล็อกใหม่ให้กับ blockNext
  @override
  void initState() {
    initGameArea();
    initGameAreaTemp();
    initGameAreaNextBlock();  // Add here

    block = createBlock();
    blockNext = createBlock(); // Add here

    timer =
        Timer.periodic(Duration(milliseconds: speed), (Timer t) => process());
    super.initState();
  }
ที่ process() ก็ทำเหมือนกัน คือ initGameAreaNextBlock();
แล้ว copy ค่าใส่ GameAreaNextBlock
 void process() {
    setState(() {
      initGameAreaTemp();
      moveBlockDown(block);
      copyBlockToGameAreaTemp(block);

      if (isBlockCrashOnGround(block)) {
        onBlockToGround();
      }

      initGameAreaNextBlock(); // Add here
      copyBlockToGameAreaNextBlock(blockNext); // Add here
    });
  }
ที่ onBlockToGround() พอบล็อกถึง ground แล้วก็ให้สุ่มบล็อกถัดไปมารอเลย
  void onBlockToGround() {
    copyBlockToGameArea(block);
    initGameAreaTemp();
    clearCompleteLine();
    block = blockNext;
    blockNext = createBlock();
  }
ต่อไปคือเชื่อม GameAreaNextBlock กับ Widget ให้แสดงผล หลักการคล้ายกับ GameArea ก่อนหน้านี้
List<Widget> nextBlockContainer() {
  List<Widget> listRow = List();
  for (int row = 0; row < 4; row++) {
    List<Widget> listCol = List();
    for (int col = 0; col < 4; col++) {
      listCol.add(buildAreaUnitNextBlock(row, col));
    }
    listRow.add(Row(children: listCol));
  }
  return listRow;
}

Widget buildAreaUnitNextBlock(int row, int col) {
  AreaUnit areaUnit = gameAreaNextBlock[row][col];

  if (areaUnit.available) {
    return buildAreaUnitView(
        SIZE_AREA_UNIT_NEXT_BLOCK, colorBackgroundGameArea);
  } else {
    return buildAreaUnitView(SIZE_AREA_UNIT_NEXT_BLOCK, areaUnit.color);
  }
}
ลองรัน
แสดงคะแนนแถว
กำหนดตัวแปรเก็บค่า
int countLine = 0;
ที่ removeLineOnGameArea() จะถูกเรียกเมื่อแถวนั้นถูกลบ ดังนั้นเราก็แค่เพิ่มค่า countLine ที่นี่
  void removeLineOnGameArea(int row) {
    ...
    countLine++;
  }
เอาตัวปร countLine ไปใส่ที่ช่องคะแนน
Text( "$countLine",
ลองรัน
เริ่มเกมใหม่
มาทำที่ค้างไว้อีกนิด คือ ปุ่มเริ่มเกมใหม่
เขียน method restart() โดยมันจะกำหนดค่าเริ่มต้นใหม่ทั้งหมดให้กับเกม
  void restart(){
    setState(() {
      initGameArea();
      initGameAreaTemp();
      initGameAreaNextBlock();
      block = createBlock();
      blockNext = createBlock();
      countLine = 0;
    });
  }
FlatButton(
              color: Colors.white,
              child: Text("New Game",
                  style: TextStyle(color: Colors.blue[500], fontSize: 18)),
              onPressed: () {
                restart();
              },
            )

ทำให้บล็อกเริ่มจากตรงกลาง
ตอนนี้บล็อกจะเริ่มจากตำแหน่ง 0,0 ซึ่งมันคือมุมบนซ้าย แต่ที่ถูกต้องควรเริ่มจาก มุมบนกลาง
ดังนั้นเรามาปรับตรงนี้อีกนิดครับ
ก่อนอื่นกำหนดค่าให้กับ coordinatesBlockAreaStart ให้เริ่มจาก col ตรงกลางจอ ซึ่งคือ COUNT_COL/2
การใช้ COUNT_COL~/ 2 คือมันจะหาร 2 แล้วแปลงเป็น int ให้เลย สะดวกดีนะ
class BlockL {
  static Block create() {
    Block block = Block();
    block.color = Colors.red;
    block.coordinatesBlockAreaStart = Coordinate(row: 0, col: COUNT_COL ~/ 2);
แต่แค่นี้จะยังไม่เสร็จ เพราะปกติ coordinatesBlockAreaStart จะใช้ตอน rotate แต่การนำตำแหน่งแสดงจะใช้จาก currentCoordinatesOnGameArea ในคลาส Block
ดังนั้นต้องเพิ่ม method เพิ่มอัพเดทค่า currentCoordinatesOnGameArea โดยบวกค่า coordinatesBlockAreaStart เข้าไป
class Block {
  ...
  updateCurrentCoordinateOnGameAreaWithStart(){
    for(Coordinate c in currentCoordinatesOnGameArea){
      c.row += coordinatesBlockAreaStart.row;
      c.col += coordinatesBlockAreaStart.col;
    }
  }
  ...
จากนั้นก็เรียก method update ตอนสร้างบล็อก แล้วทำแบบนี้กับบล็อกทุกรูปแบบ
class BlockL {
  static Block create() {
    Block block = Block();
    block.color = Colors.red;
    block.coordinatesBlockAreaStart = Coordinate(row: 0, col: COUNT_COL ~/ 2);
    block.currentCoordinatesOnGameArea = getCoordinateRotate1();
    block.updateCurrentCoordinateOnGameAreaWithStart();
    ...
    return block;
  }
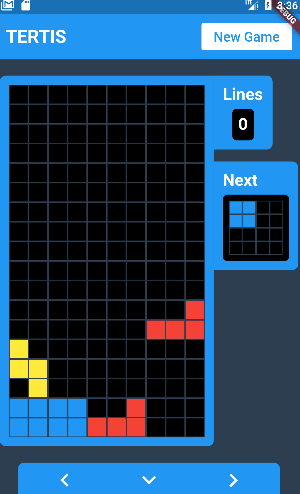
ลองรัน

ทำหน้า Game Over
สุดท้ายคือเช็คจบเกม แล้วแสดง dialog ว่า game over
เพิ่มตัวแปรกำหนดว่า เกมกำลังรันอยู่หรือไม่
bool gameRunning = true;
ก่อนอื่นเขียน dialog แสดง Game over ขึ้นมา เป็นอะไรก็ได้ แค่มีปุ่ม restart เกม
void showGameOverDialog() {
    // flutter defined function
    showDialog(
      context: context,
      builder: (BuildContext context) {
        // return object of type Dialog
        return AlertDialog(
            content: Column(mainAxisSize: MainAxisSize.min, children: <Widget>[
              Text("Game Over ):",
                  style: TextStyle(
                      fontSize: 32,
                      color: Colors.pink[800],
                      fontWeight: FontWeight.bold)),
              RaisedButton(
                padding: EdgeInsets.symmetric(horizontal: 18, vertical: 6),
                color: Colors.blue[500],
                child: Text("Play again",
                    style: TextStyle(
                        fontSize: 22,
                        color: Colors.white,
                        fontWeight: FontWeight.bold)),
                onPressed: () {
                  Navigator.of(context).pop();
                  restart();
                },
              )
            ]));
      },
    );
  }
ทีนี้ กรณี game over คือกรณีที่บล็อกมันล้นจนเกินขอบบนของ Game Area นั่นหมายความว่า
ตอนเรา copy ค่า จาก block ไปใส่ GameArea มันจะต้องทับค่าเดิมที่มีบล็อกอยู่แล้ว
ดังนั้น หาก AreaUnit ไม่ว่าง มันทับไม่ได้หมายความว่าล้นจอแล้วนั่นเอง
bool copyBlockToGameArea(Block block) {
  for (Coordinate c in block.currentCoordinatesOnGameArea) {
    if( gameArea[c.row][c.col].available) {
      gameArea[c.row][c.col] = AreaUnit(color: block.color, available: false);
    }else{
      return false;
    }
  }
  return true;
}
ดังนั้นตอนเรานำ block ลงที่ Ground ก็แค่เช็คว่ามันทำสำเร็จหรือไม่ ถ้าไม่ก็แสดง game over
  void onBlockToGround() {
    bool moveBlockSuccess = copyBlockToGameArea(block);
    if(moveBlockSuccess) {
      initGameAreaTemp();
      clearCompleteLine();
      block = blockNext;
      blockNext = createBlock();
    }else{
      gameRunning = false;
      showGameOverDialog();
    }
  }
จะได้แบบนี้

จบแล้ว
สรุปการทำเกม Tertis ใช้หลักการรันไปเรื่อยๆคล้ายๆเกมงู มีหลักการยุ่งยากกว่านิดหน่อย
โดยหลักการที่ผมใช้คือมี GameArea 3 อัน อันแรกสำหรับ Ground Block อันที่สองสำหรับ Block ที่กำลังเลื่อน อันที่สามสำหรับใบ้ Next Block
การเลื่อนบล็อกใช้วิธีลบ แถวสุดท้ายใน game area แล้วแทรกแถวใหม่ด้านบน
ส่วนการหมุนบล็อก ก็เก็บตัวต้นแบบไว้ในขนาด 4×4 และเก็บค่าตำแหน่งบนซ้ายของบล็อกใน GameArea แล้วนำตัวต้นแบบมาทับกับบล็อกเดิม
สุดท้ายก็ทำปุ่มกับทำส่วนของการลากบล็อก
โค้ดอยู่ใน Github
https://github.com/benznest/tertis-game-flutter
ส่วนที่ยังเหลือ
ตอนนี้เกมก็เล่นได้แล้ว แต่ก็มีส่วนที่ยังขาดอยู่ ก็คือ
1. ยังไม่ได้ทำ responsive ให้รองรับทุกหน้าจอ
2. ส่วนของการลากยังไม่ smooth พอ
3. ยังไม่มีการเก็บ High score
4. บล็อกแบบอื่นๆ เช่น แบบ S กลับด้าน , L กลับด้าน
5. การหมุนของบล็อกยังไม่ smooth เช่น บล็อก l small
6. ยังไม่ได้ทำให้มันเร่งเวลาตาม level
ว่างๆเดี๋ยวจะทำต่อนะ
 Previous Post
 Next Post