Flutter : ทำระบบสมาชิกและ Login ด้วย Firebase Auth

สวัสดีผู้อ่านครับ หากได้ติดตามบล็อก งานเขียนของผม จะเห็นว่าช่วงนี้มีแต่เรื่อง Flutter เยอะมาก นั่นก็เพราะว่าผมลองเขียน Flutter มาสักพักแล้ว ยังมีเรื่องให้ลองเล่นอีกหลายเรื่องเลย บล็อกนี้ได้เวลาของ Firebase ซึ่งนับว่าเป็นเรื่องที่ mobile dev สมัยใหม่ล้วนต้องรู้ทุกคน โดยผมจะเริ่มจาก Firebase Auth ก่อน
รู้จักกับ Firebase Auth
Firebase Auth เป็นบริการหนึ่งใน Firebase ที่รวบรวมบริการ backend สำหรับแอพและเว็บแอพเอาไว้ มีความสามารถเยอะมาก ช่วยให้นักพัฒนาไม่ต้องทำ backend เอง ซึ่งในบล็อกนี่จะพาไปลองเล่นบริการนึงของ Firebase คือ Firebase Auth นี่แหละ โดยตัวมันช่วยให้การทำระบบสมาชิก ล็อคอินเป็นเรื่องง่าย ซึ่งการใช้งาน Firebase Auth ใน Flutter ก็ไม่ได้ยากเลย
สามารถล็อคอินโดยใช้ gmail ได้เลย แล้วก็สร้างโปรเจค
https://firebase.google.com/
ติดตั้ง Firebase ใน Flutter project
ติดตั้ง Firebase ใน project ของเรา ขั้นตอนคือ เอาไฟล์ของ firebase ไปใส่ใน project android และ iOS แล้วก็เพิ่ม plugin บางอย่าง ซึ่งสามารถอ่านได้ที่
https://firebase.google.com/docs/android/setup
https://firebase.google.com/docs/ios/setup
ของ Android ทำถึงแค่ step3 นะ
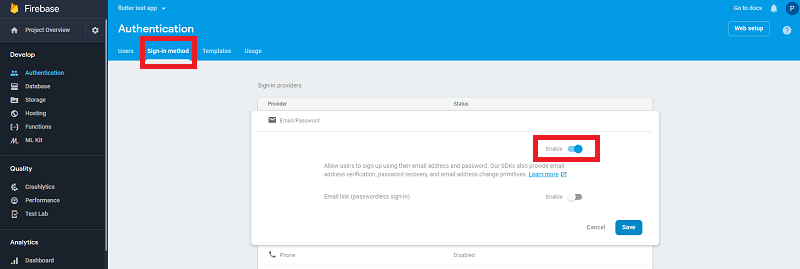
เปิดใช้งาน Firebase Auth
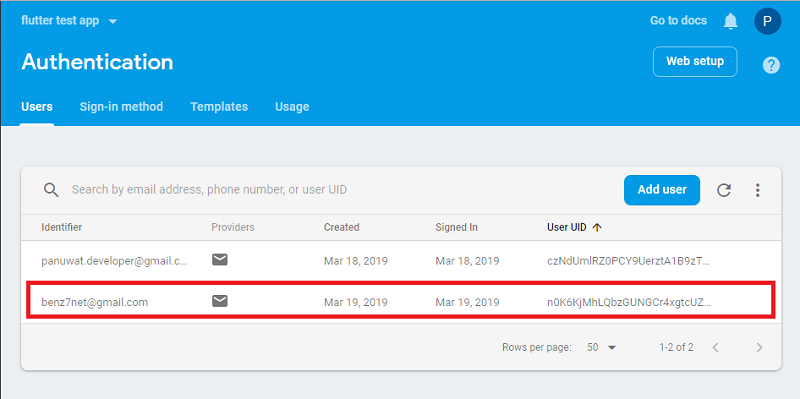
หลังจากที่เราล็อคอินเข้ามาในเว็บ firebase แล้ว ไปที่เมนู authentication ให้ enable email provider ที่ sign-in method
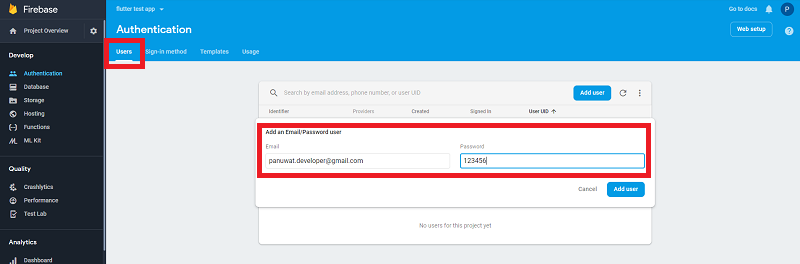
ลองสร้าง user มา 1 user
เพิ่ม dependencies
กลับมาที่ Flutter project เพิ่ม dependencies ของ Firebase Auth เข้ามาใน project ที่ไฟล์ pubspec.yaml
dependencies:
firebase_core: 0.3.1+1
firebase_auth: 0.8.1+4
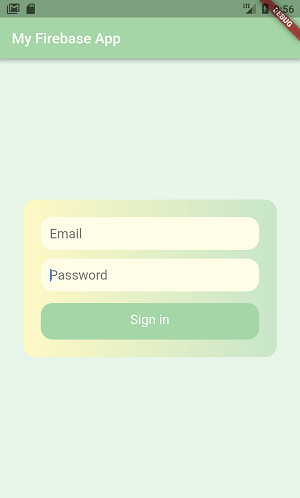
..สร้างหน้าล็อคอิน
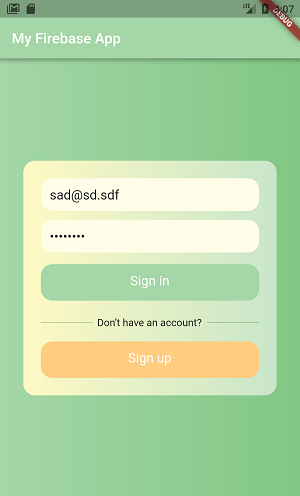
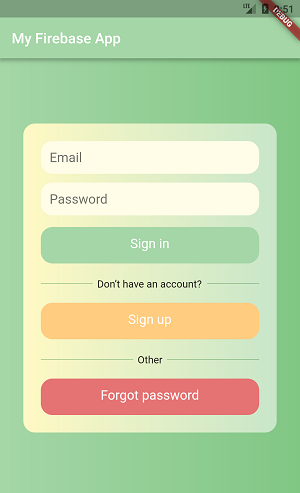
สร้างหน้าจอ UI หน้าล็อคอิน ที่มีช่องกรอก email , password แล้วก็มีปุ่ม login ด้วย บล็อกนี้ขอแต่งให้ดูดีกว่าปกตินิดนึงละกัน
class MyLoginPage extends StatefulWidget {
  MyLoginPage({Key key}) : super(key: key);

  @override
  _MyLoginPageState createState() => _MyLoginPageState();
}

class _MyLoginPageState extends State<MyLoginPage> {
  @override
  Widget build(BuildContext context) {
    return Scaffold(
        appBar: AppBar(
          title: Text("My Firebase App", style: TextStyle(color: Colors.white)),
        ),
        body: Container(
            color: Colors.green[50],
            child: Center(
              child: Container(
                  decoration: BoxDecoration(
                      borderRadius: BorderRadius.circular(16),
                      gradient: LinearGradient(
                          colors: [Colors.yellow[100], Colors.green[100]])),
                  margin: EdgeInsets.all(32),
                  padding: EdgeInsets.all(24),
                  child: Column(
                    mainAxisSize: MainAxisSize.min,
                    mainAxisAlignment: MainAxisAlignment.center,
                    children: <Widget>[
                      buildTextFieldEmail(),
                      buildTextFieldPassword(),
                      buildButtonSignIn(),
                    ],
                  )),
            )));
  }

  Container buildButtonSignIn() {
    return Container(
        constraints: BoxConstraints.expand(height: 50),
        child: Text("Sign in",
            textAlign: TextAlign.center,
            style: TextStyle(fontSize: 18, color: Colors.white)),
        decoration: BoxDecoration(
            borderRadius: BorderRadius.circular(16), color: Colors.green[200]),
        margin: EdgeInsets.only(top: 16),
        padding: EdgeInsets.all(12));
  }

  Container buildTextFieldEmail() {
    return Container(
        padding: EdgeInsets.all(12),
        decoration: BoxDecoration(
            color: Colors.yellow[50], borderRadius: BorderRadius.circular(16)),
        child: TextField(
            decoration: InputDecoration.collapsed(hintText: "Email"),
            style: TextStyle(fontSize: 18)));
  }

  Container buildTextFieldPassword() {
    return Container(
        padding: EdgeInsets.all(12),
        margin: EdgeInsets.only(top: 12),
        decoration: BoxDecoration(
            color: Colors.yellow[50], borderRadius: BorderRadius.circular(16)),
        child: TextField(
            obscureText: true,
            decoration: InputDecoration.collapsed(hintText: "Password"),
            style: TextStyle(fontSize: 18)));
  }
}
ผมตกแต่งคร่าวๆ ได้ประมาณนี้
การใช้งาน FirebaseAuth
พระเอกของเราคือ class ที่ชื่อว่า FirebaseAuth ซึ่งเราต้องสร้าง instance ก่อนใช้งาน
class _MyLoginPageState extends State<MyLoginPage> {
  final FirebaseAuth _auth = FirebaseAuth.instance;
  ..
Sign in ด้วย email
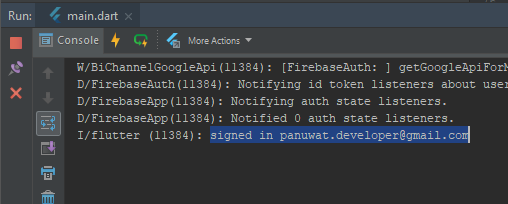
เขียร method สำหรับ signIn() โดยจะลอง hardcode ค่า email , password ไปก่อน
  signIn(){
    _auth.signInWithEmailAndPassword(
        email: "panuwat.developer@gmail.com",
        password: "123456"
    ).then((user) {
      print("signed in ${user.email}");
    }).catchError((error) {
       print(error);
    });
  }
เพิ่ม InkWell ให้กับปุ่ม โดยมันคือ widget ที่ช่วยให้เมื่อเรากดจะมี animation เล็กๆ พร้อมกับมี onTap ให้ด้วย ซึ่ง onTap ให้กดแล้วไปเรียก signIn()
  Widget buildButtonSignIn() {
    return InkWell(
      child: ... ,
      onTap: () {
        signIn();
      },
    );
  }
ลองรันแล้วกดที่ปุ่ม sign in จะเห็นว่าค่า email ของเรามาแสดงแล้ว
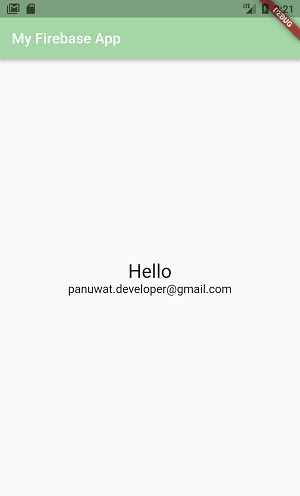
สร้างหน้า Home
สร้างหน้า home ที่จะแสดงหลังจาก login โดยรับพารามิเตอร์ คือ FirebaseUser (หรือจะไป get เอาจาก FirebaseAuth ในหน้านี้ก็ได้นะ)
import 'package:firebase_auth/firebase_auth.dart';
import 'package:flutter/material.dart';

class MyHomePage extends StatefulWidget {
  final FirebaseUser user;

  MyHomePage(this.user, {Key key}) : super(key: key);

  @override
  _MyHomePageState createState() => _MyHomePageState();
}

class _MyHomePageState extends State<MyHomePage> {
  @override
  initState() {
    super.initState();
  }

  @override
  Widget build(BuildContext context) {
    return Scaffold(
        appBar: AppBar(
          title: Text("My Firebase App", style: TextStyle(color: Colors.white)),
        ),
        body: Container(
            child: Center(
                child:
                    Column(mainAxisSize: MainAxisSize.min,children: <Widget>[
          Text("Hello", style: TextStyle(fontSize: 26)),
          Text(widget.user.email, style: TextStyle(fontSize: 16)),
        ]))));
  }
}
ตรวจสอบสถานะ
ตรวจสอบว่า ถ้าล็อคอินแล้ว ให้เปลี่ยนหน้าไปที่หน้า home แทน
  Future checkAuth(BuildContext context) async {
    FirebaseUser user = await _auth.currentUser();
    if (user != null) {
      print("Already singed-in with");
      Navigator.pushReplacement(
          context, MaterialPageRoute(builder: (context) => MyHomePage(user)));
    }
  }
เรียก method checkAuth() ที่ initState() เพื่อให้เปิดแอปมาแล้วก็เช็คเลย
class _MyLoginPageState extends State<MyLoginPage> {
  final FirebaseAuth _auth = FirebaseAuth.instance;

  @override
  void initState() {
    super.initState();
    checkAuth(context);
    ..
หลังจากนั้น พอเราเข้าแอปมาอีกครั้ง ถ้าเคย sign in แล้วก็จะเปลี่ยนไปหน้า home อัตโนมัติ
ปรับให้กดปุ่มล็อคอินแล้ว ถ้าสำเร็จก็เปลี่ยนไปหน้า home
  signIn(){
    _auth.signInWithEmailAndPassword(
        ..
    ).then((user) {
      print("signed in ${user.email}");
      checkAuth(context);  // add here
    }).catchError((error) {
       print(error);
    });
  }
Sign-out
เพิ่มไอคอน action สำหรับ sign out ไปที่ AppBar
class _MyHomePageState extends State<MyHomePage> {
  ..
  @override
  Widget build(BuildContext context) {
    return Scaffold(
        appBar: AppBar(
          title: .. ,
          actions: <Widget>[
            IconButton(
                icon: Icon(Icons.exit_to_app),
                color: Colors.white,
                onPressed: () {
                   signOut(context)
                })
          ],
        )
เขียน method signOut() วิธีการแค่เรียกจาก .signOut() ผ่าน FirebaseAuth ได้เลย หลังจากนั้นก็ให้ route ไปที่หน้า sign in ของเรา
  void signOut(BuildContext context) {
    _auth.signOut();
    Navigator.pushAndRemoveUntil(
        context,
        MaterialPageRoute(builder: (context) => MyLoginPage()),
        ModalRoute.withName('/'));
  }
ลองรัน ตอนนี้เราสามารถ sign-in และ sign-out ได้แล้ว
กำหนด TextEditingController หน้า Login
ตอนนี้เรายัง hardcode ค่า email,password เอาไว้ ถึงเวลาเปลี่ยนมาใช้ค่าจาก user กันแล้ว โดยการดึงค่าจาก TextField จะใช้ TextEditingController ดังนั้นเราต้องสร้าง
TextEditingController สำหรับ email และ password
class _MyLoginPageState extends State<MyLoginPage> {
  TextEditingController emailController = TextEditingController();
  TextEditingController passwordController = TextEditingController();
  ..
จากนั้นก็เพิ่ม controller ให้กับ TextField ทั้ง email และ password
  Container buildTextFieldEmail() {
    ..
        child: TextField(
            controller: emailController,
ตอนเรา sign in ก็ใช้วิธีดึงค่าจาก TextEditingController
  Future<FirebaseUser> signIn() async {
    final FirebaseUser user = await _auth.signInWithEmailAndPassword(
      email: emailController.text.trim(),
      password: passwordController.text.trim(),
    );
    ..
แสดง error กรณี sign-in ไม่ได้
มาลองทดสอบกรณี error กันบ้าง โดยการแสดง error ผมจะใช้ SnackBar แสดง error ซึ่ง Firebase ก็ส่งข้อความ error มาให้
SnackBar นั้นจะอยู่ใน Scaffold ซึ่งเราต้องเก็บค่า State ของ scaffold ไว้ก่อน โดยสร้าง GlobalKey<ScaffoldState> เอาไว้เรียกใช้ scaffold จากที่อื่นๆ
class _MyLoginPageState extends State<MyLoginPage> {
  ..
  GlobalKey<ScaffoldState> scaffoldKey = GlobalKey();
  ..
เอา scaffoldKey ของเราไปกำหนดใน key ของ Scaffold
  @override
  Widget build(BuildContext context) {
    return Scaffold(
        key: scaffoldKey,
        ..
ทีนี้ตอนจะแสดง error ก็เรียก scaffoldKey.currentState.showSnackBar(..) ได้เลย
  signIn() {
       ..
    .catchError((error) {
      print(error.message);
      scaffoldKey.currentState.showSnackBar(SnackBar(
        content: Text(error.message, style: TextStyle(color: Colors.white)),
        backgroundColor: Colors.red,
      ));
    });
  }
ข้อความ error มาแล้ว
เพิ่มปุ่มสมัครสมาชิก
ต่อมาทำหน้าสมัครสมาชิก ก็ต้องมีปุ่มให้เปลี่ยนหน้าไปยังหน้าสมัครสมาชิก ดังนั้นต้องเพิ่มปุ่ม sign up
 @override
  Widget build(BuildContext context) {
    ...
                  child: Column(
                    mainAxisSize: MainAxisSize.max,
                    mainAxisAlignment: MainAxisAlignment.center,
                    children: <Widget>[
                      ...
                      buildOtherLine(),
                      buildButtonRegister()
                    ],
                  )),
            ]))));
  }

  ..

  Widget buildOtherLine() {
    return Container(
        margin: EdgeInsets.only(top: 16),
        child: Row(children: <Widget>[
          Expanded(child: Divider(color: Colors.green[800])),
          Padding(
              padding: EdgeInsets.all(6),
              child: Text("Don’t have an account?",
                  style: TextStyle(color: Colors.black87))),
          Expanded(child: Divider(color: Colors.green[800])),
        ]));
  }


  Container buildButtonRegister() {
    return Container(
        constraints: BoxConstraints.expand(height: 50),
        child: Text("Sign up",
            textAlign: TextAlign.center,
            style: TextStyle(fontSize: 18, color: Colors.white)),
        decoration: BoxDecoration(
            borderRadius: BorderRadius.circular(16), color: Colors.orange[200]),
        margin: EdgeInsets.only(top: 12),
        padding: EdgeInsets.all(12));
  }
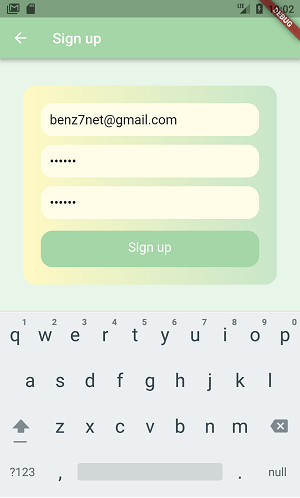
สร้างหน้าสมัครสมาชิก
สร้างหน้า sign up เพิ่ม มันก็คล้ายๆหน้า login แค่เพิ่มช่องให้ใส่รหัสยืนยันอีกช่องนึง
class MySignUpPage extends StatefulWidget {
  MySignUpPage({Key key}) : super(key: key);

  @override
  _MySignUpPageState createState() => _MySignUpPageState();
}

class _MySignUpPageState extends State<MySignUpPage> {
  @override
  Widget build(BuildContext context) {
    return Scaffold(
        appBar: AppBar(
          title: Text("Sign up", style: TextStyle(color: Colors.white)),
        ),
        body: Container(
            color: Colors.green[50],
            child: Center(
              child: Container(
                  decoration: BoxDecoration(
                      borderRadius: BorderRadius.circular(16),
                      gradient: LinearGradient(
                          colors: [Colors.yellow[100], Colors.green[100]])),
                  margin: EdgeInsets.all(32),
                  padding: EdgeInsets.all(24),
                  child: Column(
                    mainAxisSize: MainAxisSize.min,
                    mainAxisAlignment: MainAxisAlignment.center,
                    children: <Widget>[
                      buildTextFieldEmail(),
                      buildTextFieldPassword(),
                      buildTextFieldPasswordConfirm(),
                      buildButtonSignUp(context)
                    ],
                  )),
            )));
  }

  Container buildButtonSignUp(BuildContext context) {
    return Container(
        constraints: BoxConstraints.expand(height: 50),
        child: Text("Sign up",
            textAlign: TextAlign.center,
            style: TextStyle(fontSize: 18, color: Colors.white)),
        decoration: BoxDecoration(
            borderRadius: BorderRadius.circular(16), color: Colors.green[200]),
        margin: EdgeInsets.only(top: 16),
        padding: EdgeInsets.all(12));
  }

  Container buildTextFieldEmail() {
    return Container(
        padding: EdgeInsets.all(12),
        decoration: BoxDecoration(
            color: Colors.yellow[50], borderRadius: BorderRadius.circular(16)),
        child: TextField(
            decoration: InputDecoration.collapsed(hintText: "Email"),
            keyboardType: TextInputType.emailAddress,
            style: TextStyle(fontSize: 18)));
  }

  Container buildTextFieldPassword() {
    return Container(
        padding: EdgeInsets.all(12),
        margin: EdgeInsets.only(top: 12),
        decoration: BoxDecoration(
            color: Colors.yellow[50], borderRadius: BorderRadius.circular(16)),
        child: TextField(
            obscureText: true,
            decoration: InputDecoration.collapsed(hintText: "Password"),
            style: TextStyle(fontSize: 18)));
  }

  Container buildTextFieldPasswordConfirm() {
    return Container(
        padding: EdgeInsets.all(12),
        margin: EdgeInsets.only(top: 12),
        decoration: BoxDecoration(
            color: Colors.yellow[50], borderRadius: BorderRadius.circular(16)),
        child: TextField(
            obscureText: true,
            decoration: InputDecoration.collapsed(hintText: "Re-password"),
            style: TextStyle(fontSize: 18)));
  }
}
แล้วเพิ่ม onTap ให้ปุ่ม sign up ให้ route ไปหน้าใหม่
  Widget buildButtonRegister(BuildContext context) {
    return InkWell(
        child: ...
        onTap: () {
          Navigator.push(
              context, MaterialPageRoute(builder: (context) => MySignUpPage()));
        });
  }
กำหนด TextEditingController หน้า Sign up
ประกาศ instance ของ FirebaseAuth
class _MySignUpPageState extends State<MySignUpPage> {
  FirebaseAuth _auth = FirebaseAuth.instance;
  ..
แล้วก็ TextEditingController ของ ทั้ง 3 TextField
  TextEditingController emailController = TextEditingController();
  TextEditingController passwordController = TextEditingController();
  TextEditingController confirmController = TextEditingController();
  ..
กำหนด controller ให้ TextFieldแต่ละตัว
  Container buildTextFieldEmail() {
    return Container(
        ..
        child: TextField(
            controller: emailController,
ส่ง sign up ไปยัง Firebase
หน้า sign up คือสมัครสมาชิกใหม่ เมื่อกดที่ปุ่มก็ต้องไปเพิ่ม user ใน firebase ซึ่งวิธีการง่ายมาก แค่เรียกคำสั่ง createUserWithEmailAndPassword()
  signUp() {
    String email = emailController.text.trim();
    String password = passwordController.text.trim();
    String confirmPassword = confirmController.text.trim();
    if (password == confirmPassword && password.length >= 6) {
      _auth
          .createUserWithEmailAndPassword(email: email, password: password)
          .then((user) {
        print("Sign up user successful.");
      }).catchError((error) {
         print(error.message);
      });
    } else {
      print("Password and Confirm-password is not match.");
    }
  }
ใส่ onTap ให้ปุ่ม sign up ให้ไปเรียก method signUp()
  Widget buildButtonSignUp(BuildContext context) {
    return InkWell(
        child: ..
        onTap: () => signUp());
  }
ลองสมัครสมาชิกกันดู
มาแล้ว user ใหม่ใน firebase
เพิ่มอีกนิดนึงละกัน คือ เมื่อสมัครสมาชิกสำเร็จแล้วก็ให้ route ไปที่หน้า home
        Navigator.pushAndRemoveUntil(
            context,
            MaterialPageRoute(builder: (context) => MyHomePage(user)),
            ModalRoute.withName('/'));
แบบนี้
ลืมรหัสผ่าน
อีกหนึ่งปัญหาที่มาคู่กับระบบลงทะเบียน คือ การลืมรหัสผ่าน ที่ user ต้องการจะ reset password ของพวกเขา ถ้าเราทำระบบพวกนี้เองจะต้องยุ่งมากแน่ๆ แต่ Firebase ทำให้หมดแล้ว
เพิ่มปุ่ม ลืมรหัสผ่านที่หน้า login ของเรา
  buildButtonForgotPassword(BuildContext context) {
    return InkWell(
        child: Container(
            constraints: BoxConstraints.expand(height: 50),
            child: Text("Forgot password",
                textAlign: TextAlign.center,
                style: TextStyle(fontSize: 18, color: Colors.white)),
            decoration: BoxDecoration(
                borderRadius: BorderRadius.circular(16),
                color: Colors.red[300]),
            margin: EdgeInsets.only(top: 12),
            padding: EdgeInsets.all(12)),
        onTap: () => navigateToResetPasswordPage(context));
  }

  navigateToResetPasswordPage(BuildContext context) {
    Navigator.push(
        context, MaterialPageRoute(builder: (context) => MyResetPasswordPage()));
  }
ได้แบบนี้
สร้างหน้า สำหรับให้ user กรอกอีเมลลงไป
class MyResetPasswordPage extends StatefulWidget {
  MyResetPasswordPage({Key key}) : super(key: key);

  @override
  _MyResetPasswordPageState createState() => _MyResetPasswordPageState();
}

class _MyResetPasswordPageState extends State<MyResetPasswordPage> {
  GlobalKey<ScaffoldState> scaffoldKey = GlobalKey();
  FirebaseAuth _auth = FirebaseAuth.instance;
  TextEditingController emailController = TextEditingController();

  @override
  Widget build(BuildContext context) {
    return Scaffold(
        key: scaffoldKey,
        appBar: AppBar(
          title: Text("Reset password", style: TextStyle(color: Colors.white)),
          iconTheme: IconThemeData(
            color: Colors.white, //change your color here
          ),
        ),
        body: Container(
            color: Colors.green[50],
            child: Center(
              child: Container(
                  decoration: BoxDecoration(
                      borderRadius: BorderRadius.circular(16),
                      gradient: LinearGradient(
                          colors: [Colors.yellow[100], Colors.green[100]])),
                  margin: EdgeInsets.all(32),
                  padding: EdgeInsets.all(24),
                  child: Column(
                    mainAxisSize: MainAxisSize.min,
                    mainAxisAlignment: MainAxisAlignment.center,
                    children: <Widget>[
                      buildTextFieldEmail(),
                      buildButtonSignUp(context)
                    ],
                  )),
            )));
  }

  Widget buildButtonSignUp(BuildContext context) {
    return InkWell(
        child: Container(
            constraints: BoxConstraints.expand(height: 50),
            child: Text("Reset password",
                textAlign: TextAlign.center,
                style: TextStyle(fontSize: 18, color: Colors.white)),
            decoration: BoxDecoration(
                borderRadius: BorderRadius.circular(16),
                color: Colors.green[200]),
            margin: EdgeInsets.only(top: 16),
            padding: EdgeInsets.all(12)),
        onTap: () => resetPassword());
  }

  Container buildTextFieldEmail() {
    return Container(
        padding: EdgeInsets.all(12),
        decoration: BoxDecoration(
            color: Colors.yellow[50], borderRadius: BorderRadius.circular(16)),
        child: TextField(
            controller: emailController,
            decoration: InputDecoration.collapsed(hintText: "Email"),
            keyboardType: TextInputType.emailAddress,
            style: TextStyle(fontSize: 18)));
  }

  resetPassword() {
    //
  }
}
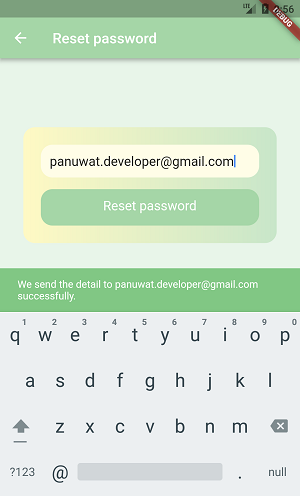
ขั้นตอนการ reset password คือ เรียก auth.sendPasswordResetEmail() แค่นี้เลยจริงๆ จากนั้น Firebase ก็จะไปเช็คแล้วส่ง email รายละเอียดการ reset password ให้อัตโนมัติ
 resetPassword() {
    String email = emailController.text.trim();
    _auth.sendPasswordResetEmail(email: email);
    scaffoldKey.currentState.showSnackBar(SnackBar(
      content: Text("We send the detail to $email successfully.",
          style: TextStyle(color: Colors.white)),
      backgroundColor: Colors.green[300],
    ));
  }
ลองแกล้งกดลืมรหัสผ่าน ใส่อีเมลของเราที่เคยล็อคอินลงไป
ไปดูที่อีเมล จะพบว่ามีอีเมลสำหรับ reset password มาแล้วจ้า
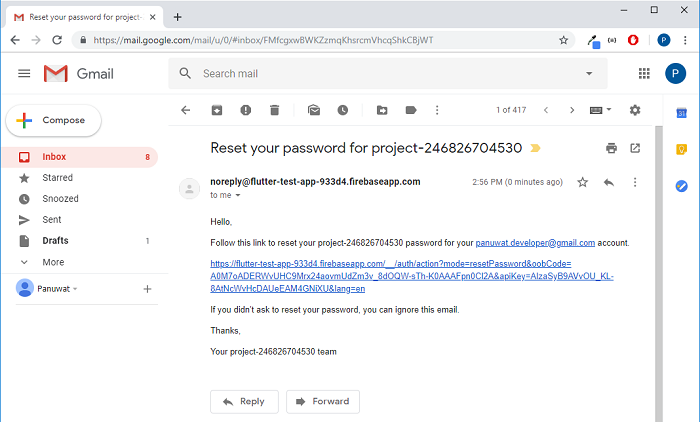
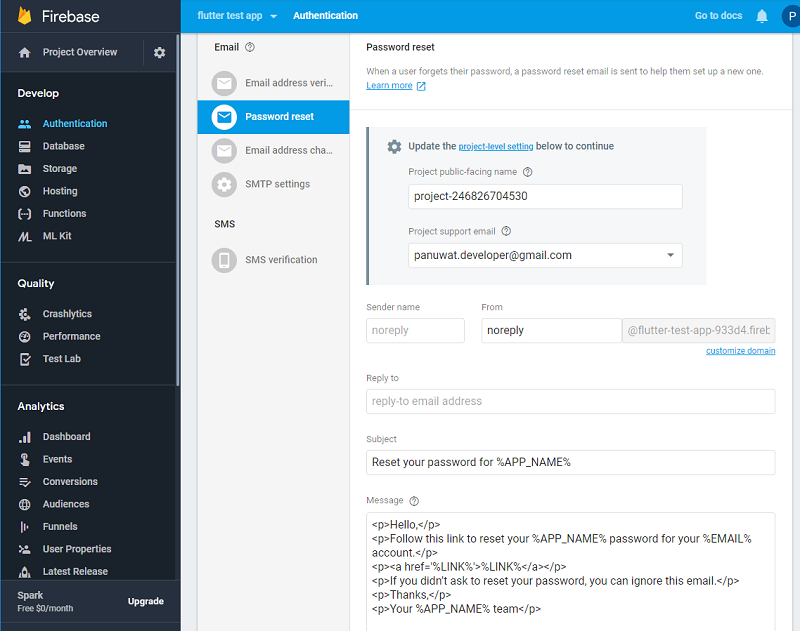
โดยเราสามารถแก้ไขหน้าตา template ของอีเมลได้ที่ Firebase auth > Template > Password reset
สรุป
Firebase Auth เป็นบริการที่ช่วยให้เราไม่ต้องเขียน ระบบ authen อย่างพวก login สมัครสมาชิกเอง อาจจะมียุ่งยากก็แค่ตอนแรกคือการติดตั้งในโปรเจค แต่การใช้งานใน Flutter นับว่าง่ายมาก
ตอนต่อไป
ในตอนหน้าของ Firebase Auth ใน Flutter ผมจะพาไปลองเล่น Facebook Login กันครับ ซึ่งนับว่าเป็นระบบ authen ใช้กันบ่อยมากๆแบบนึงในแอพครับ
เครดิต
https://medium.com/flutterpub/flutter-how-to-do-user-login-with-firebase-a6af760b14d5
ยังมีบทความเรื่อง Flutter ที่ผมเขียนไว้ อีกเยอะเลยในบล็อกนี้ ไม่จำเป็นต้องไปเรียนที่ไหนแล้วละ แค่พยายามศึกษาด้วยตนเองเหมือนผมก็เขียนได้
https://benzneststudios.com/blog/category/flutter/
 Previous Post
 Next Post