[Android Code] การสร้าง Android Slices ตอนที่ 1
สวัสดีครับ ช่วงนี้ว่างๆก็เลยหาอะไรทำ ศึกษาอะไรสนุกๆ แล้วก็ไปเจอฟีเจอร์ใหม่ใน Android P ซึ่งมีความสามารถใหม่ที่เรียกว่า Slice ก็เลยลองเล่นและนำมาเขียนบล็อกเพื่อทบทวนเป็นความรู้ครับ
รู้จักกับ slice
Slice คือ การแสดงส่วนนึงของแอปในแอปอื่น หรือก็คือเราสามารถนำอะไรบางอย่างในแอปอื่นที่เขาเตรียมไว้มาไว้ในแอปเราได้ แบบเดียวกับที่เห็นใน Google Assistance ซึ่งความสามารถนี้มากับ Android P แต่สามารถใช้งานได้ย้อนไปตั้งแต่ Android Kitkat 4.4 เลยนะ
เริ่มต้น
โดยบทความนี้ ผมจะลองเล่นเจ้า Slice โดยการทำแอปตัวแรกที่เตรียม Slice เอาไว้ 1 อัน จากนั้นทำแอปตัวที่สอง โดยจะนำเอา Slice ของแอปแรกมาแสดง โดยแอปตัวที่สองจะไม่มีอะไรเลย นอกจาก Slice Viewer
เริ่มกันเลย
เพิ่ม Dependencies
ตัว Slice library จะอยู่ใน androidx ซึ่งก็คือ ทาง Google ได้รวมพวก Support library ต่างๆไว้ที่เดียว
dependencies {
    implementation 'androidx.appcompat:appcompat:1.0.0-rc01'
    implementation 'androidx.constraintlayout:constraintlayout:1.1.2'

    // slice
    implementation 'androidx.slice:slice-core:1.0.0-rc01'
    implementation 'androidx.slice:slice-builders:1.0.0-rc01'
}
หรือถ้าไม่ใช้ androidx จะใช้แบบ support แบบเดิมปกติก็ได้
    implementation 'com.android.support:appcompat-v7:28.0.0-rc01'
    implementation 'com.android.support.constraint:constraint-layout:1.1.2'
    implementation 'com.android.support:slice-builders:+'
สร้าง Provider
สร้าง class ขึ้นมาแล้ว extends SliceProvider ซึ่ง class นี้จะทำงานตอนที่ slice ของเราถูกเรียกใช้งาน
method ที่สำคัญคือ onBindSlice(Uri) เดี๋ยวเราค่อยมาเขียนส่วนนี้ทีหลัง
public class MySlicesProvider extends SliceProvider {

    @Override
    public boolean onCreateSliceProvider() {
        return true;
    }

    public Slice onBindSlice(Uri sliceUri) {
        //
        return null;
    }
}
สร้าง BroadcastReceiver
สร้าง class BroadcastReceiver ซึ่งคลาสนี้จะทำงานตอนมี action มา slice ของเรา เช่น กดปุ่ม
ตอนนี้ให้กำหนด KEY ของ ACTION ที่เราจะรับเข้ามาว่ามีอะไรบ้าง แล้วเดี๋ยวเราค่อยมาเขียนส่วนนี้ทีหลัง
public class MySliceBroadcastReceiver extends BroadcastReceiver {

    public static String ACTION_CHANGE_TEMP = "com.benzneststudios.myandroidslice.ACTION_CHANGE_TEMP";
    public static String EXTRA_TEMP_VALUE = "ccom.benzneststudios.myandroidslice.EXTRA_TEMP_VALUE";

    @Override
    public void onReceive(Context context, Intent intent) {
          // do something
    }
}
กำหนด Provider และ Receiver ใน manifests
กำหนด provider ของเราลงใน Androidmanifests.xml เพื่อให้แอปรู้จักกับ provider ของเรา
    <application>
       ..
        <provider
            android:authorities="com.benzneststudios.myandroidslice"
            android:name=".MySlicesProvider"
            android:exported="true">
        </provider>
        <receiver android:name=".MySliceBroadcastReceiver"/>
    </application>
เขียนส่วน Slice Provider
ต่อมาก็มากำหนดว่า Slice ของเราจะมีอะไรแสดงบ้าง
โดยเราจะเริ่มออกแบบ Slice ง่ายๆแบบนี้ก่อน

เริ่มจาก Slice ของแอปนั้นจะใช้ URI ในการระบุตัวตนของ slice ซึ่งก็คือ content://<packagename>/<PATH SOMETHING> เช่น
content://com.benzneststudios.myandroidslice/volume
ดังนั้น ถ้ามีแอปไหนเรียกใช้ slice ของเรา จะมาเข้าที่ onBindSlice(uri) ให้เช็ค URI ที่ได้รับเข้ามา
หากตรงกับของเรา ก็ให้สร้าง slice แล้ว return ค่ากลับไป
public class MySlicesProvider extends SliceProvider {

    @Override
    public boolean onCreateSliceProvider() {
        return true;
    }

    public Slice onBindSlice(Uri sliceUri) {
        switch (sliceUri.getPath()) {
            case "/volume":
                return createVolumeSlice(sliceUri);
        }
        return null;
    }

    ...
ต่อมาก็มาเขียนส่วนของการสร้าง slice
วิธีการคือใช้คลาสที่ชื่อว่า ListBuider จะสร้าง view ใน slice แบบลิส ดังนั้นให้เราสร้างแถว เพิ่ม action
ที่สำคัญต้องใส่ setPrimaryAction(action) เสมอ ซึ่งก็คือเมื่อผู้ใช้กดทีื่ slice ของเรา
public class MySlicesProvider extends SliceProvider {

    ...

    private Slice createVolumeSlice(Uri sliceUri) {
        // Construct our parent builder
        ListBuilder listBuilder = new ListBuilder(getContext(), sliceUri, ListBuilder.INFINITY);

        // Add the row to the parent builder
        listBuilder.addRow(new ListBuilder.RowBuilder()
                .setTitle("Volume = " + MyData.volume)
                .setPrimaryAction(getSliceActionOpenActivity()));

        listBuilder.addAction(getSliceActionIncreaseVolume());
        listBuilder.addAction(getSliceActionDecreaseVolume());
        // Build the slice
        return listBuilder.build();
    }

    ...
}
แล้วก็ในที่นี้จะต้องมีที่เก็บค่า ของ volume จึงขอสมมุติโดยการสร้าง class ตัวแปรแบบ static ไว้
public class MyData {
    public static int volume= 25;
}
ส่วน SliceAction จะกำหนดไว้ 3 อย่าง คือปุ่ม เพิ่ม-ลดด้านขวา กดแล้วตัวเลขจะเพิ่มขึ้น-ลดลง แล้วก็เมื่อกดที่ตัว slice จะให้ทำการเปิดแอปของเราขึ้นมา
ซึ่ง SliceAction จะต้องกำหนด PendingIntent เสมอ ซึ่งมันก็การการกำหนดว่าให้ action นั้นๆทำอะไร และ PendingIntent ก็จะกำหนด Action เป็น KEY ใน receiver ของเรา
แล้วก็ reqCode ของ PendingIntent ของ action เพิ่ม กับ action ลด ห้ามซ้ำกันนะ
 public class MySlicesProvider extends SliceProvider {

    ...

    private PendingIntent createPendingIntentWithData(int reqCode, int value) {
        Intent intent = new Intent(MySliceBroadcastReceiver.ACTION_CHANGE_TEMP);
        intent.setClass(getContext(), MySliceBroadcastReceiver.class);
        intent.putExtra(MySliceBroadcastReceiver.EXTRA_TEMP_VALUE, value);
        return PendingIntent.getBroadcast(getContext(), reqCode, intent,
                PendingIntent.FLAG_UPDATE_CURRENT);
    }

    private SliceAction getSliceActionIncreaseVolume() {
        Log.d("Slice", "Increase");
        SliceAction tempUp = new SliceAction(createPendingIntentWithData(1111, MyData.volume + 1), IconCompat.createWithResource(getContext(), R.drawable.ic_up), "+");
        return tempUp;
    }

    private SliceAction getSliceActionDecreaseVolume() {
        Log.d("Slice", "Decrease");
        SliceAction tempDown = new SliceAction(createPendingIntentWithData(2222, MyData.volume - 1), IconCompat.createWithResource(getContext(), R.drawable.ic_down), "-");
        return tempDown;
    }

    private SliceAction getSliceActionOpenActivity() {

        // The primary action; this will activate when the row is tapped
        Intent intent = new Intent(getContext(), MainActivity.class);
        PendingIntent pendingIntent = PendingIntent.getActivity(getContext(), 0, intent, 0);
        SliceAction openTempActivity = new SliceAction(pendingIntent,
                IconCompat.createWithResource(getContext(),
                        R.drawable.ic_launcher_foreground), "controls");
        return openTempActivity;
    }
}
เขียนส่วน Slice Receiver
ต่อมาเขียน onReceive() ให้เช็ค Action ของ Intent
แล้วก็ update ค่า volume ใหม่ จากนั้นก็ให้ update Slice ใหม่อีกครั้ง ใช้คำสั่ง notifyChange(uri)
public class MySliceBroadcastReceiver extends BroadcastReceiver {

    public static String ACTION_CHANGE_TEMP = "com.benzneststudios.myandroidslice.ACTION_CHANGE_TEMP";
    public static String EXTRA_TEMP_VALUE = "ccom.benzneststudios.myandroidslice.EXTRA_TEMP_VALUE";

    @Override
    public void onReceive(Context context, Intent intent) {
        String action = intent.getAction();

        if (ACTION_CHANGE_TEMP.equals(action) && intent.getExtras() != null) {
            int newValue = intent.getExtras().getInt(EXTRA_TEMP_VALUE, 25);
            updateVolume(context, newValue);
        }
    }

    private void updateVolume(Context context, int newValue) {

        MyData.volume = newValue;

        Uri uri = Uri.parse("content://com.benzneststudios.myandroidslice/volume");
        context.getContentResolver().notifyChange(uri, null);
    }
}
สร้างแอปที่สองสำหรับแสดง Slice
ให้สร้างโปรเจคอีกตัว โดยแอปนี้จะเอาไว้แสดง slice ของแอปแรก
โดยกำหนด packagename ต่างจากแอปแรก
เพิ่ม Dependencies
เพิ่ม dependencies ของ slice-view
dependencies {
    ...
    implementation 'androidx.appcompat:appcompat:1.0.0-rc01'
    implementation 'androidx.constraintlayout:constraintlayout:1.1.2'

    // slice view
    implementation 'androidx.slice:slice-view:1.0.0-rc01'
}
กำหนด SliceView ใน layout
ที่ layout ของ activity หรือ fragment ให้กำหนด SliceView ลงไป
<FrameLayout
    xmlns:android="http://schemas.android.com/apk/res/android"
    xmlns:app="http://schemas.android.com/apk/res-auto"
    xmlns:tools="http://schemas.android.com/tools"
    android:layout_width="match_parent"
    android:layout_height="match_parent"
    tools:context=".MainActivity"
    android:padding="16dp">

    <androidx.slice.widget.SliceView
        android:id="@+id/sliceView"
        android:layout_width="match_parent"
        android:layout_height="match_parent" />

</FrameLayout>
ใช้งาน SliceView ใน Activity
ในที่นี้ผมจะใช้ sliceView ใน MainActivity
วิธีการใช้ คือใช้คลาสที่ชื่อว่า LiveData โดยแปลงมาจาก URI ในที่นี้คือ URI ของแอปตัวแรกที่เราทำไว้
แล้วก็เรียก observe
public class MainActivity extends AppCompatActivity {

    private SliceView sliceView;

    @SuppressLint("RestrictedApi")
    @Override
    protected void onCreate(Bundle savedInstanceState) {
        super.onCreate(savedInstanceState);
        setContentView(R.layout.activity_main);

        sliceView = findViewById(R.id.sliceView);
        sliceView.setMode(SliceView.MODE_LARGE);

        LiveData liveData = SliceLiveData.fromUri(this, Uri.parse("content://com.benzneststudios.myandroidslice/volume"));
        liveData.observe(this, sliceView);
    }
}
อธิบายเพิ่มเติมอีกนิด ซึ่งพารามิเตอร์ตัวแรกของ observe คือ LifecycleOwner มันคือ คลาสที่รวมพวก lifecycle ของ activity , fragment เช่น onStart() , onStop() , onResume() เอาไว้ ดังนั้นเราก็แค่โยน activity ให้มัน แล้วที่เหลือเดี๋ยวมันจัดการเอง
ลองรัน
ความสามารถนี้สามารถใช้งานย้อนไปถึง Android 4.4 เลย
รันแอปที่สอง (Slice view) ดูผลลัพธ์ แอปจะถามหา permission
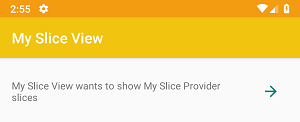
ก็ให้เรากด อนุญาตซะ
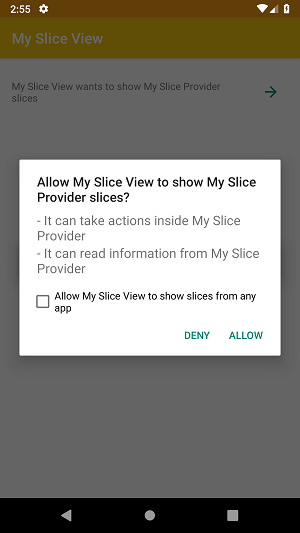
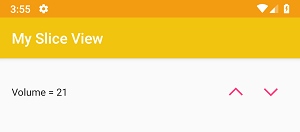
เราจะสามารถมี action กับ slice ได้
บทความนี้ขอหยุดเพียงเท่านี้ก่อน บทความนี้รวมๆก็คือเป็นการนำ slice ไปใช้ ในตอนหน้าจะลองทำ Slice แบบ advance ขึ้น
ตัวอย่างโปรเจค
https://github.com/benznest/my-android-slices/tree/master
Reference
https://developer.android.com/guide/slices/
https://codelabs.developers.google.com/codelabs/android-slices-basic/index.html
 Previous Post
 Next Post