Flutter: การใช้ Notification ใน Flutter
สวัสดีผู้อ่านครับ ช่วงนี้ยังอยู่กับการลองเล่น library เรื่องต่างๆใน Flutter ลองเล่นไปเรื่อยๆแล้วสนุกดี บล็อกนี้พามาลองใช้งานการแสดงแจ้งเตือนหรือ notification จากแอปของเรา (ผมขอเรียกสั้นๆว่า noti นะ) โดยในบล็อกนี้จะมีเฉพาะส่วนการแสดง noti จากคำสั่งในแอปของเราเอง ไม่ได้รวมส่วนของการ push noti หรือ firebase messaging นะ ซึ่งมีคนทำ library สำหรับ เรื่องนี้ไว้ดีมากทีเดียว
เพิ่ม dependencies
ในตัวอย่างนี้ dependencies ที่เราจะใช้มี 3 ตัว คือ
flutter_local_notifications เอาไว้แสดง noti
http เอาไว้โหลดรูปจาก url มาแสดงใน noti
path_provider เอาไว้ใช้งานเรื่องไฟล์
เพิ่ม dependencies ใน pubspec.yaml
dependencies:
  flutter:
    sdk: flutter
  ..
  flutter_local_notifications: 0.7.0
  http: 0.12.0+2
  path_provider: 0.5.0+1
ใน android เพิ่ม permission และ receiver ใน android/app/src/main/AndroidManifest.xml ซึ่ง flutter_local_notifications มีความสามารถในการทำ Scheduled Notification ด้วย คือตั้งเวลาให้แจ้งเตือนตามเวลา ดังนั้น หากปิดเครื่องไป แล้วเปิดใหม่จะต้องให้แอปรัน service อีกครั้ง จึงต้องใส่ permission RECEIVE_BOOT_COMPLETED นั่นเอง
<manifest ..>

    <uses-permission android:name="android.permission.RECEIVE_BOOT_COMPLETED"/>
    <uses-permission android:name="android.permission.VIBRATE" />
    <uses-permission android:name="android.permission.WAKE_LOCK" />

    <application
        ..
        <activity
            ..

            <intent-filter>
                <action android:name="android.intent.action.MAIN"/>
                <category android:name="android.intent.category.LAUNCHER"/>
            </intent-filter>
        </activity>

        <receiver android:name="com.dexterous.flutterlocalnotifications.ScheduledNotificationReceiver" />
        <receiver android:name="com.dexterous.flutterlocalnotifications.ScheduledNotificationBootReceiver">
            <intent-filter>
                <action android:name="android.intent.action.BOOT_COMPLETED"></action>
            </intent-filter>
        </receiver>

    </application>
</manifest>
สำหรับ iOS ตัว noti ฟีเจอร์ไม่เยอะเท่า android เลยไม่ต้องทำอะไร ลองอ่านรายละเอียดได้ที่
https://github.com/MaikuB/flutter_local_notifications
เริ่มต้น
มาลองเล่น noti กัน ก่อนอื่นเลย import package เข้ามา
import 'package:flutter_local_notifications/flutter_local_notifications.dart';
import 'dart:io';
import 'package:http/http.dart' as http;
import 'package:path_provider/path_provider.dart';
ประกาศตัวแปร FlutterLocalNotificationsPlugin ซึ่งเจ้าตัวนี้จะต้องเป็นตัวแปร Global ของแอป
FlutterLocalNotificationsPlugin flutterLocalNotificationsPlugin =
FlutterLocalNotificationsPlugin();
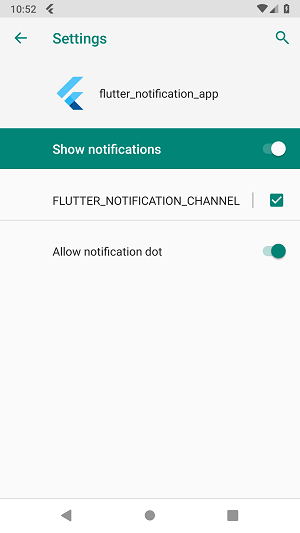
void main() => runApp(MyApp());ประกาศตัวแปรใน state คือ channel id , name , description เพราะว่าใน android Oreo มีฟีเจอร์Notification channel ที่ให้ผู้ใข้สามารถเลือกปิดได้
class _MyHomePageState extends State<MyHomePage> {
String message;
String channelId = "1000";
String channelName = "FLUTTER_NOTIFICATION_CHANNEL";
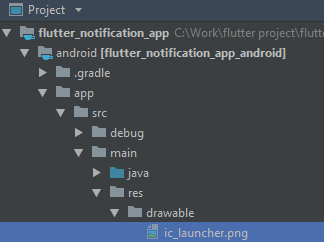
String channelDescription = "FLUTTER_NOTIFICATION_CHANNEL_DETAIL";ต่อมาคือ ไอคอนของ noti ใน android จะใช้จากใน res/drawable ดังนั้นเราต้องเอาไอคอนไปวางไว้ในนี้
ที่ initState คือ เราต้องกำหนด initialize ของ flutterLocalNotificationsPlugin
ซึ่งสิ่งที่เราต้องทำคือ สร้าง InitializationSettings สำหรับ android และ iOS ให้มัน
ใน android หากเรากดที่ noti มันจะเข้ามาที่ onSelectNotification แต่ใน iOS จะเข้ามาที่ onDidReceiveLocalNotification
@override
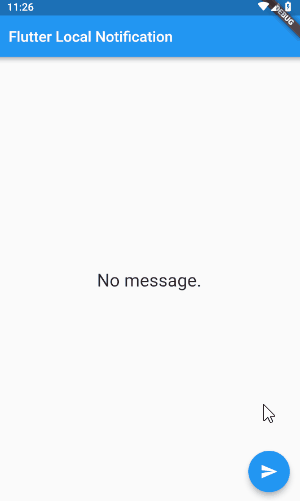
initState() {
message = "No message.";
var initializationSettingsAndroid =
AndroidInitializationSettings('ic_launcher');
var initializationSettingsIOS = IOSInitializationSettings(
onDidReceiveLocalNotification: (id, title, body, payload) {
print("onDidReceiveLocalNotification called.");
});
var initializationSettings = InitializationSettings(
initializationSettingsAndroid, initializationSettingsIOS);
flutterLocalNotificationsPlugin.initialize(initializationSettings,
onSelectNotification: (payload) {
// when user tap on notification.
print("onSelectNotification called.");
setState(() {
message = payload;
});
});
super.initState();
}
ส่งการแจ้งเตือน
มาลองส่งการแจ้งเตือนให้แสดงกันบ้าง วิธีการง่ายมาก คือใช้ flutterLocalNotificationsPlugin.show() โดยกำหนด id ให้มัน เอาไว้สำหรับเราจะลบหรืออัพเดทกก็ใช้ id นี้ แล้วก็กำหนด title, body ซะ อีกตัวพระเอกเลยคือ PlatformChannelSpecifics มันก็คือการกำหนดว่า noti ของเราจะแสดงในรูปแบบไหน ในแต่ละ platfrom ซึ่งใน android มีลูกเล่นเยอะ แต่ใน iOS มีแค่แบบธรรมดา
sendNotification() async {
var androidPlatformChannelSpecifics = AndroidNotificationDetails('10000',
'FLUTTER_NOTIFICATION_CHANNEL', 'FLUTTER_NOTIFICATION_CHANNEL_DETAIL',
importance: Importance.Max, priority: Priority.High);
var iOSPlatformChannelSpecifics = IOSNotificationDetails();
var platformChannelSpecifics = NotificationDetails(
androidPlatformChannelSpecifics, iOSPlatformChannelSpecifics);
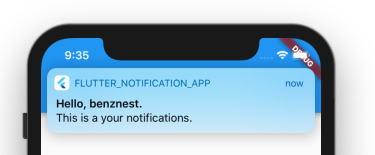
await flutterLocalNotificationsPlugin.show(111, 'Hello, benznest.',
'This is a your notifications. ', platformChannelSpecifics,
payload: 'I just haven\'t Met You Yet');
}สร้างหน้า UI ให้กดปุ่มแล้วเรียกฟังชันก์ที่เราทำไว้
@override
Widget build(BuildContext context) {
return Scaffold(
appBar: AppBar(
title: Text(widget.title),
),
body: Center(
child: Column(
mainAxisAlignment: MainAxisAlignment.center,
children: <Widget>[
Text(
message,
style: TextStyle(fontSize: 24),
),
],
),
),
floatingActionButton: FloatingActionButton(
onPressed: () {
sendNotification();
},
tooltip: 'Increment',
child: Icon(Icons.send),
),
);
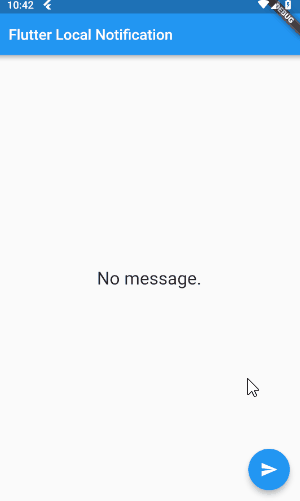
}ลองรันได้ แค่นี้ก็ได้ notification แล้ว ซึ่งอย่างที่บอกไปตอนต้นว่าใน android เมื่อเรากดที่ noti มันจะไปเข้า onSelectNotification พร้อม payload ดังนั้นเราก็สามารถรู้ว่าผู้ใช้กด noti อันไหน
ของ iOS
ซึ่งคำสั่ง show อื่นๆก็มีลูกเล่นแบบกำหนดเวลา หรือแบบตามกำหนดการได้อีกด้วย

อย่างที่กล่าวไปตอนต้นว่าสำหรับใน android Oreo ขึ้นไป จะมี Notification Channel ใน Setting ซึ่งผู้ใช้สามารถมาปิดได้ว่า ไม่อยากได้การแจ้งเตือนประเภทนี้ โดยชื่อ channel ก็มาจากที่เราตั้งไว้ตอน initialize นั่นเอง
การยกเลิกการแจ้งเตือน
หากเราต้องการลบหรือยกเลิกการแจ้งเตือนนั้นออก ไม่ให้ผู้ใช้เห็นสามารถใช้คำสั่ง cancel โดยใช้ id หรือจะยกเลิกทุกอันด้วย cancelAll ก็ได้
flutterLocalNotificationsPlugin.cancel(id);
flutterLocalNotificationsPlugin.cancelAll();
การแจ้งเตือนแบบแนบรูปภาพ
มาลองเล่น noti ที่แนบรูปภาพมาด้วย ในขณะที่เขียนอยู่นี้ library ยังไม่รองรับใน iOS จะใช้งานได้แต่ใน android ดังนั้นลองเล่นใน android ก่อนนะ
เริ่มจากลองแบบใช้รูปจาก resource ก่อน
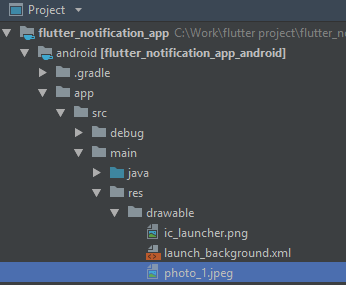
เพิ่มรูปภาพลงไปใน android/app/main/res/drawable
การใช้งาน ใช้แบบเดียวกับการแสดง noti ก่อนหน้านี้ แค่เพิ่ม style: AndroidNotificationStyle.BigPicture และ styleInformation ว่าใช้รูปจาก Drawable นะ
sendNotificationWithPicture() async {
var androidPlatformChannelSpecifics = AndroidNotificationDetails(channelId, channelName, channelDescription,
importance: Importance.Max,
priority: Priority.High,
largeIcon: "ic_launcher",
style: AndroidNotificationStyle.BigPicture,
styleInformation:
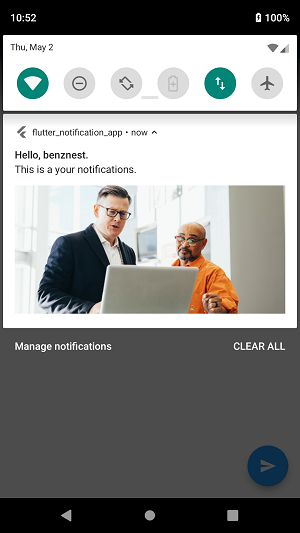
BigPictureStyleInformation("photo_1", BitmapSource.Drawable));ผลที่ได้คือ ได้ noti สวยๆพร้อมรูปภาพแบบนี้แล้ว
หากต้องการใช้รูปภาพจาก URL ก็ทำได้ โดยจะต้องดาวน์โหลดรูปภาพมาก่อน แล้ว save ลงเป็นไฟล์ จากนั้นจึงเอาไฟล์รูปภาพไปแนบใส่ noti โดยกำหนดว่าstyleInformation ใช้จาก FilePath
 sendNotificationWithPictureUrl() async {

    String pathFile  = await downloadImage("https://images.pexels.com/photos/2213547/pexels-photo-2213547.jpeg?auto=compress&cs=tinysrgb&dpr=2&h=750&w=1260","example");

    var androidPlatformChannelSpecifics = AndroidNotificationDetails(channelId, channelName, channelDescription,
        importance: Importance.Max,
        priority: Priority.High,
        largeIcon: pathFile ,
        largeIconBitmapSource: BitmapSource.FilePath,
        style: AndroidNotificationStyle.BigPicture,
        styleInformation:
            BigPictureStyleInformation(pathFile, BitmapSource.FilePath));

    var iOSPlatformChannelSpecifics = IOSNotificationDetails();

    var platformChannelSpecifics = NotificationDetails(
        androidPlatformChannelSpecifics, iOSPlatformChannelSpecifics);

    await flutterLocalNotificationsPlugin.show(111, 'Hello, benznest.',
        'This is a your notifications. ', platformChannelSpecifics,
        payload: 'I just haven\'t Met You Yet');
  }
}
ลองรัน
การแจ้งเตือนแบบบทสนทนา
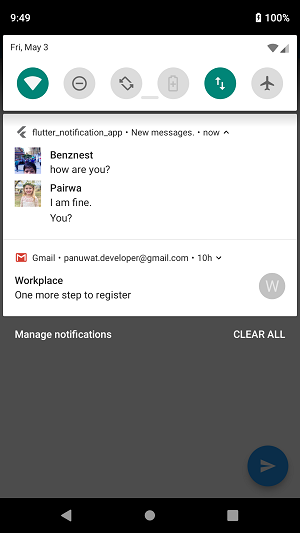
ความสามารถนึงใน noti ที่เพิ่มเข้ามาใน android N คือ การแสดง noti แบบ messaging คล้ายๆกับการแชทโดยจะสามารถกำหนดรูปโปรไฟล์และเวลาได้
ซึ่งใน Flutter ผู้พัฒนาเขาก็ได้ เขียนให้ใช้งานฟีเจอร์นี้ได้ง่ายๆ ด้วยการใช้งานคลาส Person และกำหนด key
จากนั้นที่ AndroidNotificationDetails ก็กำหนด style: AndroidNotificationStyle.Messaging
sendNotificationWithMessaging() async {
    Person benznest = Person(
        name: 'Benznest',
        key: 'benznest',
        icon: 'img_benznest',
        iconSource: IconSource.Drawable);
    Person pairwa = Person(
        name: 'Pairwa',
        key: 'pairwa',
        icon: 'img_pairwa',
        iconSource: IconSource.Drawable);

    var androidPlatformChannelSpecifics = AndroidNotificationDetails(
        channelId, channelName, channelDescription,
        importance: Importance.Max,
        priority: Priority.High,
        largeIcon: "ic_launcher",
        style: AndroidNotificationStyle.Messaging,
        styleInformation: MessagingStyleInformation(benznest,
//            groupConversation: true,
            conversationTitle: "New messages.",
            messages: <Message>[
              Message("how are you? ", DateTime.now().add(Duration(minutes: 5)),
                  benznest),
              Message(
                  "I am fine.", DateTime.now().add(Duration(minutes: 15)), pairwa),
              Message(
                  "You?", DateTime.now().add(Duration(minutes: 1)), pairwa),
            ]));

    var iOSPlatformChannelSpecifics = IOSNotificationDetails();

    var platformChannelSpecifics = NotificationDetails(
        androidPlatformChannelSpecifics, iOSPlatformChannelSpecifics);

    await flutterLocalNotificationsPlugin.show(111, 'Hello, benznest.',
        'This is a your notifications. ', platformChannelSpecifics,
        payload: 'I just haven\'t Met You Yet');
  }
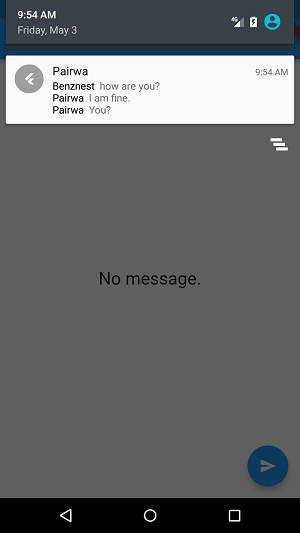
หากเรานำไปใช้งานใน android ที่ต่ำกว่า Oreo ก็จะแสดงแจ้งเตือนเป็นแบบธรรมดาแทน
การแจ้งเตือนแบบ Progress
อีกแบบคือการใช้ noti ให้แสดง progress วิธีการใช้งานง่ายมาก แค่กำหนด
showProgress: true แล้วใส่ค่า progress และ max เท่านั้นเอง หากอยากอัพเดทก็แค่เรียก show ซ้ำ
  sendNotificationWithProgress() async {
    for (var i = 0; i <= 100; i++) {
      await Future.delayed(Duration(milliseconds: 20), () async {
        var androidPlatformChannelSpecifics = AndroidNotificationDetails(
            channelId, channelName, channelDescription,
            importance: Importance.Max,
            priority: Priority.High,
            showProgress: true,
            progress: i,
            maxProgress: 100);

        var iOSPlatformChannelSpecifics = IOSNotificationDetails();

        var platformChannelSpecifics = NotificationDetails(
            androidPlatformChannelSpecifics, iOSPlatformChannelSpecifics);

        await flutterLocalNotificationsPlugin.show(111, 'Downlaoding..',
            '$i%', platformChannelSpecifics,
            payload: 'I just haven\'t Met You Yet');
      });
    }
    flutterLocalNotificationsPlugin.cancel(111);
  }
ตัวอย่าง

มีตัวเลือกให้กำหนด indeterminate คือ ตัว progress จะรันแบบไม่สิ้นสุด
AndroidNotificationDetails(
            ..
            indeterminate: true,
            showProgress: true,
            progress: i,
            maxProgress: 100
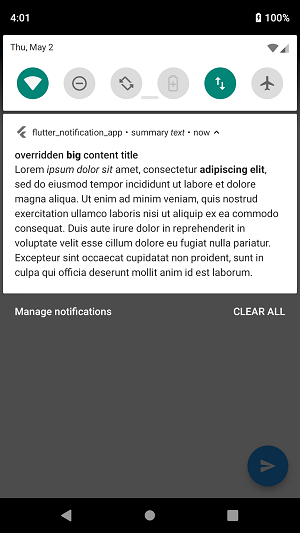
การแจ้งเตือนแบบข้อความยาวๆ
noti อีกอันคือการใส่ข้อความยาวๆ ซึ่งรองรับการใช้ HTML ด้วย เรียกว่า noti แบบนี้ว่า Big Text
  sendNotificationBigText() async {
    var bigTextStyleInformation = BigTextStyleInformation(
        'Lorem <i>ipsum dolor sit</i> amet, consectetur <b>adipiscing elit</b>, sed do eiusmod tempor incididunt ut labore et dolore magna aliqua. Ut enim ad minim veniam, quis nostrud exercitation ullamco laboris nisi ut aliquip ex ea commodo consequat. Duis aute irure dolor in reprehenderit in voluptate velit esse cillum dolore eu fugiat nulla pariatur. Excepteur sint occaecat cupidatat non proident, sunt in culpa qui officia deserunt mollit anim id est laborum.',
        htmlFormatBigText: true,
        contentTitle: 'overridden <b>big</b> content title',
        htmlFormatContentTitle: true,
        summaryText: 'summary <i>text</i>',
        htmlFormatSummaryText: true);
    var androidPlatformChannelSpecifics = AndroidNotificationDetails(
        'big text channel id',
        'big text channel name',
        'big text channel description',
        style: AndroidNotificationStyle.BigText,
        styleInformation: bigTextStyleInformation);
    var platformChannelSpecifics =
    NotificationDetails(androidPlatformChannelSpecifics, null);
    await flutterLocalNotificationsPlugin.show(
        0, 'big text title', 'silent body', platformChannelSpecifics);
  }
สรุป
เจ้า Library flutter_local_notifications ช่วยให้เราสามารถใช้คำสั่งในการแสดงผล Notification ใน Flutter ได้ง่ายมาก
อ่านเพิ่มเติมและดูตัวอย่างอบบอื่นๆได้ที่
https://github.com/MaikuB/flutter_local_notifications/
จริงๆจะว่าไปแล้วเรื่อง notification ผมก็เคยเขียนบล็อกสำหรับใน Android ไปแล้วซึ่งในบล็อกนี้ของ Flutter ก็คล้ายกันมาก หากอ่านบล็อกนี้จบก็แวะไปอ่านได้นะ
 Previous Post
 Next Post