[iOS] การส่งข้อมูลระหว่าง ViewController
สวัสดีครับ บทความนี้เป็นบทความขณะหัดเขียน iOS ของผม ซึ่งผมกำลังหัดเขียน Swift ใน Xcode เพื่อทำแอป iPhone และเพื่อสร้างความเข้าใจมากขึ้น ผมจึงตั้งใจจะเขียนเรื่องต่างๆที่ได้เรียนรู้ เป็นการบันทึกความรู้และแชร์ความรู้ไปในตัว และวันนี้ได้ลองทำการส่งค่าระหว่าง ViewController และการส่งค่ากลับครับ เลยมาเขียนบล็อกไว้อ่าน หวังว่าจะมีประโยชน์กับผู้เรียนมือใหม่ด้วยกันครับ
การส่งค่าด้วย Propertise
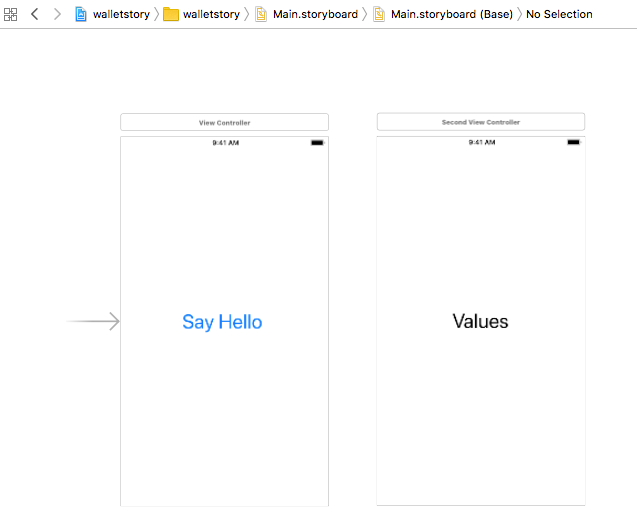
ก่อนอื่นสร้าง ViewController 2 หน้า หน้าแรกมีปุ่ม ส่วนหน้าสองมี Label ตัวนึง
สิ่งที่เราจะทำคือกดปุ่มแล้วให้มันส่งค่าไปอีกหน้าเพื่อแสดงข้อความ

สร้าง SecondViewController.swift
ทำการเชื่อม Label เข้ามาให้เรียบร้อย แล้วก็กำหนด ตัวแปร string ไว้ตัวนึงสำหรับรับค่า
แล้วก็ที่ viewDidLoad ก็ทำการกำหนด text ให้ Label
class SecondViewController: UIViewController {

    var text:String=""

    @IBOutlet var tvLabel: UILabel!

    override func viewDidLoad() {
        super.viewDidLoad()
        tvLabel.text = text
        // Do any additional setup after loading the view.
    }

    override func didReceiveMemoryWarning() {
        super.didReceiveMemoryWarning()
        // Dispose of any resources that can be recreated.
    }

}
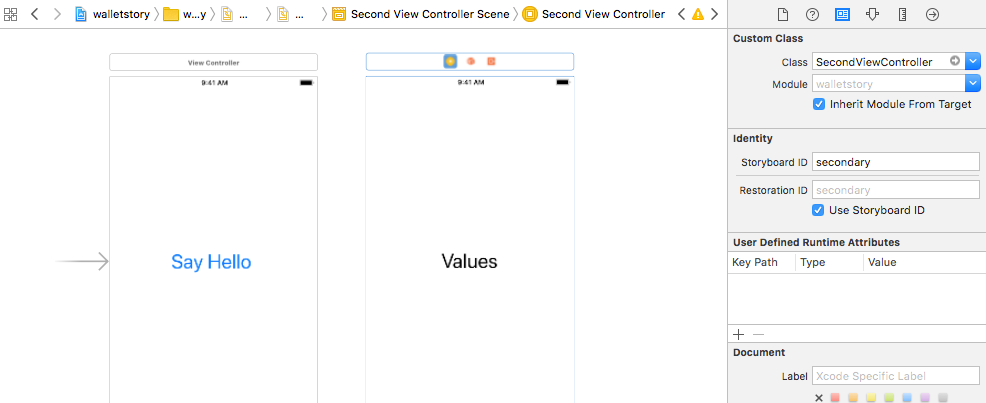
กำหนด Custom Class ให้กับหน้าที่สองเป็น SecondViewController
และกำหนด Storyboard ID ด้วย อย่าลืมติ๊กถูกที่ Use Storyboard ID ด้วยนะ
มาที่ ViewController ของหน้าแรก ให้ทำการเชื่อม Action ของปุ่มมาที่ ViewController
แล้วใส่ code ดังนี้
คือทำการสร้าง SecondViewController โดยระบุจาก storyboard ที่ชื่อว่า Main และ view ที่เรากำหนด indentifier ไว้ว่า secondary จากนั้นเราจะได้ object ของ SecondViewController ซึ่งทำให้เราสามารถเข้าถึงตัวแปรของมันได้ ก็ให้เราทำการ set ค่าที่เรากำหนดไว้ใน secondViewCntroller สุดท้ายคือเรียกคำสั่ง present
class ViewController: UIViewController {

    @IBAction func onButtonClicked(_ sender: Any) {
        let storyboard = UIStoryboard(name: "Main", bundle: nil)
        let secondController = storyboard.instantiateViewController(withIdentifier: "secondary") as! SecondViewController
        secondController.text = "Hello!"

        present(secondController, animated: true)
    }
    ..
ลองรันดู
เพิ่มเติม ทีนี้ถ้าเราใช้ NavigationController (มีปุ่ม back ให้อัตโนมัติ) จะต้องใช้คำสั่ง present อีกแบบนึง
ลองทำเลย ให้กดที่กลมๆสีฟ้าของ ViewController ไปที่เมนู Editor > Embed in > Navigation Controller
มันจะครอบ Navigation Controller ให้กับ ViewController นั้นเลย
จากนั้นที่คำสั่งตอนกดปุ่ม ก็ให้เราแก้ไขเป็นดังนี้
    @IBAction func onButtonClicked(_ sender: Any) {
        let storyboard = UIStoryboard(name: "Main", bundle: nil)
        let secondController = storyboard.instantiateViewController(withIdentifier: "secondary") as! SecondViewController
        secondController.text = "Hello!"
        navigationController?.pushViewController(secondController,animated: true)
    }
ลองรัน
การส่งค่ด้วย Segue
การส่งค่าอีกวิธีก็สะดวกดี คือการใช้ Seque
ให้เราลากเส้น โดยากด Ctrl ค้างลากจาก ViewController ไปยัง SecondViewController เลือก Show
เราจะได้เส้นๆนึงที่เชื่อมกัน ให้กดที่เส้น แล้วกำหนด indentifier ให้มัน
จากนั้นที่ ViewController ให้ override method ที่ชื่อว่า prepare ตัว method นี้จะถูกเรียกก่อนที่ StoryboardSeque จะถูกดำเนินการ ซึ่งในที่นี้เราก็ทำการตรวจสอบ indentifier ของ segue ว่าใช่ที่เราต้องการหรือไม่
ถ้าใช้ก็ทำการ cast ปลายทางของ seque เป็น class ที่เรากำหนดไว้ จากนั้นก็แค่กำหนดค่า
    override func prepare(for segue: UIStoryboardSegue, sender: Any?) {
        if segue.identifier == "toSecondController" {
            if segue.destination is SecondViewController
            {
                let vc = segue.destination as? SecondViewController
                vc?.text = "Hello!!"
            }
        }
    }
จากนั้นที่คำสั่งปุ่ม เราก็เรียกใช้คำสั่งเดียวคือ performSegue()
    @IBAction func onButtonClicked(_ sender: Any) {
        performSegue(withIdentifier: "toSecondController", sender: nil)
    }
ลองรัน
การส่งค่ากลับด้วย Delegation
เราลองทำการส่งค่าไปแล้ว ทีนี้ลองส่งค่ากลับบ้าง โดยจะทำการลองเพิ่มปุ่มที่หน้าที่สอง พอเรากดก็ให้มันส่งค่ามาที่หน้าที่เรียกมัน ซึ่งคือหน้าแรก แล้วเราก็เอาค่านั้นไปใช้
สร้าง protocol ขึ้นมา ภายในกำหนดฟังชันก์และ agrument ในที่นี้ผมจะส่งค่ากลับเป็น String
ซึ่ง protocol มันก็คือ interface ใน Java นั่นแหละ
protocol MyDelegate{
    func onButtonSecondClicked(message: String)
}
ทำการเพิ่ม Protocol ของเราใน extends ของ ViewController
แล้วก็ imprement method ในที่นี้ผมจะแค่ print เฉยๆ
class ViewController: UIViewController,MyDelegate {

    func onButtonSecondClicked(message: String) {
        print(message)
    }
    ..
ที่หน้า SecondViewController ประกาศตัวแปร protocol ที่เราสร้าไว้
class SecondViewController: UIViewController {
    var delegate:MyDelegate?
    ..
ที่ปุ่มของหน้าแรก เพิ่มคำสั่ง set ตัวแปร protocol ที่เราสร้างไว้ด้วย self
ซึ่งในที่นี้คือ method onButtonSecondClicked นั่นแหละ
    @IBAction func onButtonClicked(_ sender: Any) {
        let storyboard = UIStoryboard(name: "Main", bundle: nil)
        let secondController = storyboard.instantiateViewController(withIdentifier: "secondary") as! SecondViewController
        secondController.text = "Hello!"
        secondController.delegate = self
        navigationController?.pushViewController(secondController,animated: true)
    }
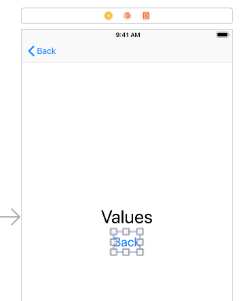
ต่อมาสร้างปุ่มหน้าสอง
ทำการเชื่อมปุ่ม Action ให้เรียบร้อย แล้วเราจะสร้างใช้งาน protocol ได้เลย
เราก็ส่งค่ากลับผ่าน parameter ของ method protocol ได้เลย
    @IBAction func onClickBackListener(_ sender: Any) {
        delegate!.onButtonSecondClicked(message: "Yes sir.")
    }
การส่งค่ากลับนี้ ก็คือ Callback และถ้าเคยเขียน Java หรือใน Android มาแล้ว นี่มันคือการใช้งาน Interface Listener นั่นเอง เพียงแต่ว่าใน Swift เรียกคนละชื่อเท่านั้น


 Previous Post