Flutter Project: สร้างเกม OX (Tic-Tac-Toe) ด้วย Flutter
สวัสดีครับ ช่วงนี้ผมกำลังสนุกกับ Flutter เลย กำลังทำโปรเจคด้วย Flutter พบว่ามันเป็นอะไรที่สุดยอดมากกับการเขียนแอปในตอนนี้ บล็อกนี้จะพาไปทำเกม OX หรือในภาษาอังกฤษเรียกว่า tic-tac-toe ด้วย Flutter ครับ เป็นเกมที่เล่นง่ายๆที่มักเป็นโจทย์สำหรับหัดเขียนโปรแกรมได้เป็นอย่างดี แล้วก็เพื่อให้เห็นไอเดียของการทำแอปด้วย Flutter ว่ามันง่ายมาก จริงๆนะ
เริ่มต้น
สร้างโปรเจคเปล่าๆขึ้นมา
import 'package:flutter/material.dart';

void main() => runApp(MyApp());

class MyApp extends StatelessWidget {
  @override
  Widget build(BuildContext context) {
    return MaterialApp(
      title: 'XO Game',
      theme: ThemeData(
        primarySwatch: Colors.green,
      ),
      home: MyHomePage(title: 'XO Game'),
    );
  }
}

class MyHomePage extends StatefulWidget {
  MyHomePage({Key key, this.title}) : super(key: key);

  final String title;

  @override
  _MyHomePageState createState() => _MyHomePageState();
}

class _MyHomePageState extends State<MyHomePage> {

  @override
    Widget build(BuildContext context) {
    return Scaffold(
        appBar: AppBar(
          title: Text(widget.title),
        ),
        body: Center(child: Text("Hello Flutter",style: TextStyle(fontSize: 22)))
    );
  }
}
สร้างตาราง
วาดตารางเปล่าๆสำหรับเกม XO โดยจะเป็นขนาด 3×3
วิธีการก็คือใช้ Row กับ Column นี่แหละ Row จะเรียง widget ในแนวนอน ส่วน column จะเรียงแนวตั้ง
โดยผมขอเรียกช่องในตารางว่า Channel
  @override
  Widget build(BuildContext context) {
    return Scaffold(
      appBar: AppBar(
        title: Text(widget.title),
      ),
      body: Container(constraints: BoxConstraints.expand(),
          color: Colors.green[100],
          child: Center(
              child: Container(color: Colors.green[400],
                  padding: EdgeInsets.all(8),
                  child: Column(
                    mainAxisSize: MainAxisSize.min,
                    mainAxisAlignment: MainAxisAlignment.center,
                    children: <Widget>[
                      Row(mainAxisSize: MainAxisSize.min,
                          mainAxisAlignment: MainAxisAlignment.center,
                          children: <Widget>[
                            buildChannel(),
                            buildChannel(),
                            buildChannel(),
                          ]),
                      Row(mainAxisSize: MainAxisSize.min,
                          mainAxisAlignment: MainAxisAlignment.center,
                          children: <Widget>[
                            buildChannel(),
                            buildChannel(),
                            buildChannel(),
                          ]),
                      Row(mainAxisSize: MainAxisSize.min,
                          mainAxisAlignment: MainAxisAlignment.center,
                          children: <Widget>[
                            buildChannel(),
                            buildChannel(),
                            buildChannel(),
                          ]),
                    ],
                  )))),
    );
  }

  Container  buildChannel() => Container(margin: EdgeInsets.all(4), width: 100, height: 100, color: Colors.green[100]);
ใส่พื้นหลังให้ container ใหญ่ แล้วก็ใส่ margin ให้ container ช่องๆด้านใน เท่านี้ก็ได้ตารางแล้ว
ตกแต่งตาราง
ตารางมันดูธรรมดาไปนิดนึง เพื่อความสวยงาม ขอตกตแต่งตารางให้มีขอบมนขึ้น
วิธีการคือใส่ BoxDecoration ให้กับ Container ซึ่งเพื่อความเท่ ผมจะใส่ให้กับ Container กรอบใหญ่สุด
กับแค่ 4 มุมของช่องด้านในเท่านั้น
 static const double RADIUS_CORNER = 12;

  @override
  Widget build(BuildContext context) {
    ...
                  child: Column(
                    mainAxisSize: MainAxisSize.min,
                    mainAxisAlignment: MainAxisAlignment.center,
                    children: <Widget>[
                      Row(mainAxisSize: MainAxisSize.min,
                          mainAxisAlignment: MainAxisAlignment.center,
                          children: <Widget>[
                            buildChannel(RADIUS_CORNER, 0, 0, 0),
                            buildChannel(0, 0, 0, 0),
                            buildChannel(0, RADIUS_CORNER, 0, 0),
                          ]),
                      Row(mainAxisSize: MainAxisSize.min,
                          mainAxisAlignment: MainAxisAlignment.center,
                          children: <Widget>[
                            buildChannel(0, 0, 0, 0),
                            buildChannel(0, 0, 0, 0),
                            buildChannel(0, 0, 0, 0),
                          ]),
                      Row(mainAxisSize: MainAxisSize.min,
                          mainAxisAlignment: MainAxisAlignment.center,
                          children: <Widget>[
                            buildChannel(0, 0, RADIUS_CORNER, 0),
                            buildChannel(0, 0, 0, 0),
                            buildChannel(0, 0, 0, RADIUS_CORNER),
                          ]),
                    ],

     ...
  }

  Container buildChannel(double tlRadius,
      double trRadius,
      double blRadius,
      double brRadius) =>
      Container(margin: EdgeInsets.all(2), width: 100, height: 100,
          decoration: BoxDecoration(
              color: Colors.green[100],
              borderRadius: BorderRadius.only(
                  topLeft: Radius.circular(tlRadius),
                  topRight: Radius.circular(trRadius),
                  bottomLeft: Radius.circular(blRadius),
                  bottomRight: Radius.circular(brRadius)
              )));
}
ลองกำหนดค่า X O ให้กับตาราง
ต่อมากำหนดค่าของตัวแปร X O ให้กับตัวตาราง ดังนี้
  static const int NONE = 0;
  static const int VALUE_X = 1;
  static const int VALUE_O = 2;
เราจะลอง hard code ก่อน คือ ปรับให้ตัวตารางรับค่า แล้วนำมาวาดไอคอน X หรือ O ลงในช่องแต่ละช่อง
พร้อมกับหากมีค่า X O ก็เปลี่ยนพื้นหลังด้วย
  static const double RADIUS_CORNER = 12;
  static const int NONE = 0;
  static const int VALUE_X = 1;
  static const int VALUE_O = 2;

  @override
  Widget build(BuildContext context) {
    ...
                  child: Column(
                    mainAxisSize: MainAxisSize.min,
                    mainAxisAlignment: MainAxisAlignment.center,
                    children: <Widget>[
                      Row(mainAxisSize: MainAxisSize.min,
                          mainAxisAlignment: MainAxisAlignment.center,
                          children: <Widget>[
                            buildChannel(RADIUS_CORNER,0,0,0, NONE),
                            buildChannel(0,0,0,0,VALUE_X),
                            buildChannel(0,RADIUS_CORNER,0,0,VALUE_O),
                          ]),
                      Row(mainAxisSize: MainAxisSize.min,
                          mainAxisAlignment: MainAxisAlignment.center,
                          children: <Widget>[
                            buildChannel(0,0,0,0,VALUE_X),
                            buildChannel(0,0,0,0,VALUE_X),
                            buildChannel(0,0,0,0,VALUE_O),
                          ]),
                      Row(mainAxisSize: MainAxisSize.min,
                          mainAxisAlignment: MainAxisAlignment.center,
                          children: <Widget>[
                            buildChannel(0,0,RADIUS_CORNER,0,VALUE_X),
                            buildChannel(0,0,0,0,NONE),
                            buildChannel(0,0,0,RADIUS_CORNER,VALUE_X),
                          ]),
                    ],
    ...
  }

  Container buildChannel(double tlRadius,
      double trRadius,
      double blRadius,
      double brRadius,
      int status) =>
      Container(margin: EdgeInsets.all(2),
          width: 100,
          height: 100,
          decoration: BoxDecoration(
              color: getBackgroundChannelFromStatus(status),
              borderRadius: BorderRadius.only(
                  topLeft: Radius.circular(tlRadius),
                  topRight: Radius.circular(trRadius),
                  bottomLeft: Radius.circular(blRadius),
                  bottomRight: Radius.circular(brRadius)
              )),
          child: Icon(getIconFromStatus(status), size: 60, color: Colors.green[800]));

  IconData getIconFromStatus(int status) {
    if (status == 1) {
      return Icons.close;
    } else if (status == 2) {
      return Icons.radio_button_unchecked;
    }
    return null;
  }

  Color getBackgroundChannelFromStatus(int status) {
    if (status == 1) {
      return Colors.green[300];
    } else if (status == 2) {
      return Colors.green[300];
    }
    return Colors.green[100];
  }
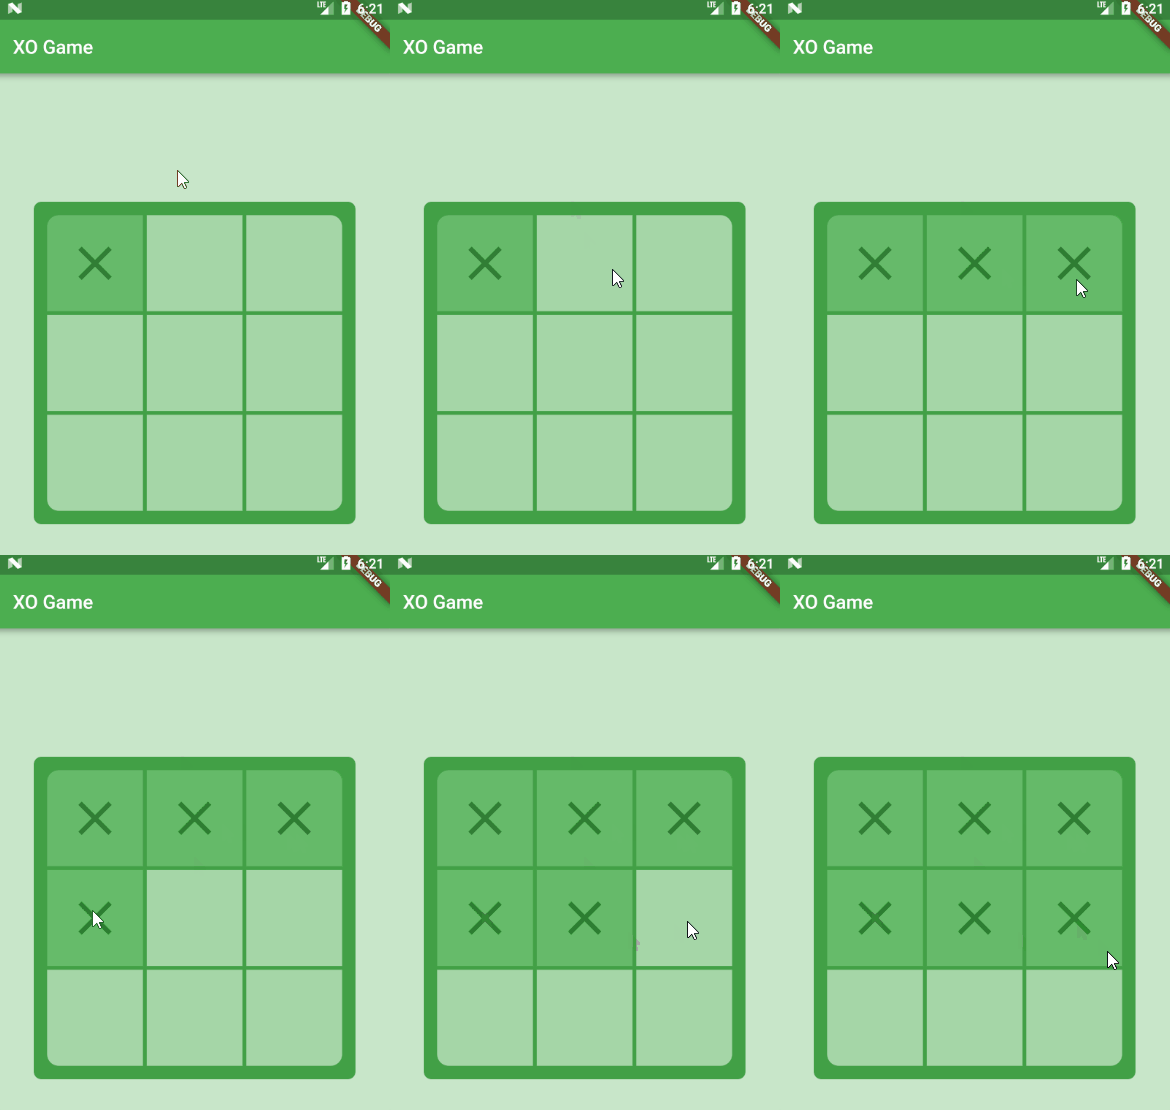
จะได้แบบนี้
ปรับแต่งสีตาราง
พวกค่าสีต่างๆ ที่กำหนดมันดูกระจัดกระจาย ผมคิดว่าควรจะทำเป็นตัวแปรเอาไว้ดีกว่า และเผื่อในอนาคตเราจะเปลี่ยนสีด้วยจะได้ง่ายต่อการใช้งาน
  ...

  /// Theme game
   Color colorBorder = Colors.green[600];
   Color colorBackground = Colors.green[100];
   Color colorBackgroundChannelNone = Colors.green[200];
   Color colorBackgroundChannelValueX = Colors.green[400];
   Color colorBackgroundChannelValueO = Colors.green[400];
   Color colorChannelIcon = Colors.green[800];

  ...

  Color getBackgroundChannelFromStatus(int status) {
    if (status == VALUE_X) {
      return colorBackgroundChannelValueX;
    } else if (status == VALUE_O) {
      return colorBackgroundChannelValueO;
    }
    return colorBackgroundChannelNone;
  }
ทำให้ตารางแสดงผลตาม State
ต่อมา ทำตารางให้แสดงค่าตามตัวแปรใน State
ก่อนอื่นกำหนด ตัวแปร List คล้าย array 2 มิติ ที่เก็บค่า channel แต่ละช่องใน ตาราง
NONE คือยังไม่มี XO
  // State of Game
  List<List<int>> channelStatus = [
    [NONE, NONE, NONE],
    [NONE, NONE, NONE],
    [NONE, NONE, NONE],
  ];
ใส่ค่าของตัวแปรลงในตาราง เรียงไปตาม index
         children: <Widget>[
                      Row(mainAxisSize: MainAxisSize.min,
                          mainAxisAlignment: MainAxisAlignment.center,
                          children: <Widget>[
                            buildChannel(RADIUS_CORNER, 0, 0, 0, channelStatus[0][0]),
                            buildChannel(0, 0, 0, 0, channelStatus[0][1]),
                            buildChannel(0, RADIUS_CORNER, 0, 0, channelStatus[0][2]),
                          ]),
                      Row(mainAxisSize: MainAxisSize.min,
                          mainAxisAlignment: MainAxisAlignment.center,
                          children: <Widget>[
                            buildChannel(0, 0, 0, 0, channelStatus[1][0]),
                            buildChannel(0, 0, 0, 0, channelStatus[1][1]),
                            buildChannel(0, 0, 0, 0, channelStatus[1][2]),
                          ]),
                      Row(mainAxisSize: MainAxisSize.min,
                          mainAxisAlignment: MainAxisAlignment.center,
                          children: <Widget>[
                            buildChannel(0, 0, RADIUS_CORNER, 0, channelStatus[2][0]),
                            buildChannel(0, 0, 0, 0, channelStatus[2][1]),
                            buildChannel(0, 0, 0, RADIUS_CORNER, channelStatus[2][2]),
                          ]),
                    ],
ทีนี้ลองกำหนดค่าตัวแปร เริ่มต้นเป็นดังนี้
  // State of Game
  List<List<int>> channelStatus = [
    [VALUE_X, NONE, VALUE_X],
    [NONE, VALUE_X, NONE],
    [VALUE_X, NONE, VALUE_X],
  ];
การแสดงผลก็จะเปลี่ยนไปตามค่าใน State แล้ว
กำหนด event การกด
สร้าง method สำหรับกดปุ่มแล้วให้ตารางเปลี่ยนค่าตาม โดยตอนนี้จะลองให้ เมื่อกด ช่องว่างเปล่าให้เปลี่ยนเป็น X
ซึ่ง method นี้จะรับค่า row , col เพื่อจะได้รู้ว่ากำลังกดอันไหน
  onChannelPressed(int row, int col) {
    if (channelStatus[row][col] == NONE) {
      setState(() {
        channelStatus[row][col] = VALUE_X;
      });
    }
  }
เอา GestureDetector ไปครอบ Continer ช่องในตาราง เพื่อใส่ event เกี่ยวกับการ tap
แล้วก็เพิ่มให้ method ที่วาดช่องนี้ มันรู้ว่ากำลังวาดช่องที่เท่าไหร่ โดยให้มันรับ row , col เข้ามา เพื่อส่งให้ method onChannelPressed
  Widget buildChannel(
      int row,
      int col,
      double tlRadius,
      double trRadius,
      double blRadius,
      double brRadius,
      int status) =>
      GestureDetector(onTap: () => onChannelPressed(row, col),
          child: Container(
                ...
              );
กลับไปที่การวาดช่องแต่ละช่องในตาราง เพิ่มการส่งค่า row , col ไป
Row(mainAxisSize: MainAxisSize.min,
                          mainAxisAlignment: MainAxisAlignment.center,
                          children: <Widget>[
                            buildChannel( 0,0,RADIUS_CORNER,0, 0, 0,channelStatus[0][0]),
                            buildChannel(0,1,0,0,0,0,channelStatus[0][1]),
                            buildChannel(0,2, 0, RADIUS_CORNER, 0, 0, channelStatus[0][2]),
                          ]),
                      Row(mainAxisSize: MainAxisSize.min,
                          mainAxisAlignment: MainAxisAlignment.center,
                          children: <Widget>[
                            buildChannel(1,0, 0, 0, 0, 0, channelStatus[1][0]),
                            buildChannel(1, 1, 0,  0, 0,  0,channelStatus[1][1]),
                            buildChannel(1, 2, 0,  0, 0,  0, channelStatus[1][2]),
                          ]),
                      Row(mainAxisSize: MainAxisSize.min,
                          mainAxisAlignment: MainAxisAlignment.center,
                          children: <Widget>[
                            buildChannel(2, 0, 0 0, RADIUS_CORNER, 0,channelStatus[2][0]),
                            buildChannel(2, 1, 0 ,0, 0, 0, channelStatus[2][1]),
                            buildChannel(2, 2, 0, 0, 0, RADIUS_CORNER, channelStatus[2][2]),
                          ]
ตอนนี้สามารถเปลี่ยนค่าตาราง ได้จากการกดช่องที่ว่างแล้ว
ปรับแต่งโค้ด
จะเห็นว่าที่ method build() โค้ดการวาดช่องต่างๆในตางรางนั้นเยอะมาก ทำให้อ่านเข้าใจยาก ควรทำการปรับแต่งให้โค้ดเป็นส่วนๆมากขึ้น เริ่มจาก ทำ method buildRowChannel() โดยตัวนี้มันจะรับแค่ row แล้วเอามาวาด col พร้อมกับใส่มุมขอบมนไปด้วย
  List<Widget> buildRowChannel(int row) {
    List<Widget> listWidget = List();
    for (int col = 0; col < 3; col++) {
      double tlRadius = row == 0 && col == 0 ? RADIUS_CORNER : 0;
      double trRadius = row == 0 && col == 2 ? RADIUS_CORNER : 0;
      double blRadius = row == 2 && col == 0 ? RADIUS_CORNER : 0;
      double brRadius = row == 2 && col == 2 ? RADIUS_CORNER : 0;
      Widget widget = buildChannel(
          row,
          col,
          tlRadius,
          trRadius,
          blRadius,
          brRadius,
          channelStatus[row][col]);
      listWidget.add(widget);
    }
    return listWidget;
  }
ทำให้ที่ build() เราก็แค่เรียก buildRowChannel(row) จบเกม โค้ดสั้นลง อ่านง่ายขึ้นเยอะ
                ...
                Column(
                    mainAxisSize: MainAxisSize.min,
                    mainAxisAlignment: MainAxisAlignment.center,
                    children: <Widget>[
                      Row(mainAxisSize: MainAxisSize.min,
                          mainAxisAlignment: MainAxisAlignment.center,
                          children: buildRowChannel(0)),
                      Row(mainAxisSize: MainAxisSize.min,
                          mainAxisAlignment: MainAxisAlignment.center,
                          children: buildRowChannel(1)),
                      Row(mainAxisSize: MainAxisSize.min,
                          mainAxisAlignment: MainAxisAlignment.center,
                          children: buildRowChannel(2))
                    ],
                  )
ตอนนี้รอบของใคร
ประกาศตัวแปร currentTurn กำหนดให้ X เริ่มก่อนละกัน
int currentTurn = VALUE_X;
เพิ่มตัวหนังสือ Text อยู่ด้านบนตาราง บอกว่าตอนนี้ เป็นรอบของใคร X หรือ O
  @override
  Widget build(BuildContext context) {
            ...
            child: Center(
                child: Column(mainAxisSize: MainAxisSize.min,
                    children: <Widget>[
                      Text("Turn of player",
                          style: TextStyle(
                              fontSize: 36, color: colorTextCurrentTurn,
                              fontWeight: FontWeight.bold)),
                      Icon(getIconFromStatus(currentTurn), size: 60, color: colorChannelIcon),
                      Container(
                          ...
จากนั้น เขียน method switchPlayer() เพื่อสลับรอบกัน
 void switchPlayer() {
        if (currentTurn == VALUE_X) {
          currentTurn = VALUE_O;
        } else if (currentTurn == VALUE_O) {
          currentTurn = VALUE_X;
        }
    }
พอกดช่องว่างในตาราง หลังจากใส่ค่าลงในตารางแล้ว ก็ให้เรียก switchPlayer() ด้วย
  onChannelPressed(int row, int col) {
    if (channelStatus[row][col] == NONE) {
      setState(() {
        channelStatus[row][col] = currentTurn;
        switchPlayer();
      });
    }
  }
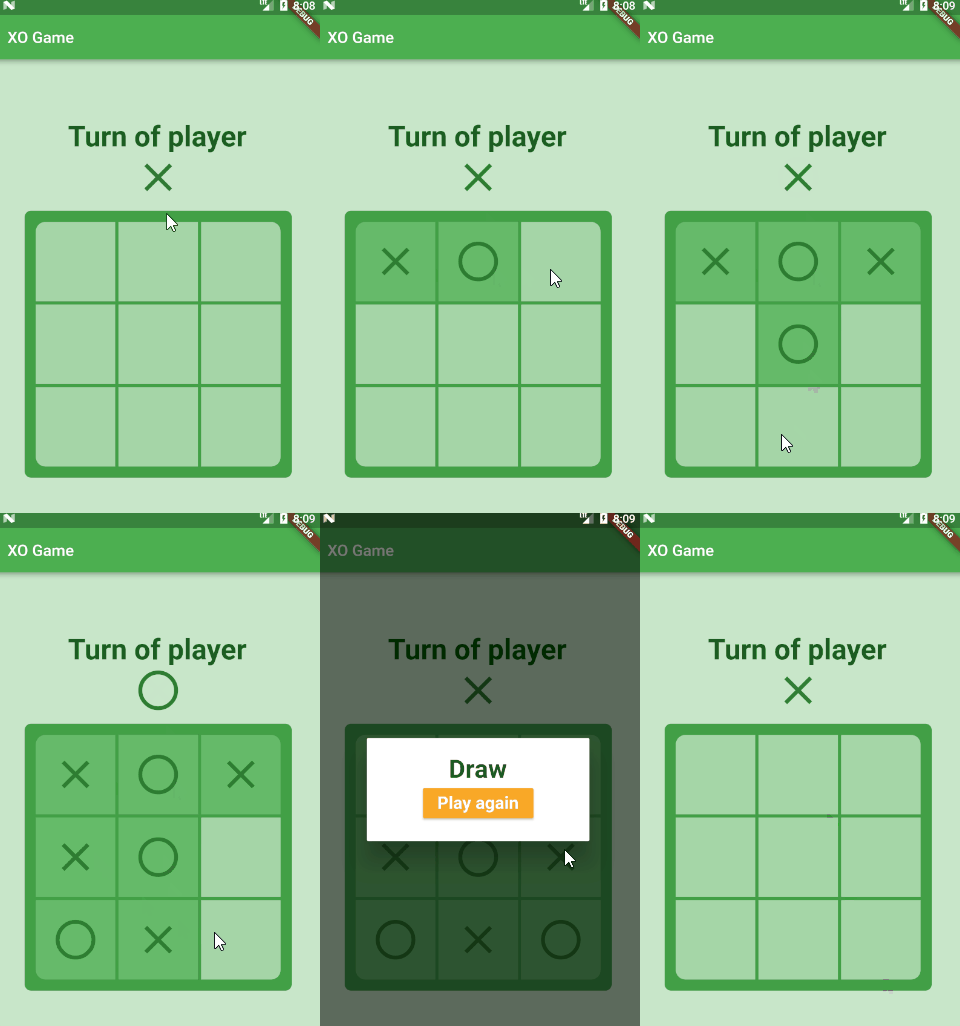
ตอนนี้จะสามารถสลับรอบกันได้แล้ว พร้อมกับข้อความแสดงว่า เป็นรอบของใคร
การชนะเกม
พอเล่นสลับกัน จนเต็มตาราง แน่นอนว่าต้องมีกรณี มีคนชนะ ซึ่งก็มีแค่ 4 กรณีใหญ่ๆ คือ กรณีชนะแนวตั้ง ชนะแนวนอน ชนะแนวทะแยงซ้าย ชนะแนวทะแยงขวา โดย method isGameEndByWin() จะเช็คว่าเกมจบโดยการชนะหรือไม่
    bool isGameEndedByWin() {
      // check vertical.
      for (int col = 0; col < 3; col++) {
        if (channelStatus[0][col] != NONE &&
            channelStatus[0][col] == channelStatus[1][col] &&
            channelStatus[1][col] == channelStatus[2][col]) {
          return true;
        }
      }

      // check horizontal.
      for (int row = 0; row < 3; row++) {
        if (channelStatus[row][0] != NONE &&
            channelStatus[row][0] == channelStatus[row][1] &&
            channelStatus[row][1] == channelStatus[row][2]) {
          return true;
        }
      }

      // check cross left to right.
      if (channelStatus[0][0] != NONE &&
          channelStatus[0][0] == channelStatus[1][1] &&
          channelStatus[1][1] == channelStatus[2][2]) {
        return true;
      }

      // check cross right to left.
      if (channelStatus[0][2] != NONE &&
          channelStatus[0][2] == channelStatus[1][1] &&
          channelStatus[1][1] == channelStatus[2][0]) {
        return true;
      }

      return false;
    }
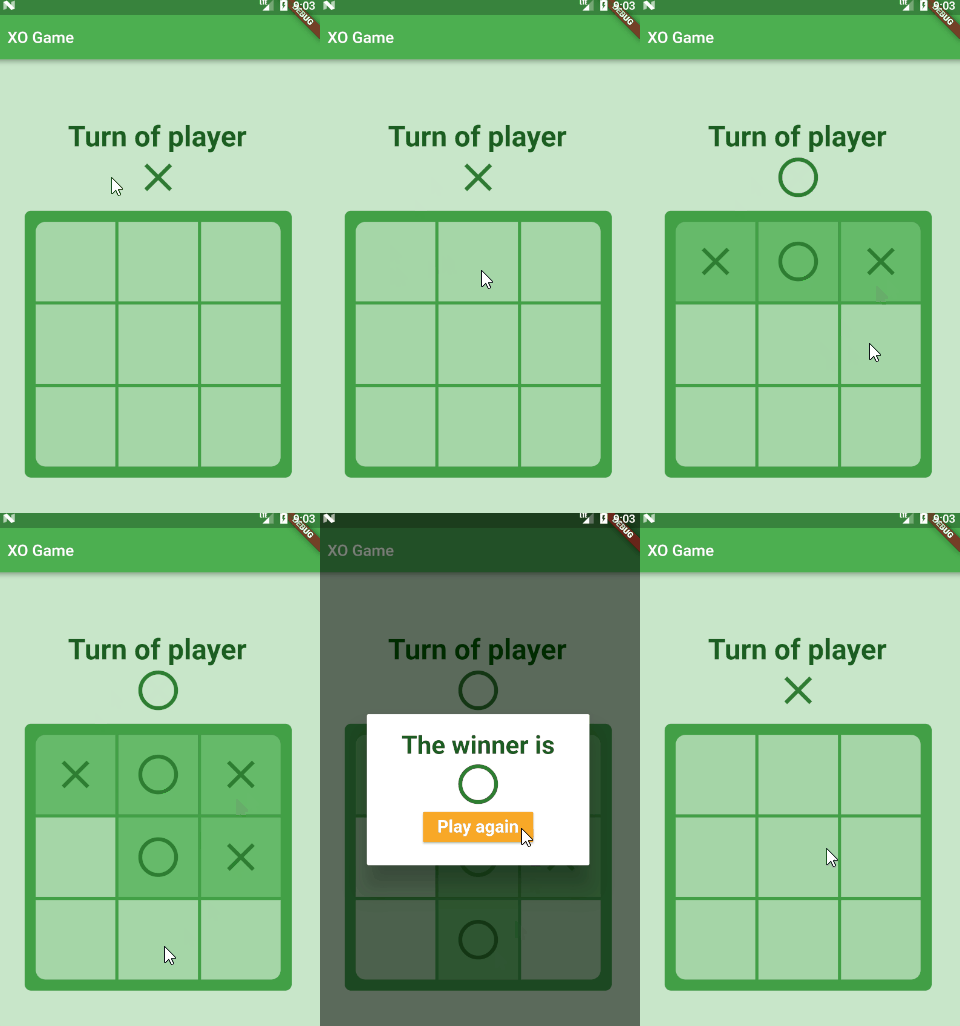
เมื่อเกมจบก็จะให้แสดง dialog ว่าชนะแล้ว และมีปุ่มให้เลือกว่าจะเล่นอีกไหม
  void showEndGameDialog(int winner) {
    // flutter defined function
    showDialog(
      context: context,
      builder: (BuildContext context) {
        // return object of type Dialog
        return AlertDialog(
            content: Column(mainAxisSize: MainAxisSize.min,
                children: <Widget>[
                  Text("The winner is", style: TextStyle(
                      fontSize: 32,
                      color: colorTextCurrentTurn,
                      fontWeight: FontWeight.bold)),
                  Icon(getIconFromStatus(currentTurn),
                      size: 60,
                      color: colorChannelIcon),
                  RaisedButton(padding: EdgeInsets.symmetric(horizontal: 18,vertical: 6),
                    color: Colors.yellow[800],
                    child: Text("Play again",
                        style: TextStyle(
                            fontSize: 22,
                            color: Colors.white,
                            fontWeight: FontWeight.bold)),
                    onPressed: () {
                      Navigator.of(context).pop();
                    },
                  )
                ])
        );
      },
    );
  }
ดังนั้นทุกครั้งที่ใส่ค่าลงในตารางต้องเช็คว่ามีคนชนะหรือยัง ถ้าชนะก็ให้แสดง dialog
onChannelPressed(int row, int col) {
  if (channelStatus[row][col] == NONE) {
    setState(() {
      channelStatus[row][col] = currentTurn;

      if (isGameEndedByWin()) {
        showEndGameDialog(currentTurn);
      } else {
        switchPlayer();
      }
    });
  }
}
ปุ่มเล่นอีกครั้ง
การเล่นอีกครั้ง เรียก restart ก็ได้ วิธีการก็แค่เรียก setState แล้วกำหนด ค่าใน state เป็นค่าเริ่มต้นทั้งหมด
  playAgain() {
    setState(() {
      currentTurn = VALUE_X;
      channelStatus = [
        [NONE, NONE, NONE],
        [NONE, NONE, NONE],
        [NONE, NONE, NONE],
      ];
    });
  }
แล้วก็ใส่ method ที่ปุ่ม playa Again
 void showEndGameDialog(int winner) {
            ...
                    onPressed: () {
                      playAgain();
                      Navigator.of(context).pop();
                    }
            ...
}
กรณีเสมอกัน
อีกกรณีคือเสมอกัน ก็แค่เช็คค่าในตารางว่ายังมีช่องว่างหรือไม่ ถ้าไม่มีแล้วยังไม่ชนะ ก็คือเสมอนั่นเอง
  bool isGameEndedByDraw() {
    for (int row = 0; row < 3; row++) {
      for (int col = 0; col < 3; col++) {
        if(channelStatus[row][col] == NONE){
          return false;
        }
      }
    }
    return true;
  }
เสมอกันก็แสดง dialog ว่าเสมอกัน
  onChannelPressed(int row, int col) {
    if (channelStatus[row][col] == NONE) {
      setState(() {
        channelStatus[row][col] = currentTurn;

        if (isGameEndedByWin()) {
          showEndGameDialog(currentTurn);
        } else {
          if(isGameEndedByDraw()){
            showEndGameByDrawDialog();
          }else {
            switchPlayer();
          }
        }
      });
    }
  }
จบแล้ว
เกม XO แบบง่ายๆ ทั้งหมดก็ประมาณนี้ครับ โค้ดทั้งหมดอยู่ใน Github แล้วนะ
https://github.com/benznest/xo-game-flutter/blob/master/lib/main.dart


 Previous Post
 Next Post