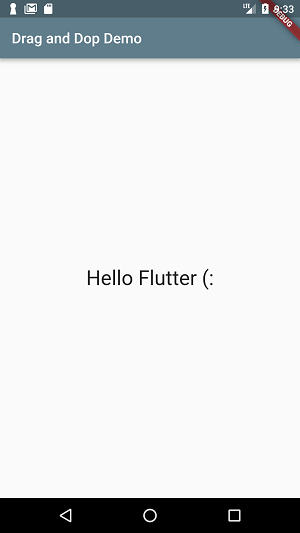
Flutter : การทำลาก-วาง (Draggable) ใน Flutter

สวัสดีทุกท่าน ช่วงนี้ผมมีโปรเจคคิดว่าจะทำเล่นๆไปเรื่อยๆ แล้วมีโปรเจคนึงคิดว่าต้องใช้การลาก วาง widget ในแแอป วันนี้ก็เลยลองเล่นเกี่ยวกับ การทำ ลาก-วาง (draggable) บน Flutter ครับ เลยมาเขียนสรุปคร่าวๆในบล็อกนี้
เริ่มต้น
เตรียมตัวให้พร้อม
new Flutter Project
Draggable Widget
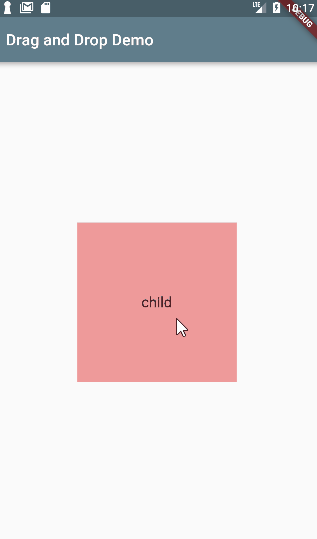
Draggable เป็น Widget ที่เมื่อนำมาครอบ Widget อื่น Widget นั้นก็จะลากได้ ง่ายๆแค่นี้แหละ
โดยมี ลูกเล่นหลักๆ 3 อันคือ
child = View ลูกที่แสดงตอนยังไม่ได้ถูกลาก
feedback = View ที่แสดง ขณะกำลังถูกลากไปพร้อมกับเรา
vhildWhenDragging = View ลูกที่แสดงขณะกำลังถูกลากอยู่
  @override
  Widget build(BuildContext context) {
    return Scaffold(
      appBar: AppBar(
        title: Text(widget.title),
      ),
      body: Center(
        child: Column(
          mainAxisAlignment: MainAxisAlignment.center,
          children: <Widget>[
            Draggable(
              child: buildBox("child", Colors.red[200]),
              feedback: buildBox("feedback", Colors.yellow[200]),
              childWhenDragging:
                  buildBox("childWhenDragging", Colors.blue[200]),
            ),
          ],
        ),
      ), // This trailing comma makes auto-formatting nicer for build methods.
    );
  }

  Container buildBox(String title, Color color) {
    return Container(
        width: 200,
        height: 200,
        color: color,
        child: Center(child: Text(title, style: TextStyle(fontSize: 18,color: Colors.black))));
  }
เพื่อความเข้าใจ ผมลองสร้าง Container แล้วลองเพิ่ม Draggable ให้มัน

ดังนั้นถ้าอยากให้มันเหมือนกำลังถูกลากไปจริงๆ ก็ไม่ต้องใส่ childWhenDragging
Draggable(
              child: buildBox("child", Colors.red[200]),
              feedback: buildBox("feedback", Colors.yellow[200]),
              childWhenDragging:Container(),
            )

โดยเราสามารถกำหนดให้ลากได้เฉพาะแนวตั้งหรือแนวนอนก็ได้
โดยใช้ axis
Draggable(
              axis: Axis.vertical,
              child: buildBox("child", Colors.red[200]),
              feedback: buildBox("feedback", Colors.yellow[200]),
              childWhenDragging:Container(),
            )
อีกอันที่น่าจะมีประโยชน์คือ dragAnchor มันก็คือการระบุว่าจะให้แสดง feedback ตรงไหน
โดยปกติจะมีค่าเป็น DragAnchor.child แต่ถ้าเรากำหนดแบบ pointer มันจะแสดง feedback ตรงตำแหน่งที่เรากดแทน
Draggable(
               dragAnchor: DragAnchor.pointer,
                ...

Draggable listener
ลูกเล่นเพิ่มเติม คือ Listener ของ Draggable ซึ่งสามารถทำได้หลายอย่าง เช่น
onDragStarted = ถูกเรียกเมื่อเราเริ่มลาก
onDragCompleted = ถูกเรียกเมื่อเราลากแล้ว Target ยอมรับ เดี๋ยวจะพูดถึงในหัวข้อถัดไป
onDragEnd = ถูกเรียกเมื่อ เราวางแล้ว ไม่ว่าจะ Target ยอมรับหรือไม่
onDraggableCanceled = ถูกเรียกเมื่อ ลากไปวางในที่ๆ Target ไม่มี หรือไม่ถูกยอมรับ
        Draggable(
                child: buildBox("Hello", Colors.red[200]),
                feedback: buildBox("Draging..", Colors.red[200]),
                childWhenDragging: buildBox("", Colors.grey[300]),
                onDragStarted: (){
                  print("onDragStarted");
                },
                onDragCompleted: (){
                  print("onDragCompleted");
                },
                onDragEnd: (details){
                  print("onDragEnd = "+details.wasAccepted.toString());
                },
                onDraggableCanceled: (Velocity velocity, Offset offset){
                  print("onDraggableCanceled");
                },
              )
ลองดู Cycle คร่าวๆ

โดยตัว onDragEnd จะมี details ส่งมาให้ด้วย ซึ่งก็เช็คได้หลายอย่าง เช่น Target ยอมรับหรือไม่
ระยะทาง ตำแหน่งที่วางสุดท้าย
               onDragEnd: (details){
                  print("onDragEnd Accept = "+details.wasAccepted.toString());
                  print("onDragEnd Velocity = "+details.velocity.pixelsPerSecond.distance.toString());
                  print("onDragEnd Offeset= "+details.offset.direction.toString());
                }
หลายคน ถ้าใหม่ๆอาจจะสงสัยว่า เราจะรู้ได้อย่างไรว่า callback ที่มันส่งกลับมามี argument อะไรบ้าง
วิธีการก็คือ กดเข้าไปดู Definition ของมัน (Ctrl+คลิก) เช่น onDragEnd ก็กดเข้าไปดูว่ามันเป็น Function แบบไหน

Draggable Data
อย่างที่เรารู้กันว่า การที่เราลาก object ก็เพราะเราต้องการทำอะไรบ้างอย่าง ดังนั้นมันก็ต้องมีจุดหมายของการลาก และการที่จุดหมายนั้นจะรู้ว่าเราลากอะไรไปวาง มันก็ต้องมีข้อมูลติดไปด้วย
draggable สามารถกำหนดข้อมูลไปกับมันได้ โดยใช้ data
   Draggable(
                data: 1,
                ...
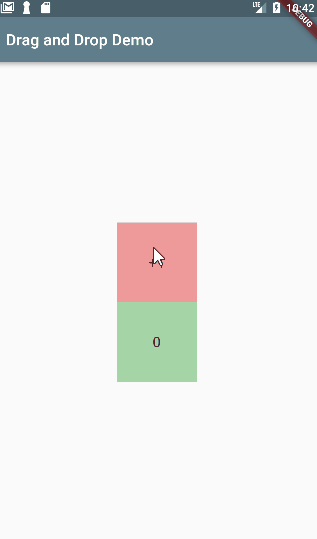
Drag Target
พอทำให้ widget ลากได้แล้ว ก็ต้องมีจุดหมายที่รออยู่ (Target)
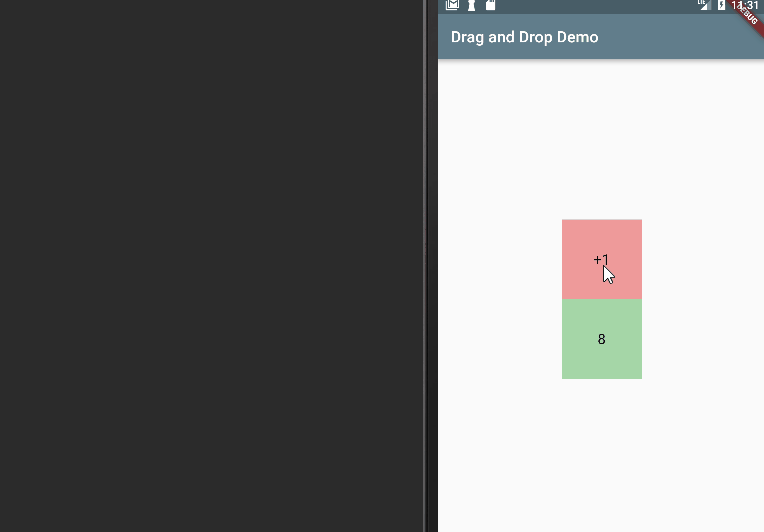
โดยตัวอย่างนี้ผมจะทำ widget สองตัว โดยลากตัวนึงแล้วจะ +1 แสดงผลที่ widget อีกตัว
class _MyHomePageState extends State<MyHomePage> {
  int count = 0;
  ...
เตรียม Draggable กำหนด data เป็น 1
          Draggable(
              child: buildBox("+1", Colors.red[200]),
              feedback: buildBox("+1", Colors.red[200]),
              childWhenDragging:buildBox("+1", Colors.grey[300]),
              data:  1
            )
ต่อมาก็ทำ DragTarget โดยตัวละครสำคัญของมันคือ
builder = Widget ที่แสดง
candidateData = ข้อมูลที่ถูกยอมรับเข้ามา
rejectdData = ข้อมูลที่ไม่ยอมรับ
onWillAccept = ตรวจสอบว่า ข้อมูลที่รับมาจาก Draggable ตรงกับที่ต้องการหรือไม่
onAccept = ยอมรับ แล้วทำอะไร
            DragTarget(
              builder: (BuildContext context, List<int> candidateData,
                  List<dynamic> rejectedData) {
                // build widget target with data.
              },
              onWillAccept: (int data) {
                // when decide Accept or Reject.
              },onAccept: (int){
                // when accept the data.
            },
            )
สิ่งที่ผมจะทำก็คือ builder ก็ return Widget แสดง count
onWillAccept ก็เช็คว่า ข้อมูลตรงมัย ในที่นี้คือ ต้องมีค่า = 1
onAcept เมื่อยอมรับแล้วก็ + ค่าให้กับ count
            DragTarget(
              builder: (BuildContext context, List<int> candidateData,
                  List<dynamic> rejectedData) {
                return buildBox("$count", Colors.green[200]);
              },
              onWillAccept: (int data) {
                return data == 1;  // accept when data = 1 only.
              },
              onAccept: (int data) {
                count += data;
              },
            )
ลองรัน
ที่เหลือ listener ของ DragTarget อีกอันคือ
onLeave = เมื่อลาก widget ออกจาก Target
            DragTarget(
              builder: (BuildContext context, List<int> candidateData,
                  List<dynamic> rejectedData) {
                print("candidateData = " + candidateData.toString()+" , rejectedData = " + rejectedData.toString());
                return buildBox("$count", Colors.green[200]);
              },
              onWillAccept: (data) {
                print("onWillAccept");
                return data == 1; // accept when data = 1 only.
              },
              onAccept: (data) {
                print("onAccept");
                count += data;
              },
              onLeave: (data) {
                print("onLeave");
              },
            )
ลองดู cycle ของ DragTarget
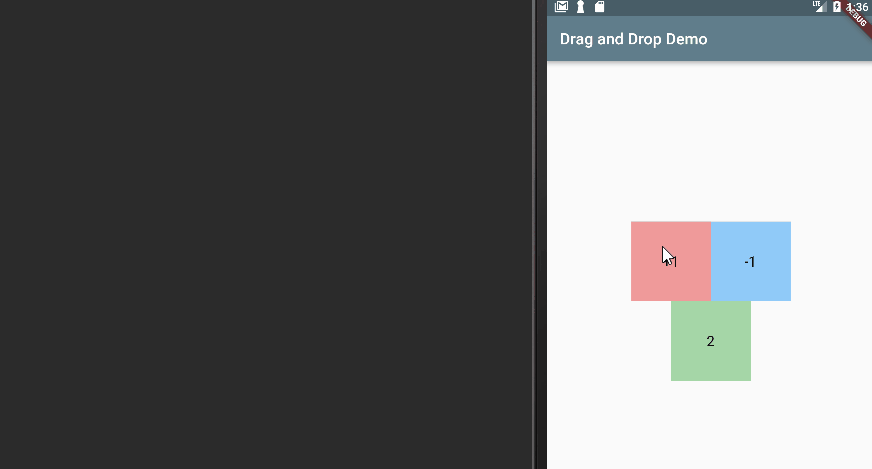
ทีนี้ลองทำ Draggble เพิ่มอีกตัว คือ data มีค่า -1
 @override
  Widget build(BuildContext context) {
    return Scaffold(
      appBar: AppBar(
        title: Text(widget.title),
      ),
      body: Center(
        child: Column(
          mainAxisAlignment: MainAxisAlignment.center,
          children: <Widget>[
            Row(mainAxisAlignment: MainAxisAlignment.center, children: <Widget>[
              Draggable(
                child: buildBox("+1", Colors.red[200]),
                feedback: buildBox("+1", Colors.red[200]),
                childWhenDragging: buildBox("+1", Colors.grey[300]),
                data: 1,
              ),
              Draggable(
                child: buildBox("-1", Colors.blue[200]),
                feedback: buildBox("-1", Colors.blue[200]),
                childWhenDragging: buildBox("-1", Colors.blue[300]),
                data: -1,
              )
            ]),
            DragTarget(
              builder: (BuildContext context, List<int> candidateData,
                  List<dynamic> rejectedData) {
                return buildBox("$count", Colors.green[200]);
              },
              onWillAccept: (data) {
                print("onWillAccept");
                return data == 1 || data == -1; // accept when data = 1 only.
              },
              onAccept: (data) {
                print("onAccept");
                count += data;
              },
              onLeave: (data) {
                print("onLeave");
              },
            )
          ],
        ),
      ),
    );
  }

สุดท้ายลองมาดู ภาพรวม cycle ของ Draggable + DragTarget ครับ
จบแล้ว
บล็อกนี้เป็นพื้นฐานการทำ Draggable ใน Flutter ครับ จะเห็นว่าทำ draggable ทำได้ง่ายมาก หวังว่าบล็อกนี้จะมีประโชน์ครับ (:
โค้ดทั้งหมดอยู่ที่ Gist Github
https://gist.github.com/benznest/a784012f046efed6ee214481f0fb7def
 Previous Post
 Next Post