รู้จัก Navigator 2.0 ใน Flutter

สวัสดีผู้อ่านทุกท่านครับ ในบล็อกนี้ผมจะพามาลองเล่น Navigator 2.0 ซึ่งเป็น API ที่เพิ่มเข้ามาเกี่ยวกับ Navigation and Routing โดย Navigator 2 นี้ แตกต่างจากเดิมเป็นอย่างมาก เพราะเปลี่ยนแนวคิดไปอย่างสิ้นเชิงเพื่อรองรับ Flutter Web จะเป็นอย่างไร บล็อกนี้จะอธิบายให้อ่านกัน
โดยในบล็อกนี้ผมจะใช้ตัวอย่างใน Flutter Web เพื่อเป็นตัวอย่างการแสดง routing และจะใช้ dart null-safety นะ
ทบทวน Navigator 1
ก่อนจะไป Navigator 2 เรามาทบทวนพื้นฐานการใช้งาน Navigator 1 ใน Flutter กันก่อน แน่นอนว่าเพื่อนๆที่เขียน Flutter เป็นประจำกันน่าจะคุ้นเคยกันดี เพราะเป็นเรื่องที่ทุกแอปต้องใช้งานเหมือนกัน
เริ่มจาก มีแอปง่ายๆ 2 หน้า คือหน้า Home จากนั้นกดปุ่มก็จะเปลี่ยนไปหน้า Detail
ซึ่งโดยปกติ MaterialApp ของเราก็จะเขียนง่ายๆแบบนี้คือ
// main.dart
MaterialApp(
    ...
    home : HomeScreen()
    )
จากนั้นในหน้า Home เมื่อเราต้องการไปหน้า Detail เราก็ใช้คำสั่ง Navigator.push
// home_screen.dart
Navigator.push(context, MaterialPageRoute(builder: (context) => DetailScreen()));
และเมื่อต้องการกลับหน้า Home ก็ใช้คำสั่ง Navigator.pop
// detail_sreen.dart
Navigator.pop(context);
เมื่อรันใน Web จะได้แบบนี้
ซึ่งจะเห็นว่าตัว URL ตรง address bar ไม่ได้เปลี่ยนแปลง ใช่แล้วครับ เพราะมันเป็น Navigation แบบไม่ระบุชื่อนั่นเอง ซึ่งวิธีการนี้ไม่สอดคล้องกับระบบ URL ที่เราคุ้นเคยใน website ดังนั้นหากจะพัฒนา web การใช้ Navigation แบบไม่ระบุชื่อเพื่อเปลี่ยนหน้าจะไม่ work เลย นอกจากจะใช้กับพวก dialog หรือ popup เพราะมันยังอยู่หน้าเดิม
Routing แบบพื้นฐาน
มาทบทวนกันต่อกับ routing แบบง่ายๆ ถ้าเราต้องการเปลี่ยนหน้าแต่ขณะเดียวกันก็ยังรองรับระบบ URL แบบใน web เราก็ยังสามารถใช้ Navigator 1 ได้นะ
วิธีการคือ กำหนด Routes และ initialRoute ใน App ของเรา
MaterialApp(
      ...
      routes: {
        '/': (context) => HomeScreen(),
        '/details': (context) => DetailScreen(),
      },
      initialRoute: "/",

    );
จากนั้นเรา ก็ใช้คำสั่ง Navigator.pushNamed เพื่อให้เปลี่ยนหน้าไปยัง route
Navigator.pushNamed( context, '/details' );ผลที่ได้คือ เราจะได้ web ที่ URL เปลี่ยนตามการ routing แล้ว
Routing แบบมี parameter
การกำหนด route ไว้ล่วงหน้าจะไม่รองรับ route ที่มี parameter ใน path เช่น /details/:id แต่ว่า Flutter ก็รองรับ โดยการ implement ที่ onGenerateRoute()
โดยตัวอย่างนี้ ผมจะทำ route ที่ชื่อว่า /details/:id จากนั้นจะเปิดหน้า Detail พร้อมกับส่งค่า id ไปแสดงในหน้า Detail
MaterialApp(
initialRoute: "/",
onGenerateRoute: ((settings) {
String path = settings.name ?? "";
if (path == "/") {
return MaterialPageRoute(builder: (_) => HomeScreen());
}
// handle path '/details/:id'
Uri? uri = Uri.tryParse(path);
if (uri != null) {
if (uri.pathSegments.length == 2 &&
uri.pathSegments[0] == 'details') {
var id = uri.pathSegments[1];
return MaterialPageRoute(
builder: (context) => DetailScreen(id: id));
}
}
return MaterialPageRoute(builder: (_) => ErrorPathScreen());
}),
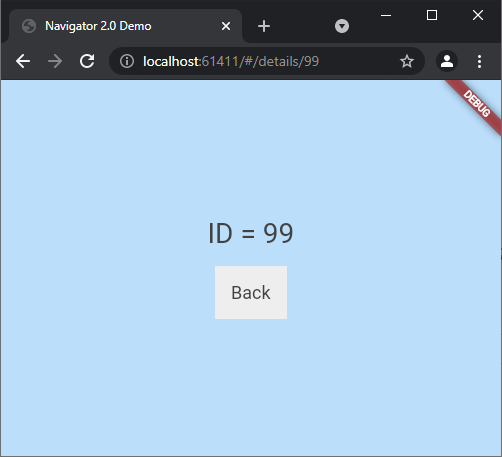
);ในหน้า Detail จะแสดงแค่ค่า id ที่รับมา และปุ่มสำหรับกดกลับ
import 'package:flutter/material.dart';

class DetailScreen extends StatefulWidget {
  final String id;

  DetailScreen({required this.id});

  @override
  _DetailScreenState createState() => _DetailScreenState();
}

class _DetailScreenState extends State<DetailScreen> {
  @override
  Widget build(BuildContext context) {
    return Scaffold(
      body: Container(
          color: Colors.blue[100],
          child: Center(
            child: Column(
              mainAxisSize: MainAxisSize.min,
              children: [
                Text(
                  'ID = ${widget.id}',
                  style: TextStyle(color: Colors.grey[800], fontSize: 28),
                ),
                ...
              ],
            ),
          )),
    );
  }
}
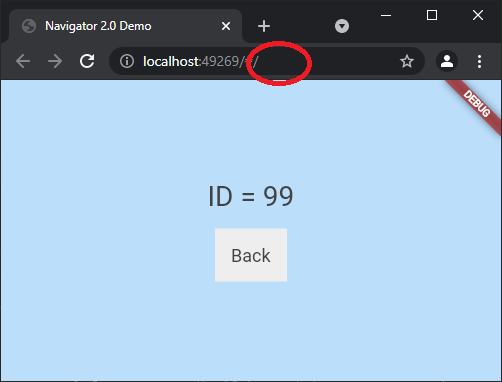
จากนั้นจำลองการเรียก route สมมุติไปที่ /details/99
              Navigator.pushNamed(
                context,
                '/details/99',
              );
เมื่อลองกดปุ่ม จะเปิดหน้า Detail พร้อมกับแสดงค่า 99 ขึ้นมา แต่ว่า url ไม่เปลี่ยน path ตามที่เราต้องการ
วิธีแก้ คือ เราต้องไปกำหนด name ให้กับ MaterialPageRoute ด้วย ในทุกๆ path
             ...
             return MaterialPageRoute(
                  settings: RouteSettings(name: path),
                  builder: (context) => DetailScreen(id: id))
เรียบร้อยได้แล้ว url เปลี่ยนตามต้องการเมื่อไปที่หน้า Detail แล้ว
ลองเข้าถึงจาก url โดยตรง ก็สามารถเข้าได้เช่นกัน เช่น พิมพ์ url /details/99 ก็จะไปที่หน้านั้นโดยตรงเลย
การทำ Routing โดยการใช้ Navigator 1 เสร็จสมบูรณ์
Source code ตัวอย่างในบล็อกนี้ของ Navigator 1
https://gist.github.com/benznest/ff061c88aba68ef90af948e24f595d76
เริ่มต้น Navigator 2.0
ทบทวน Navigator 1 กันมาแล้ว จะเห็นว่า มันไม่ได้มีปัญหาอะไร มันใช้งานได้ดี แต่ว่าทำไมต้องมี Navigator 2.0 กันล่ะ
ข้อจำกัดของ Navigator 1
Navigator 1 นั้น ออกแบบมาเพื่อการทำ routing พื้นฐานใน mobile app เป็นหลัก โดยใช้หลักการ Stack ที่มี push() , pop() แต่เมื่อ Flutter ขยายการรองรับ Platform มายัง Web ที่มีระบบ URL , link และการ routing ที่ซับซ้อนขึ้น จำเป็นต้องสามารถแก้ไข ข้อมูล, ลำดับใน Stack ได้ ทำให้ Navigator API เดิมเกิดข้อจำกัดขึ้น อีกทั้ง Navigator เดิมนั้นไม่สามารถ rebuild ได้ ไม่สามารถเปลี่ยน route ได้เหมือนกับที่ rebuild widget ทำให้เราไม่สามารถเปลี่ยน route ใน Navigator แล้วทำการ rebuild ตามต้องการได้
Navigator 2 จึงมี API เพื่อช่วยให้สามารถจัดการ routing ได้อย่างอิสระ สามารถใช้งาน Navigator ได้แบบ widget ที่สามารถ rebuild ได้ตามต้องการ ไม่เพียงแค่นั้น เราสามารถทำ Nested navigator ได้ หรือพูดง่ายๆก็คือ สามารถมี routing ของตัวเองที่เป็นอิสระในแต่ละ Page เลยก็ทำได้
Imperative vs Declarative
Navigator 1 นั้นใช้วิธีการเขียนโปรแกรมแบบ Imperative Style แต่ในขณะที่ Navigator 2 นั้นใช้การเขียนโปรแกรมแบบ Declarative Style ทั้งสองแตกต่างกันพอสมควร แต่เราสามารถใช้งาน Navigator 1 และ 2 ร่วมกันได้ เพราะ Navigator 2 เป็นเพียง API ที่เพิ่มเติมมานั่นเอง
Imperative Style คือ การเขียนโปรแกรมที่ให้ความสำคัญกับขั้นตอนการทำงาน จะเห็นว่าการเปลี่ยนหน้าจอไปหน้าที่สองนั้นเราจะต้องเขียนขั้นตอนโดยชัดเจน
Declarative Style คือ การเขียนโปรแกรมที่ให้ความสำคัญกับสิ่งที่ต้องการ เราแค่บอกว่าเราต้องการอะไร
เตรียมข้อมูล
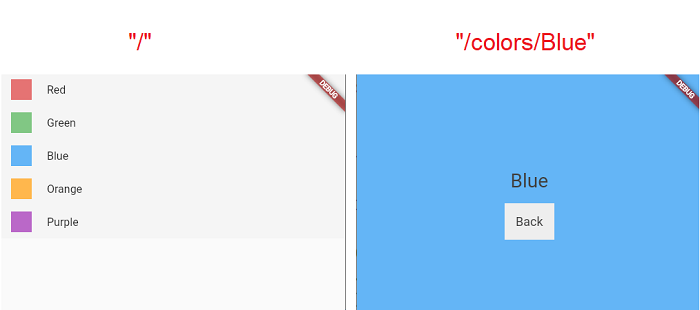
ผมจะทำแอปง่ายๆ เหมือนเดิม คือ มีหน้าหลักเป็นรายการสำหรับเลือกสี จากนั้นเมื่อเรากดเลือกจะไปที่หน้ารายละเอียดและส่งค่าไป โดย path จะง่ายๆดังนี้
home : “/”
page_color_detail : “/colors/:title”
ก่อนอื่นสร้าง class สำหรับข้อมูล ในที่นี้ของผมคือ ข้อมูลว่าสีอะไร ชื่ออะไร ขอตั้งชื่อง่ายๆว่า ColorItem
// color_item.dart
import 'package:flutter/material.dart';

class ColorItem {
  String title;
  Color color;

  ColorItem({required this.color, required this.title});
}
จากนั้น เตรียมข้อมูลจำลอง (ฐานข้อมูล) ว่ามีสีอะไรบ้างที่จะแสดงในลิส ซึ่งจะมี method สำหรับ query ข้อมูลจาก parameter ด้วย
ในที่นี้ของผมก็จะใช้ชื่อสีแทน id นะ
// color_data.dart
import 'package:flutter/material.dart';
import 'color_item.dart';

class ColorData{
 static List<ColorItem> colors = [
    ColorItem(color: Colors.red[300]!, title: "Red"),
    ColorItem(color: Colors.green[300]!, title: "Green"),
    ColorItem(color: Colors.blue[300]!, title: "Blue"),
    ColorItem(color: Colors.orange[300]!, title: "Orange"),
    ColorItem(color: Colors.purple[300]!, title: "Purple"),
  ];

 static ColorItem? getByTitle(String title){
   List<ColorItem> list = colors.where((e) => e.title == title).toList();
   if(list.isNotEmpty){
     return list.first;
   }
   return null;
 }
}
App State
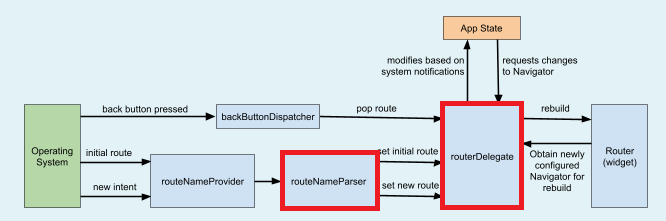
มาดูแผนภาพจำลอง Widget Tree สำหรับ Navigator 2.0 ซึ่งหลักๆจะเพิ่มส่วน Router ขึ้นมาคั้นระหว่าง App กับ Navigator เพื่อให้เราสามารถ rebuild Navigator ได้ โดยตัว Router นี้ก็จะต้องมี State นึงที่ถือข้อมูลเอาไว้ และจะสามารถ notify เพื่อ rebuild Navigator เมื่อข้อมูลอัพเดทได้
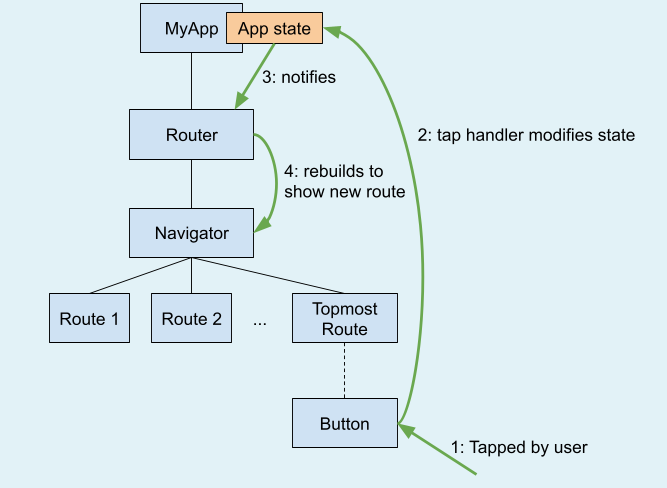
ดังนั้น เราต้องมี App State ของเรา โดย App State จะ extends ChangeNotifier
และข้อมูลที่ State นี้มี ในกรณีนี้ของผมคือ ColorItem นั่นเอง
// my_app_state.dart
import 'package:flutter/material.dart';
import 'color_item.dart';

class MyAppState extends ChangeNotifier {
  bool isError;
  ColorItem? _color;

  ColorItem? get color => _color;

  MyAppState({this.isError = false});

  set color(ColorItem? value) {
    if (value == _color) {
      return;
    }
    _color = value;
    notifyListeners();
  }
}
Color List Screen
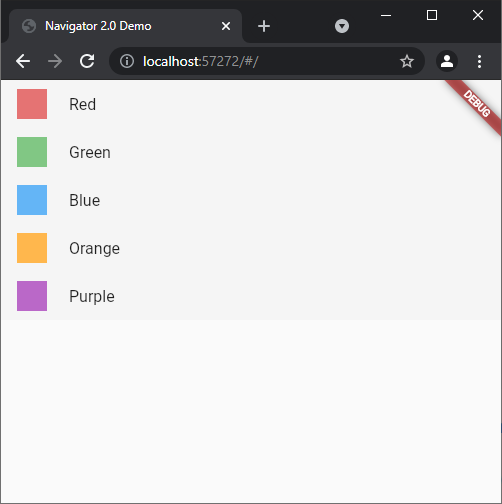
ต่อมา ทำหน้า Home ที่จะมีรายการสำหรับเลือกสี ในที่นี้ผมขอใช้ชื่อว่า ColorListScreen
ในหน้านี้ทำเป็น ListView ง่ายๆ และนำข้อมูลจาก ColorData (ข้อมูลจำลองที่เตรียมไว้) มาแสดง ใน ListView
แล้วก็มี callback Function ที่เตรียมไว้สำหรับ เมื่อกดเลือกสีแล้วให้ไปหน้า Detail
// color_list_screen.dart
import 'package:flutter/material.dart';
import 'color_data.dart';
import 'color_item.dart';

class ColorListScreen extends StatefulWidget {
  final Function(ColorItem)? onColorItemSelected;

  ColorListScreen({Key? key, this.onColorItemSelected}) : super(key: key);

  @override
  _ColorListScreenState createState() => _ColoListScreenState();
}

class _ColorListScreenState extends State<ColorListScreen> {

  @override
  Widget build(BuildContext context) {
    return Scaffold(
        body: ListView.builder(
            itemCount: ColorData.colors.length,
            itemBuilder: (context, index) {
              return ListTile(
                leading: Container(
                  width: 30,
                  height: 30,
                  color:  ColorData.colors[index].color,
                ),
                tileColor: Colors.grey[100],
                title: Text( ColorData.colors[index].title),
                onTap: () {
                  widget.onColorItemSelected?.call( ColorData.colors[index]);
                },
              );
            }));
  }
}
จากนั้นลองแสดงผล Color List Screen โดยเพิ่ม widget ColoListScreen ใน App ของเรา
class MyAppState extends State<MyApp> {

  @override
  Widget build(BuildContext context) {
    return MaterialApp(
        home: ColoListScreen());
  }
}
จะได้แบบนี้
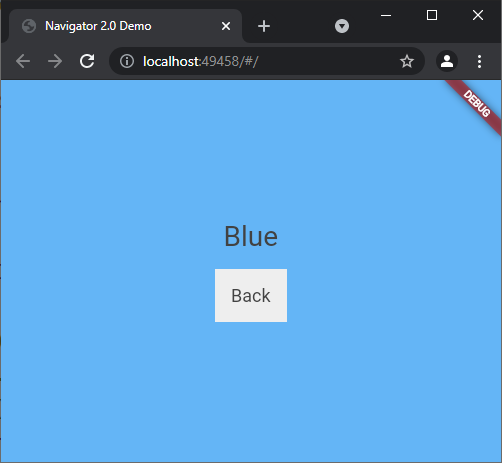
Color Detail Screen
ส่วน Detail สำหรับแสดงสี จะทำง่ายๆโดยการนำสีนั้นมาแสดงเป็นพื้นหลัง แสดงชื่อตรงกลาง และมีปุ่มสำหรับกดกลับ
// color_detail.dart
import 'package:flutter/material.dart';
import 'color_item.dart';

class ColorDetailScreen extends StatefulWidget {
  final ColorItem colorItem;

  ColorDetailScreen({required this.colorItem});

  @override
  _ColorDetailScreenState createState() => _ColorDetailScreenState();
}

class _ColorDetailScreenState extends State<ColorDetailScreen> {
  @override
  Widget build(BuildContext context) {
    return Scaffold(
      body: Container(
          color: widget.colorItem.color,
          child: Center(
            child: Column(
              mainAxisSize: MainAxisSize.min,
              children: [
                Text(
                  '${widget.colorItem.title}',
                  style: TextStyle(color: Colors.grey[800], fontSize: 28),
                ),
                SizedBox(
                  height: 16,
                ),
                GestureDetector(
                  onTap: () {
                    Navigator.pop(context);
                  },
                  child: Container(
                    padding: EdgeInsets.all(16),
                    color: Colors.grey[200],
                    child: Text(
                      'Back',
                      style: TextStyle(color: Colors.grey[800], fontSize: 18),
                    ),
                  ),
                ),
              ],
            ),
          )),
    );
  }
}
จะได้หน้าจอประมาณนี้
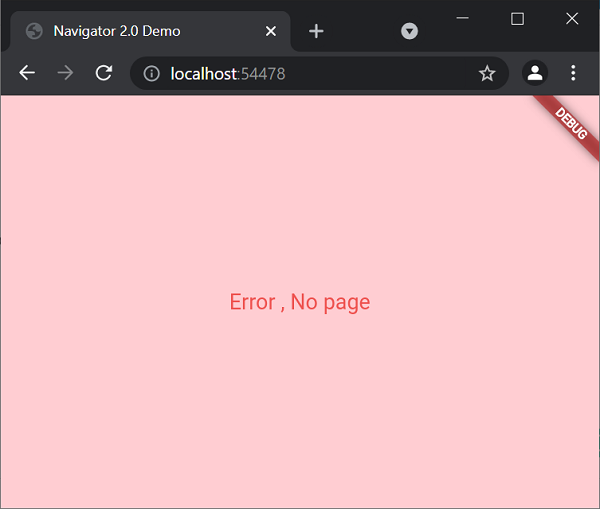
Error Page
ต้องมีหน้าจอสำหรับแสดง error หรือกรณี user ใส่ url ผิดด้วย โดยผมทำหน้าง่ายๆประมาณนี้
import 'package:flutter/material.dart';

class ErrorPathScreen extends StatelessWidget {
  @override
  Widget build(BuildContext context) {
    return Scaffold(
       body: Container(
        color: Colors.red[100],
        child: Center(
          child: Text(
            'Error, No page',
            style: TextStyle(color: Colors.red[400], fontSize: 18),
          ),
        ),
      ),
    );
  }
}
Routes
หลังจากเตรียมส่วน UI เสร็จแล้ว เราจะมาเจาะลึกที่ส่วน Router กัน
โดยตัว Router จะมี 3 ส่วนย่อย คือ
- Route Information Provider ส่วนนี้คือ ส่วนที่จะรับ route มาจาก OS แล้วส่งต่อ ซึ่งตัว provider นี้ เราไม่ต้อง implement เพราะ Flutter มี default ให้ แต่ก็สามารถ custom เองได้
- Route Information Parser ส่วนที่จะรับค่าจาก URL แล้วนำมาแปลงเป็นข้อมูล หรือแปลงข้อมูล เป็น URL
- Router Delegate ส่วนที่จะนำข้อมูลมาเชื่อมกับ widget เพื่อแสดงผลกับ Navigator
สรุปได้ว่า ส่วน Router เราได้เตรียม App State ไว้แล้ว ดังนั้นจะเหลือ 2 ส่วนที่ต้องทำ คือ Parser กับ Delegate (ขอเรียกสั้นๆ)
ซึ่งเมื่อเราลองเรียก MaterialApp.router() จะเห็นว่า มี 2 parameter ที่ required ซึ่งก็คือ Parser กับ Delegate นั่นเอง
MaterialApp.router(
        routeInformationParser: ...
        routerDelegate: ...
แต่ก่อนที่เราจะไป implement ส่วน Parser กับ Delegate เราจะต้องมีตัวที่กำหนดข้อมูล Route ของเรา โดยของผมมีง่ายๆ 3 ตัว คือ home, detail, error และสร้างเป็น enum ใน class MyRoute ไว้ง่ายๆแบบนี้
// my_routes.dart
enum MyRoutes { HOME, DETAIL, ERROR }
Configuration
ต่อมา คือ class ที่จะเก็บข้อมูลของเราว่าตอนนี้เราอยู่ที่ route ไหน มีข้อมูลแนบที่แปลงมาจาก URL ซึ่งจะถูกแปลงจาก Route Infomation Parser ส่งไปที่ Router Delegate โดย Flutter เรียกสิ่งนี้ว่า Configuration
// my_configuration.dart
import 'color_item.dart';
import 'my_routes.dart';

class MyConfiguration {
  late MyRoutes route;
  late Map<String, dynamic> arguments;

  MyConfiguration(
      {this.route = MyRoutes.HOME, Map<String, dynamic>? arguments}) {
    this.arguments = arguments ?? {};
  }

  MyConfiguration.home() {
    route = MyRoutes.HOME;
    arguments = {};
  }

  MyConfiguration.detail({required ColorItem colorItem}) {
    route = MyRoutes.DETAIL;
    arguments = {"color": colorItem};
  }

  MyConfiguration.unknown() {
    route = MyRoutes.ERROR;
    arguments = {};
  }

  bool get isKnown {
    return route != MyRoutes.ERROR;
  }
}
Route Information Parser
มาถึงส่วนตัวหลักของเรา เราจะเริ่ม implement ส่วน Parser โดยเจ้าตัวนี้จะมี 2 หน้าที่คือ แปลง ค่า URL มาเป็น Configuration และก็แปลงข้อมูลจาก Configuration ไปเป็น URL ดังนั้น class Parser ของเราจะมี Configuration เป็น Generic Type และจะมี 2 method ที่สำคัญคือ parseRouteInformation() กับ restoreRouteInformation()
parseRouteInformation จะแปลงค่า RouteInformation มาเป็น Configuration
restoreRouteInformation จะแปลง Configuration กลับเป็น RouteInformation
import 'package:flutter/material.dart';
import 'my_configuration.dart';

class MyRouteInformationParser extends RouteInformationParser<MyConfiguration > {
  @override
  Future<MyConfiguration > parseRouteInformation(
      RouteInformation routeInformation) async {
    //
  }

  @override
  RouteInformation? restoreRouteInformation(MyConfiguration route) {
    //
  }
}
เริ่มจากส่วน parseRouteInformation() เราจะแปลง RouteInformation มาเป็น Configuration ของเรา
โดย routeInformation.location จะเป็นค่า string URL ที่ถูกส่งเข้ามา
เช่น “/” ก็เป็นหน้า home
ถ้า “colors/xxx” ก็เป็นหน้า detail
กรณีอื่นๆ ให้เป็นหน้า error
// my_route_information_parser.dart
class MyRouteInformationParser extends RouteInformationParser<MyConfiguration > {
  @override
  Future<MyConfiguration> parseRouteInformation(
      RouteInformation routeInformation) async {

    var uri = Uri.parse(routeInformation.location!);

    if (uri.pathSegments.isEmpty) {
      return MyConfiguration.home();
    } else if (uri.pathSegments.length == 2 &&
        uri.pathSegments[0] == "colors") {
      ColorItem? colorItem = ColorData.getByTitle(uri.pathSegments[1]);
      if (colorItem != null) {
        return MyConfiguration(
            route: MyRoutes.DETAIL, arguments: {"color": colorItem});
      }
    }

    return MyConfiguration.unknown();
  }

  ...
}
ส่วน restoreRouteInformation ก็จะทำกลับกัน คือแปลง Configuration กลับเป็น RouteInformation
class MyRouteInformationParser extends RouteInformationParser<MyConfiguration> {
  ...

  @override
  RouteInformation? restoreRouteInformation(MyConfiguration route) {
    if (configuration.isKnown) {
      if (configuration.route == MyRoutes.HOME) {
        return RouteInformation(location: "/");
      }
      if (configuration.route == MyRoutes.DETAIL) {
        if (configuration.arguments.containsKey("color")) {
          ColorItem? colorItem = configuration.arguments["color"];
          if (colorItem != null) {
            return RouteInformation(
                location: "/colors/${colorItem.title}");
          }
        }
      }
    }
    return RouteInformation(location: "/error");
  }
}
Router Delegate
ส่วนสำคัญอีกส่วนนึงคือ Router Delegate โดย class ของเราจะ extends RouterDelegate<T> และมี Configuration เป็น generic type สิ่งที่ delegate ทำ ก็คือการ build widget ออกมาตาม configuration
ซึ่งจำเป็นต้องใช้ตัวช่วย 2 class คือ ChangeNotifier และ PopNavigatorRouterDelegateMixin
ChangeNotifier เพื่อให้เราสามารถ rebuild ใหม่ได้ เมื่อ State เปลี่ยนแปลง (Stateful)
PopNavigatorRouterDelegateMixin ช่วย implement พวก routing ของปุ่ม back
// my_router_delegate.dart
class MyRouterDelegate extends RouterDelegate<MyConfiguration>
    with ChangeNotifier, PopNavigatorRouterDelegateMixin<MyConfiguration> {

  MyRouterDelegate() {
    //
  }

  @override
  GlobalKey<NavigatorState>? get navigatorKey => GlobalKey<NavigatorState>();

  @override
  MyConfiguration? get currentConfiguration {
    //
  }

  @override
  Widget build(BuildContext context) {
    //
  }

  @override
  Future<void> setNewRoutePath(MyConfiguration configuration) async {
    //
}
ก่อนอื่นกำหนด App State ของเราใน Delegate
ใน constructor เพิ่ม state.addListener(notifyListeners) เพื่อให้เมื่อ App State มีการ update ตัว delegate จะถูก update ด้วย
class MyRouterDelegate extends RouterDelegate<MyConfiguration>
    with ChangeNotifier, PopNavigatorRouterDelegateMixin<MyConfiguration> {
  late MyAppState state;

  MyRouterDelegate() {
    this.state = MyAppState();
    this.state.addListener(notifyListeners);
  }

  @override
  void dispose() {
    super.dispose();
    state.removeListener(notifyListeners);
  }
...
}
มาที่ method ที่เราคุ้นชื่อกันดี คือ build() หน้าที่ของมัน คือการ return Navigator ที่มี page ตาม App State
ซึ่งใน Navigator 2.0 มีการเพิ่ม Page เข้ามา ซึ่งตัว MaterialPage ก็คือ MaterialPageRoute ที่เราใช้ใน Navigator 1 นั่นเอง ซึ่งจะช่วยทำ Transition ตาม Material Design
   @override
  Widget build(BuildContext context) {
    return Navigator(
      onPopPage: (route, result) {

        return _handlePopPage(route, result);
      },
      pages: [
        MaterialPage(
            key: ValueKey('page_home'),
            child: ColoListScreen(
              onColorItemSelected: (colorItem) {
                state.color = colorItem;
              },
            )),
        if (state.color != null)
          MaterialPage(
              key: ValueKey('page_color_detail'),
              child: ColorDetailScreen(
                colorItem: state.color!,
              )),
        if (state.isError)
          MaterialPage(key: ValueKey('page_error'), child: ErrorPathScreen()),
      ],
    );
  }
ตัว Navigator widget จำเป็นต้อง implement onPopPage() ด้วย
โดยให้ pop() เมื่อไม่ใช่หน้าแรก
และแก้ไขค่าใน State กลับคืนให้ถูกต้อง เช่น เมื่อกลับจากหน้ารายละเอียดสี ให้ปรับสีเป็น null
  bool _handlePopPage(Route route, result) {
    Page page = route.settings as Page;
    if (page.key == ValueKey("page_home")) {
      return false;
    }

    route.didPop(result);

    if (page.key == ValueKey("page_color_detail")) {
      state.color = null;
      return true;
    }
    if (page.key == ValueKey("page_error")) {
      state.color = null;
      return true;
    }
    return false;
  }
ต่อมา ที่ getter ที่ชื่อว่า currentConfiguration ให้เรา return ค่า Configuration ตามค่าใน App State
โดย currentConfiguration จะถูกเรียกหลังจาก build widget แล้ว จากนั้น Configuration จะถูกส่งไปที่ restoreRouteInformation ใน Route Parser เพื่ออัพเดท URL ตาม Configuration นั่นเอง
  @override
  MyConfiguration? get currentConfiguration {
    if (state.isError) {
      return MyConfiguration.unknown();
    } else {
      if (state.color != null) {
        return MyConfiguration.detail(colorItem: state.color!);
      }
      return MyConfiguration.home();
    }
  }
ส่วนสุดท้ายใน delegate คือ setNewRoutePath() โดย method นี้จะถูกเรียกเมื่อมีการเข้าถึง route โดยตรง เช่น พิมพ์ URL จาก address bar ซึ่ง setNewRoutePath จะถูกเรียกหลังจาก Parser แปลง Configuration และส่งมาให้ ดังนั้น หน้าที่ของเรา คือ การแปลง Configuration เป็น App State เพื่อให้ Delegate สามารถ build widget ตาม App State นั่นเอง
  @override
  Future<void> setNewRoutePath(MyConfiguration configuration) async {

    if (configuration.isKnown) {
      if(configuration.route == MyRoutes.HOME){
        state.isError = false;
        state.color = null;
        return;
      }
      else if(configuration.route == MyRoutes.DETAIL) {
        Map<String, dynamic> arguments = configuration.arguments;
        if (arguments.containsKey("color")) {
          var colorItem = arguments["color"];
          if (colorItem != null) {
            state.isError = false;
            state.color = colorItem;
            return;
          }
        }
      }
    }

    state.isError = true;
    state.color = null;
  }
และท้ายสุด อย่าลืมกำหนด parser กับ delegate ให้กับ MaterialApp นะ
...
class MyAppState extends State<MyApp> {

  @override
  Widget build(BuildContext context) {
    return MaterialApp.router(
        routeInformationParser: MyRouteInformationParser(),
        routerDelegate: MyRouterDelegate(),
    );
  }
}
ลองรัน ดูผลงาน routing
หรือจะเข้าผ่าน URL โดยตรงก็ต้องทำได้เหมือนกัน
Custom Page
เสริมอีกนิด สำหรับการทำ Custom Page ในกรณีที่เราอยากทำ Transition ของ Route เอง เราสามารถกำหนด Page ได้เอง แทนที่จะใช้ MaterialPage
เช่น การทำ Page แบบ Transition slide บน-ล่าง แบบนี้
// my_page.dart
import 'package:flutter/widgets.dart';

class MyPage extends Page {
  final Widget child;

  MyPage({LocalKey? key, required this.child}) : super(key: key);

  @override
  Route createRoute(BuildContext context) {
    return PageRouteBuilder(
      settings: this,
      transitionDuration: Duration(seconds: 1),
      reverseTransitionDuration: Duration(seconds: 1),
      pageBuilder: (context, animation, secondaryAnimation) => child,
      transitionsBuilder: (context, animation, secondaryAnimation, child) {
        var begin = Offset(0.0, 1.0);
        var end = Offset.zero;
        var tween = Tween(begin: begin, end: end);
        var offsetAnimation = animation.drive(tween);

        return SlideTransition(
          position: offsetAnimation,
          child: child,
        );
      },
    );
  }
}

อ่านเพิ่มเติมเรื่อง Route Transition
จบแล้ว
สามารถดู Source code ทั้งหมดได้ที่ Github ของผมนะครับ
https://github.com/benznest/flutter_learn_navigator_2
สรุป Navigator 2 แตกต่างจาก Navigator 1 ค่อนข้างมาก เรียกว่าเปลี่ยน Programming paradigm ไปเลย แต่ว่ายังคงสามารถใช้งานร่วมกันได้ และการใช้งาน imperative แบบเดิมยังคงจำเป็นอยู่ เช่น กรณี dialog , popup ต่างๆ โดย Flutter บอกว่าการมาของ Navigator 2 จะช่วยให้รองรับการทำ routing ในเว็บได้สมบูรณ์แบบ
แต่ว่าก็มี developer ออกมาแสดงความเห็นว่าพวกเขาผิดหวังกับ Navigator 2 เพราะมันใช้ code ที่ฟุ่มเฟือยและยุ่งยากมากเกินไป แถมยังซับซ้อนเกินจำเป็นอีกด้วย
อ่านได้ที่ issue นี้
https://github.com/flutter/flutter/issues/69315
อย่างไร ก็ตาม Flutter แนะนำว่าในอนาคตหากเริ่มต้นโปรเจค ใน Flutter Web ทาง Flutter แนะนำว่า ควรจะเริ่มใช้งาน Navigator 2 เป็นหลักแทน เพราะจะได้ทั้งประสิทธิภาพและการรองรับความสามารถใหม่ๆเกี่ยวกับ Routing ได้ในอนาคต
Credit
https://docs.google.com/document/d/1Q0jx0l4-xymph9O6zLaOY4d_f7YFpNWX_eGbzYxr9wY
https://medium.com/flutter/learning-flutters-new-navigation-and-routing-system-7c9068155ade
 Previous Post
 Next Post