Flutter Project : สร้างเกม 2048 ด้วย Flutter
สวัสดีครับ บล็อกนี้จะบันทึกการทำเกม 2048 ด้วย Flutter ครับ เกมนี้สนุกนะ เล่นฆ่าเวลาได้ เกมนี้เคยฮิตกันเมื่อ 3-4 ปีที่แล้ว ตอนช่วงผมกำลังเรียนมหาวิทยาลัย ตอนนั้นชมรมคอมพิวเตอร์ที่ผมอยู่ก็จัดแข่งเกมนี้ให้กับน้องๆในงานสัปดาห์วิทยาศาสตร์ หากใครไม่รู้จักก็สามารถเล่นได้ที่ http://2048game.com/ ครับ
ก่อนหน้านี้ผมได้เขียนบันทึกเกี่ยวกับการทำเกม Tertis ไปครับ ใครสนใจตามไปอ่านได้
เริ่มต้น
พร้อมแล้วก็ New Flutter Pproject
import 'package:flutter/material.dart';

void main() => runApp(MyApp());

class MyApp extends StatelessWidget {
  // This widget is the root of your application.
  @override
  Widget build(BuildContext context) {
    return MaterialApp(
      title: '2048',
      theme: ThemeData(
        primarySwatch: Colors.blue,
      ),
      home: MyHomePage(title: '2048'),
    );
  }
}

class MyHomePage extends StatefulWidget {
  MyHomePage({Key key, this.title}) : super(key: key);

  final String title;

  @override
  _MyHomePageState createState() => _MyHomePageState();
}

class _MyHomePageState extends State<MyHomePage> {
  @override
  Widget build(BuildContext context) {
    return Scaffold(
      body: Container(
          color: Color(0xfffbf9f3),
          child: Center(
            child: Column(
              mainAxisAlignment: MainAxisAlignment.center,
              children: <Widget>[
                Text(
                  '2048 Game',style: TextStyle(fontSize: 32,fontWeight: FontWeight.bold,color: Color(0xff888179)),
                ),
                Text(
                  'using Flutter',style: TextStyle(fontSize: 18,color: Color(0xff888179))
                ),
              ],
            ),
          )),
    );
  }
}
สร้างตาราง
เกมนี้เป็นการเล่นบนตาราง 4×4 ครับ
กำหนดขนาดบล็อกให้แต่ละช่องในตาราง
const double BLOCK_SIZE = 80;
วาดตาราง 4×4
  @override
  Widget build(BuildContext context) {
    return Scaffold(
      body: Container(
          color: Color(0xfffbf9f3),
          child: Center(
            child: Container(
                decoration: BoxDecoration(
                    color: Color(0xffbaad9e),
                    borderRadius: BorderRadius.circular(8),
                    border: Border.all(width: 6, color: Color(0xffbaad9e))),
                child: Column(
                    mainAxisSize: MainAxisSize.min,
                    mainAxisAlignment: MainAxisAlignment.center,
                    children: <Widget>[
                      buildRow(),
                      buildRow(),
                      buildRow(),
                      buildRow(),
                    ])),
          )),
    );
  }

  Row buildRow() {
    return Row(mainAxisSize: MainAxisSize.min, children: <Widget>[
      buildBlockUnit(),
      buildBlockUnit(),
      buildBlockUnit(),
      buildBlockUnit(),
    ]);
  }

  Container buildBlockUnit() {
    return Container(
      decoration: BoxDecoration(
        color: Color(0xffcbc0b1),
        borderRadius: BorderRadius.circular(4),
      ),
      width: BLOCK_SIZE,
      height: BLOCK_SIZE,
      margin: EdgeInsets.all(3),
    );
  }
สร้าง BlockUnit
BlockUnit คือคลาสที่เก็บค่าต่างๆในช่องของตาราง เช่น ตัวเลข สีพื้นหลัง สีตัวหนังสือ
class BlockUnit {
  int value;
  Color colorBackground;
  Color colorText;

  BlockUnit({this.value = 0, this.colorBackground, this.colorText});
}
ดังนั้นตารางของเกมมันก็คือ BlockUnit แบบ 2 มิติ
List<List<BlockUnit>> table;
กำหนดค่าเริ่มต้นให้กับตาราง โดยผมจะขอกำหนดค่าทุกช่อง = 2 ก่อน เพื่อทดสอบ
  @override
  void initState() {
    initTable();
    super.initState();
  }

  void initTable() {
    table = List();
    for (int row = 0; row < 4; row++) {
      List<BlockUnit> list = List();
      for (int col = 0; col < 4; col++) {
        list.add(BlockUnit(
            value: 2,
            colorBackground: Color(0xffeee4d9),
            colorText: Color(0xff776e64)));
      }
      table.add(list);
    }
  }
ทำการเชื่อมค่าตัวแปรใน BlockUnit กับ Container Widget
 @override
  Widget build(BuildContext context) {
    return Scaffold(
      body: Container(
          color: Color(0xfffbf9f3),
          child: Center(
            child: Container(
                decoration: BoxDecoration(
                    color: Color(0xffbaad9e),
                    borderRadius: BorderRadius.circular(8),
                    border: Border.all(width: 6, color: Color(0xffbaad9e))),
                child: Column(
                    mainAxisSize: MainAxisSize.min,
                    mainAxisAlignment: MainAxisAlignment.center,
                    children: buildTable())),
          )),
    );
  }

  List<Row> buildTable() {
    List<Row> listRow = List();
    for (int row = 0; row < 4; row++) {
      listRow.add(
          Row(mainAxisSize: MainAxisSize.min, children: buildRowBlockUnit(row)));
    }
    return listRow;
  }

  Container buildBlockUnit(int row, int col) {
    return Container(
      decoration: BoxDecoration(
        color: table[row][col].colorBackground,
        borderRadius: BorderRadius.circular(4),
      ),
      width: BOX_SIZE,
      height: BOX_SIZE,
      margin: EdgeInsets.all(3),
      child: Center(child: Text(
        "" + table[row][col].value.toString(),
          style: TextStyle(fontSize: 32, fontWeight: FontWeight.bold, color: table[row][col].colorText
      ),)),
    );
  }

  List<Widget> buildRowBlockUnit(int row) {
    List<Widget> list = List();
    for (int col = 0; col < 4; col++) {
      list.add(buildBlockUnit(row, col));
    }
    return list;
  }
ลองรัน
สร้าง BlockUnitManager
BlockUnit ในเกมไม่ได้มีแต่เลข 2 แต่มีเลข 4 8 16 …. 2048 ซึ่งแต่ละแบบก็มีสีไม่หมือนกัน ดังนั้น ก็เลยสร้างคลาส BlockUnitManager มาเก็บค่า BlockUnit แต่ละแบบ แล้วก็ความสามารการสุ่มบล็อก โดยผมจะลองเขียนแค่แบบ 2 ,4 ,8 ก่อน
ในส่วนของการสุ่ม เนื่องจากค่าของบล็อกมันเป็น 2^n ผมก็เลยสุ่มเลขที่ยกกำลังแทน เช่นสุ่ม 0-6 ถ้าสุ่มได้ 4 ค่าที่ได้คือ 2^4 = 16 นั่นเอง
const int BLOCK_VALUE_NONE = 1;
const int BLOCK_VALUE_2 = 2;
const int BLOCK_VALUE_4 = 4;
const int BLOCK_VALUE_8 = 8;

class BlockUnitManager {

  static BlockUnit randomBlock(){
    Random random = Random();
    int value = pow(2, random.nextInt(6)).toInt();
    return create(value);
  }

  static BlockUnit create(int value) {
    if(value == BLOCK_VALUE_2) {
      return BlockUnit(
          value: 2,
          colorBackground: Color(0xffeee4d9),
          colorText: Color(0xff776e64));
    }else if(value == BLOCK_VALUE_4) {
      return BlockUnit(
          value: 4,
          colorBackground: Color(0xffede0c8),
          colorText: Color(0xff776e64));
    }else if(value == BLOCK_VALUE_8) {
      return BlockUnit(
          value: 8,
          colorBackground: Color(0xfff2b179),
          colorText: Color(0xffffffff));
    }else {
      return BlockUnit(
          value: 0,
          colorBackground: Color(0xffccc0b3),
          colorText: Color(0x00776e64));
    }
  }
}
แล้วก็กำหนด initTable() ให้สุ่มบล็อกออกมา
 void initTable() {
    table = List();
    for (int row = 0; row < 4; row++) {
      List<BlockUnit> list = List();
      for (int col = 0; col < 4; col++) {
        list.add(BlockUnitManager.randomBlock());
      }
      table.add(list);
    }
  }
ทำปุ่มควบคุม
ต่อมาทำปุ่มให้มันเลื่อนซ้าย ขวา บนล่าง กันครับ จะได้เล่นและทดสอบง่ายๆ
เตรียมฟังก์ชัน สำหรับสร้างปุ่มควบคุม โดยผมจะใส่ไว้ด้านล่างของแอป
  @override
  Widget build(BuildContext context) {
    return Scaffold(
      body: Container(
          color: Color(0xfffbf9f3),
          child: Column(children: <Widget>[
            Expanded(
                child: Center(
              child: Container(
                  ...
            )),
            buildControlButton()
          ])),
    );
  }
ทิศทางของการเลื่อนมี 4 แบบ ก็ประกาศค่าคงที่เอาไว้จะได้ง่ายๆ
const int DIRECTION_UP = 0;
const int DIRECTION_LEFT = 1;
const int DIRECTION_RIGHT = 2;
const int DIRECTION_DOWN = 3;
สร้างปุ่มควบคุม 4 อัน และเพื่อความสวยงามเลยใส่ขอบโค้งให้ด้วย
(จริงๆอันนี้ ผม Copy มาจากเกมงู)
Container buildControlButton() {
    return Container(
      padding: EdgeInsets.all(8),
      color: Color(0xffede0c8),
      child:
          Row(mainAxisAlignment: MainAxisAlignment.center, children: <Widget>[
        buildControlDirectionButton(Icons.keyboard_arrow_left, DIRECTION_LEFT),
        Container(
            child: Column(
          mainAxisSize: MainAxisSize.min,
          children: <Widget>[
            buildControlDirectionButton(Icons.keyboard_arrow_up, DIRECTION_UP),
            buildControlDirectionButton(
                Icons.keyboard_arrow_down, DIRECTION_DOWN),
          ],
        )),
        buildControlDirectionButton(
            Icons.keyboard_arrow_right, DIRECTION_RIGHT),
      ]),
    );
  }

  GestureDetector buildControlDirectionButton(IconData icon, int direction) {
    return GestureDetector(
        onTap: () {
          //
        },
        child: Container(
          decoration: BoxDecoration(
              color: Colors.white,
              borderRadius: BorderRadius.only(
                  topLeft:
                      direction == DIRECTION_UP || direction == DIRECTION_LEFT
                          ? Radius.circular(8)
                          : Radius.circular(0),
                  topRight:
                      direction == DIRECTION_UP || direction == DIRECTION_RIGHT
                          ? Radius.circular(8)
                          : Radius.circular(0),
                  bottomLeft: direction == DIRECTION_LEFT ||
                          direction == DIRECTION_DOWN
                      ? Radius.circular(8)
                      : Radius.circular(0),
                  bottomRight: direction == DIRECTION_RIGHT ||
                          direction == DIRECTION_DOWN
                      ? Radius.circular(8)
                      : Radius.circular(0))),
          child: Icon(icon, size: 48),
        ));
  }
ได้ปุ่มมาแล้ว
BlockUnit เพิ่มเติม
มาเพิ่มรายละเอียด Block แบบต่างๆ โดยผมทำถึง 2^11 คือ 2048 ครับ
const int BLOCK_VALUE_16 = 16;
const int BLOCK_VALUE_32 = 32;
const int BLOCK_VALUE_64 = 64;
const int BLOCK_VALUE_128 = 128;
const int BLOCK_VALUE_256 = 256;
const int BLOCK_VALUE_512 = 512;
const int BLOCK_VALUE_1024 = 1024;
const int BLOCK_VALUE_2048 = 2048;
กำหนดค่าสีพื้นหลัง สีตัวหนังสือให้กับทุกอัน
 static BlockUnit create(int value) {
    if (value == BLOCK_VALUE_NONE) {
      return BlockUnit(
          value: value,
          colorBackground: Color(0xffccc0b3),
          colorText: Color(0x00ffffff),
          fontSize: 26);
    } else if (value == BLOCK_VALUE_2) {
      return BlockUnit(
          value: value,
          colorBackground: Color(0xffeee4d9),
          colorText: Color(0xff776e64));
    } else if (value == BLOCK_VALUE_4) {
      return BlockUnit(
          value: value,
          colorBackground: Color(0xffede0c8),
          colorText: Color(0xff776e64));
    } else if (value == BLOCK_VALUE_8) {
      return BlockUnit(
          value: value,
          colorBackground: Color(0xfff2b179),
          colorText: Color(0xffffffff));
    } else if (value == BLOCK_VALUE_16) {
      return BlockUnit(
          value: value,
          colorBackground: Color(0xfff49663),
          colorText: Color(0xffffffff));
    } else if (value == BLOCK_VALUE_32) {
      return BlockUnit(
          value: value,
          colorBackground: Color(0xfff77b63),
          colorText: Color(0xffffffff));
    } else if (value == BLOCK_VALUE_64) {
      return BlockUnit(
          value: value,
          colorBackground: Color(0xfff45639),
          colorText: Color(0xffffffff));
    } else if (value == BLOCK_VALUE_128) {
      return BlockUnit(
          value: value,
          colorBackground: Color(0xffedce71),
          colorText: Color(0xffffffff));
    } else if (value == BLOCK_VALUE_256) {
      return BlockUnit(
          value: value,
          colorBackground: Color(0xfff0cb63),
          colorText: Color(0xffffffff));
    } else if (value == BLOCK_VALUE_512) {
      return BlockUnit(
          value: value,
          colorBackground: Color(0xffecc752),
          colorText: Color(0xffffffff));
    } else if (value == BLOCK_VALUE_1024) {
      return BlockUnit(
          value: value,
          colorBackground: Color(0xffeec62c),
          colorText: Color(0xffffffff));
    } else if (value == BLOCK_VALUE_2048) {
      return BlockUnit(
          value: value,
          colorBackground: Color(0xffeec309),
          colorText: Color(0xffffffff));
    } else {
      return BlockUnit(
          value: value,
          colorBackground: Color(0xffeec309),
          colorText: Color(0xffffffff));
    }
  }
}
กำหนดเลขที่ต้องการให้สุ่ม ผมสุ่ม 0-11 ก็กำหนดค่าเป็น 12
const int COUNT_BLOCK_TYPE =12;
  static BoxUnit randomBlock() {
    Random random = Random();
    int value = pow(2, random.nextInt(COUNT_BLOCK_TYPE )).toInt();
    return create(value);
  }
มาแล้ว
เพิ่มขนาดตัวหนังสือ
ดูเหมือนขนาดตัวหนังสือของบล็อก 1024 , 2048 มันจะใหญ่ไปเมื่อเทียบกับขนาดบล็อก ดังนั้นในเคสของเลข 4 หลัก เราควรลดขนาดตัวหนังสือลงหน่อย
เพิ่มตัวแปรกำหนดขนาดตัวหนังสือให้กับ BlockUnit กำหนด default ด้วย
class BlockUnit {
  ...
  double fontSize;

  BlockUnit(
      {this.value = 0,
      this.colorBackground,
      this.colorText,
      this.fontSize = 32});
}
ในเคสของ 1024,2048 กำหนดขนาดให้ตัวเล็กลง
   ...
   } else if (value == BLOCK_VALUE_1024) {
      return BlockUnit (
          value: value,
          colorBackground: Color(0xffeec62c),
          colorText: Color(0xffffffff),
          fontSize: 26);
    } else if (value== BLOCK_VALUE_2048) {
      return BlockUnit (
          value: value,
          colorBackground: Color(0xffeec309),
          colorText: Color(0xffffffff),
          fontSize: 26);
    }
    ...
ดูดีขึ้นมาอีกนิด
การเลื่อนบล็อก
มาถึงจุดสำคัญของเกม คือการเลื่อนบล็อก
ก่อนอื่นกำหนดให้ ตารางสุ่มมาแค่เลข 2 ก่อน โดยปรับให้ random สามารถรับ max มาได้
  static BlockUnit randomBox({int maxPow = COUNT_BLOCK_TYPE}) {
    Random random = Random();
    int value = pow(2, random.nextInt(maxPow)).toInt();
    return create(value);
  }
เราจะสุ่มแต่บล็อกว่างๆกับเลข 2 ใส่ maxPow =2
มันจะสุ่มออกมาคือ 0 กับ 1
2^0 = 1 คือบล็อกว่างๆ
2^1 = 2 คือล็อกเลข 2
  void initTable() {
    table = List();
    for (int row = 0; row < 4; row++) {
      List<BlockUnit > list = List();
      for (int col = 0; col < 4; col++) {
        list.add(BlockUnitManager.randomBox(maxPow: 2));
      }
      table.add(list);
    }
  }
ต่อมาก็เขียน method การขยับซ้าย-ขวา บอกก่อนว่าวิธีที่ผมใช้ ผมคิดเอาเอง ดังนั้นมันเลยไม่ใช่ best practise
หลักการที่ผมใช้ คือ BlockUnit เราเก็บค่าเป็น list ดังนั้นมันสามารถลบและแทรกกันได้
กรณีขยับซ้าย เราก็จะวิ่งจากซ้ายไปขวาสนใจเฉพาะช่องว่าง ถ้าเจอให้ย้ายมันไปต่อแถวหลังสุด แล้วทำจนหมด
กรณีขวาก็ทำสลับกัน
จะได้ประมาณนี้
  moveLeft() {
    setState(() {
      for (int row = 0; row < 4; row++) {
        int col = 0;
        int count = 0;
        while (count < 4 && col< 4) {
          if (table[row][col].value == Block_VALUE_NONE) {
            BlockUnit blockEmpty = table[row][col];
            table[row].removeAt(col);
            table[row].add(blockEmpty);
            count++;
          } else {
            col++;
          }
        }
      }
    });
  }

  moveRight() {
    setState(() {
      for (int row = 0; row < 4; row++) {
        int col = 3;
        int count = 0;
        while (count < 4 && col< 4) {
          if (table[row][col].value == Block_VALUE_NONE) {
            BlockUnit blockEmpty = table[row][col];
            table[row].removeAt(col);
            table[row].insert(0,blockEmpty);
            count++;
          } else {
            col--;
          }
        }
      }
    });
  }
ทีนี้ที่ปุ่มควบคุมก็ให้ไปเรียก method
 GestureDetector buildControlDirectionButton(IconData icon, int direction) {
    return GestureDetector(
        onTap: () {
          if(direction == DIRECTION_LEFT){
            moveLeft();
          }else if(direction == DIRECTION_RIGHT){
            moveRight();
          }
        },
        ...
}
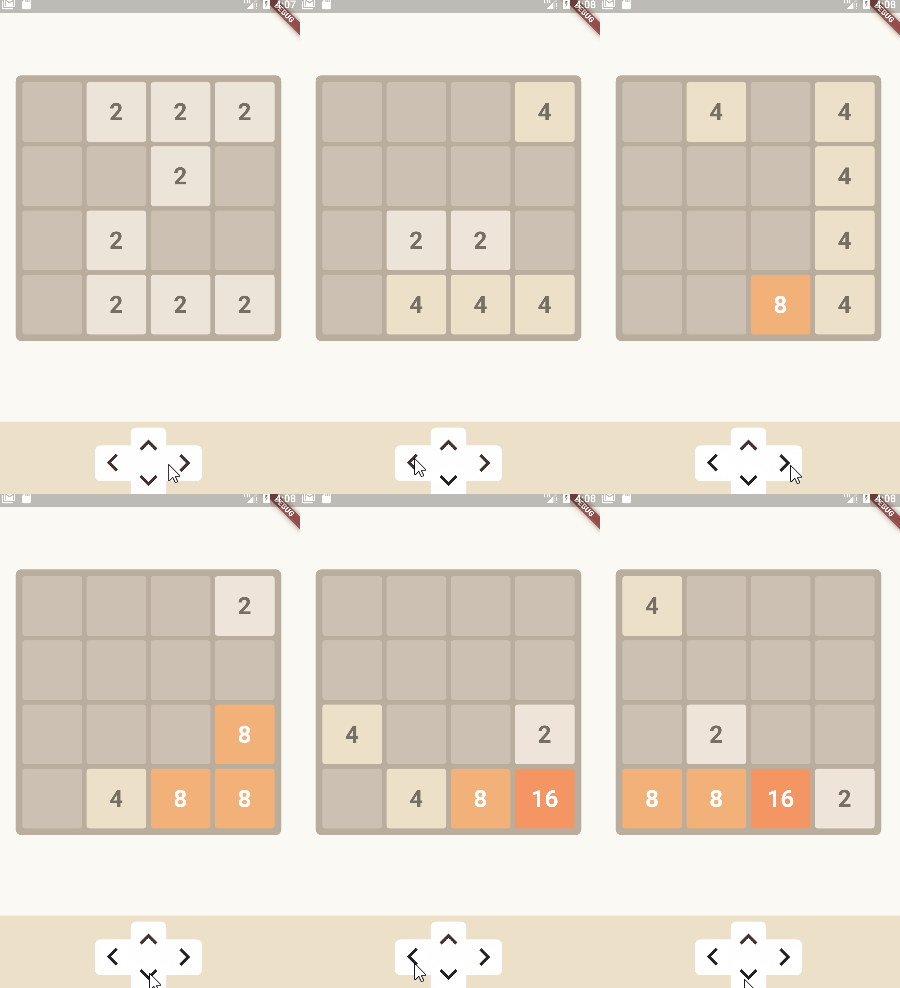
ขยับซ้ายขวาได้แล้ว
ทำให้บล็อกรวมกัน
หลังจากขยับแล้วขั้นตอนถัดไปคือ ทำให้บล็อกที่มีเลขเหมือนกันในแนวที่เราขยับ รวมค่ากัน วิธีการก็ง่ายๆอีกเช่นเคย
วิธีการมีดังนี้ สมมุติว่าขยับไปทางซ้าย เราก็ใช้วิธีเหมือนที่อธิบายไปข้างบนก่อน เพื่อให้บล็อกที่มีเลขมันขยับมาทางซ้ายให้หมด
จากนั้นก็รวมเลขที่เลขหมือนกันที่ติดกัน แล้วลบออกอันนึง พอลบออกแล้วมันจะมีช่องว่างแทรกอยู่ เราก็ทำการเลื่อนซ้ายใหม่เพื่อให้บล็อกมันชิดซ้ายให้หมด จบแล้ว
ซึ่งการรวมบล็อกมันจะมีแค่ 3 แบบ เพราะมี 4 ช่อง
คือรวม ช่องที่ 0 – 1 , 1 – 2 , 2 – 3
เช่น
  moveLeft() {
    setState(() {
      for (int row = 0; row < 4; row++) {
        moveAllBlockToLeft(row);
        combineAllBlockToLeft(row);
        moveAllBlockToLeft(row);
      }
    });
  }

  void combineAllBlockToLeft(int row) {
    if (table[row][0].value == table[row][1].value &&
        table[row][0].value != BLOCK_VALUE_NONE) {
      table[row][0] = BlockUnitManager.create(table[row][0].value * 2);
      table[row][1] = BlockUnitManager.create(BLOCK_VALUE_NONE);
    }
    if (table[row][1].value == table[row][2].value &&
        table[row][1].value != BLOCK_VALUE_NONE) {
      table[row][1] = BlockUnitManager.create(table[row][1].value * 2);
      table[row][2] = BlockUnitManager.create(BLOCK_VALUE_NONE);
    }
    if (table[row][2].value == table[row][3].value &&
        table[row][2].value != BLOCK_VALUE_NONE) {
      table[row][2] = BlockUnitManager.create(table[row][2].value * 2);
      table[row][3] = BlockUnitManager.create(BLOCK_VALUE_NONE);
    }
  }

   void moveAllBlockToLeft(int row) {
    int col = 0;
    int count = 0;
    // move all box in row to left
    while (count < 4 && col< 4) {
      if (table[row][col].value == BLOCK_VALUE_NONE) {
        BlockUnit boxEmpty = table[row][col];
        table[row].removeAt(col);
        table[row].add(boxEmpty);
        count++;
      } else {
        col++;
      }
    }
  }
ผลลัพธ์ในตอนนี้
กรณีเลื่อนขวาก็คล้ายกัน หลักการเดียวกันเด๊ะ
  moveRight() {
    setState(() {
      for (int row = 0; row < 4; row++) {
        moveAllBlockToRight(row);
        combineAllBlockToRight(row);
        moveAllBlockToRight(row);
      }
    });
  }

  void moveAllBlockToRight(int row) {
    int col = 3;
    int count = 0;
    while (count < 4 && col >= 0) {
      if (table[row][col].value == BLOCK_VALUE_NONE) {
        BlockUnit boxEmpty = table[row][col];
        table[row].removeAt(col);
        table[row].insert(0, boxEmpty);
        count++;
      } else {
        col--;
      }
    }
  }

  void combineAllBlockToRight(int row) {
    if (table[row][3].value == table[row][2].value &&
        table[row][3].value != BLOCK_VALUE_NONE) {
      table[row][3] = BlockUnitManager.create(table[row][3].value * 2);
      table[row][2] = BlockUnitManager.create(BLOCK_VALUE_NONE);
    }
    if (table[row][2].value == table[row][1].value &&
        table[row][2].value != BLOCK_VALUE_NONE) {
      table[row][2] = BlockUnitManager.create(table[row][2].value * 2);
      table[row][1] = BlockUnitManager.create(BLOCK_VALUE_NONE);
    }
    if (table[row][1].value == table[row][0].value &&
        table[row][1].value != BLOCK_VALUE_NONE) {
      table[row][1] = BlockUnitManager.create(table[row][1].value * 2);
      table[row][0] = BlockUnitManager.create(BLOCK_VALUE_NONE);
    }
  }
ต่อมาก็ทำขยับลงล่างบ้าง อันนี้จะต่างจากขยับซ้ายขวาหน่อยนึง เพราะ การขยับซ้ายขวาเราสามารถลบ แทรก ผ่าน list ของ table ได้แต่ในแนวตั้ง เราทำผ่แบบนั้นไม่ได้ เพราะ list มันเก็ยค่าเป็นแบบแถว การเลื่อนในแนวตั้ง จำเป็นต้องดึงค่าจากตารางในแนวตั้งมาเก็บไว้ใน list ข้างนอกก่อน จากนั้นขยับค่าจากใน list ข้างนอกแทน เสร็จแล้วค่อยบันทึกค่าใน list ข้างนอกกลับไปที่ตาราง
 void moveAllBlockToDown(int col) {
    int row = 3;
    int count = 0;

    List<BlockUnit> listVertical = List();
    listVertical.add(table[0][col]);
    listVertical.add(table[1][col]);
    listVertical.add(table[2][col]);
    listVertical.add(table[3][col]);

    while (count < 4 && row >= 0) {
      if (listVertical[row].value == BLOCK_VALUE_NONE) {
        BlockUnit blockEmpty= listVertical[row];
        listVertical.removeAt(row);
        listVertical.insert(0, blockEmpty);
        count++;
      } else {
        row--;
      }
    }

    for (int row = 0; row < 4; row++) {
      table[row][col] = listVertical[row];
    }
  }

  void combineAllBlockToDown(int col) {
    if (table[3][col].value == table[2][col].value &&
        table[3][col].value != BLOCK_VALUE_NONE) {
      table[3][col] = BlockUnitManager.create(table[3][col].value * 2);
      table[2][col] = BlockUnitManager.create(BLOCK_VALUE_NONE);
    }
    if (table[2][col].value == table[1][col].value &&
        table[2][col].value != BLOCK_VALUE_NONE) {
      table[2][col] = BlockUnitManager.create(table[2][col].value * 2);
      table[1][col] = BlockUnitManager.create(BLOCK_VALUE_NONE);
    }
    if (table[1][col].value == table[0][col].value &&
        table[1][col].value != BLOCK_VALUE_NONE) {
      table[1][col] = BlockUnitManager.create(table[1][col].value * 2);
      table[0][col] = BlockUnitManager.create(BLOCK_VALUE_NONE);
    }
  }
แต่ภาพรวมก็ยังคงใช้หลักการเดิม คือ ย้ายลง รวมบล้อกที่ติดกัน ย้ายลงอีกครั้ง
  moveDown() {
    setState(() {
      for (int col = 0; col < 4; col++) {
        moveAllBlockToDown(col);
        combineAllBlockToDown(col);
        moveAllBlockToDown(col);
      }
    });
  }
เพิ่มปุ่มกดลงให้ทำงาน
 GestureDetector buildControlDirectionButton(IconData icon, int direction) {
    return GestureDetector(
        onTap: () {
         ...
          } else if (direction == DIRECTION_DOWN) {
            moveDown();
          }
        },
        ...
กรณีเลื่อนขึ้นก็คล้ายเลื่อนลงนั่นแหละ ทำสลับกัน
 void moveAllBlockToUp(int col) {
    int row = 0;
    int count = 0;

    List<BlockUnit> listVertical = List();
    listVertical.add(table[0][col]);
    listVertical.add(table[1][col]);
    listVertical.add(table[2][col]);
    listVertical.add(table[3][col]);

    while (count < 4 && row < 4) {
      if (listVertical[row].value == BLOCK_VALUE_NONE) {
        BlockUnit blockEmpty = listVertical[row];
        listVertical.removeAt(row);
        listVertical.add(blockEmpty );
        count++;
      } else {
        row++;
      }
    }

    for (int row = 0; row < 4; row++) {
      table[row][col] = listVertical[row];
    }
  }

  void combineAllBlockToUp(int col) {
    if (table[0][col].value == table[1][col].value &&
        table[0][col].value != BLOCK_VALUE_NONE) {
      table[0][col] = BlockUnitManager.create(table[0][col].value * 2);
      table[1][col] = BlockUnitManager.create(BLOCK_VALUE_NONE);
    }
    if (table[1][col].value == table[2][col].value &&
        table[1][col].value != BLOCK_VALUE_NONE) {
      table[1][col] = BlockUnitManager.create(table[1][col].value * 2);
      table[2][col] = BlockUnitManager.create(BLOCK_VALUE_NONE);
    }
    if (table[2][col].value == table[3][col].value &&
        table[2][col].value != BLOCK_VALUE_NONE) {
      table[2][col] = BlockUnitManager.create(table[2][col].value * 2);
      table[3][col] = BlockUnitManager.create(BLOCK_VALUE_NONE);
    }
  }
moveUp() {
  setState(() {
    for (int col = 0; col < 4; col++) {
      moveAllBlockToUp(col);
      combineAllBlockToUp(col);
      moveAllBlockToUp(col);
    }
  });
}
 GestureDetector buildControlDirectionButton(IconData icon, int direction) {
    return GestureDetector(
        onTap: () {
         ...
          } else if (direction == DIRECTION_UP) {
            moveUp();
          }
        },
        ...
สุ่มบล็อกใหม่เพิ่มหลังจากเลื่อน
เกมนี้พอเราขยับบล็อก มันจะสุ่มบล็อกใหม่ มาใส่ในช่องที่ว่าง โดยจะสุ่มแค่บล็อก 2 -4 มาเท่านั้น
ซึ่งเราจำเป็นต้องเก็บตำแหน่งช่องที่ว่างในตาราง แล้วค่อยสุ่มเลือก
ดังนั้นสร้างคลาสสำหรับเก็บตำแหน่งในตาราง
class Coordinate {
  int row;
  int col;

  Coordinate({this.row, this.col});
}
สร้าง method ใน BlockUnitManager สำหรับสุ่มแค่ บล็อก 2 กับ 4
class BlockUnitManager {
  ...

  static BlockUnit randomSimpleBlock() {
    Random random = Random();
    int value = random.nextInt(2);
    if (value == 0) {
      return create(BLOCK_VALUE_2);
    }
    return create(BLOCK_VALUE_4);
  }
}
เขียนส่วนที่สุ่มบล็อกลงในตาราง โดยจะทำการรวบรวมช่องที่ว่างในตาราง จากนั้นก็จะเลือกช่องมาช่องนึง แล้วสุ่มบล็อกลงไป
  randomSimpleBlockToTable() {
    List<Coordinate> listBlockUnitEmpty = List();
    for (int row = 0; row < 4; row++) {
      for (int col = 0; col < 4; col++) {
        if (table[row][col].value == BLOCK_VALUE_NONE) {
          listBlockUnitEmpty.add(Coordinate(row: row, col: col));
        }
      }
    }

    Random random = Random();
    int index = random.nextInt(listBlockUnitEmpty.length);
    int row = listBlockUnitEmpty[index].row;
    int col = listBlockUnitEmpty[index].col;

    table[row][col] = BlockUnitManager.randomSimpleBlock();
  }
กำหนดให้เรียกคำสั่งนี้หลังจากกดเลื่อนที่ปุ่มควบคุม
  GestureDetector buildControlDirectionButton(IconData icon, int direction) {
    return GestureDetector(
        onTap: () {
          ...

          randomSimpleBlockToTable();
      },
      ...
ดูผลลัพธ์
หน่วงเวลา
พอเรากดเลื่อน มันก็สุ่มบล็อกมาใส่เลย ซึ่งไวมากๆ ไวจนเราไม่รู้ว่าอันไหนที่มันสุ่ม ดังนั้นเลยต้องหน่วงเวลานิดนึง
สร้างตัวแปรกำหนดว่า ตอนนี้กำลังหน่วงเวลาอยู่
bool delayMode = false;
เพิ่มโค้ดให้ หน่วงเวลา ผมลองแล้วประมาณ 0.2 วินาทีกำลังดี
  GestureDetector buildControlDirectionButton(IconData icon, int direction) {
    return GestureDetector(
        onTap: () {
          if(!delayMode) {
            delayMode = true;
            if (direction == DIRECTION_LEFT) {
              moveLeft();
            } else if (direction == DIRECTION_RIGHT) {
              moveRight();
            } else if (direction == DIRECTION_DOWN) {
              moveDown();
            } else if (direction == DIRECTION_UP) {
              moveUp();
            }

            Future.delayed(const Duration(milliseconds: 200), () {
              setState(() {
                delayMode = false;
                randomSimpleBlockToTable();
              });
            });
          }
        },..
แก้ปัญหา
ปัญหาต่อมา คือ กรณีที่เราเลื่อนบล็อกแล้วเรากดขยับในทิศทางที่ไม่มีบล็อกไหนขยับได้ แต่เกมก็ยังสุ่มบล็อกมาเพิ่ม ซึ่งจริงๆถ้าไม่มีบล็อกไหนขยับมันจะไม่สุ่มมาเพิ่ม ไม่อย่างนั้นเกมมันจะจบยาก
วิธีแก้คือ เราต้องเช็คว่ามีการเลื่อนบล็อกหรือการรวมกันของบล็อกเกิดขึ้นหรือไม่ ถ้าเกิดก็ค่อยสุ่ม
ซึ่งก็ต้องปรับโค้ดการเลื่อนนิดหน่อย คือ return boolean กลับมาว่ามีการเลื่อน หรือ รวมกันเกิดขึ้นมัย
ตัวอย่างของการเลื่อนซ้าย
  bool moveLeft() {
    bool move = false;
    setState(() {
      for (int row = 0; row < 4; row++) {
        bool moveByNormal = moveAllBlockToLeft(row);
        bool moveByCombine  = combineAllBlockToLeft(row);
        moveAllBlockToLeft(row);
        move = move || moveByNormal || moveByCombine;
      }
    });
    return move;
  }

  bool combineAllBlockToLeft(int row) {
    bool move= false;
    if (table[row][0].value == table[row][1].value &&
        table[row][0].value != BLOCK_VALUE_NONE) {
      table[row][0] = BlockUnitManager.create(table[row][0].value * 2);
      table[row][1] = BlockUnitManager.create(BLOCK_VALUE_NONE);
      move = true;
    }
    if (table[row][1].value == table[row][2].value &&
        table[row][1].value != BLOCK_VALUE_NONE) {
      table[row][1] = BlockUnitManager.create(table[row][1].value * 2);
      table[row][2] = BlockUnitManager.create(BLOCK_VALUE_NONE);
      move = true;
    }
    if (table[row][2].value == table[row][3].value &&
        table[row][2].value != BLOCK_VALUE_NONE) {
      table[row][2] = BlockUnitManager.create(table[row][2].value * 2);
      table[row][3] = BlockUnitManager.create(BLOCK_VALUE_NONE);
      move = true;
    }
    return move;
  }

  bool moveAllBlockToLeft(int row) {
    bool move = false;

    int col = 0;
    int count = 0;
    // move all BLOCK in row to left
    while (count < 4 && col < 4) {
      if (table[row][col].value == BLOCK_VALUE_NONE) {
        if(col < 4 - 1) {
          if (table[row][col + 1].value != BLOCK_VALUE_NONE) {
            move = true;
          }
        }

        BlockUnit blockEmpty = table[row][col];
        table[row].removeAt(col);
        table[row].add(blockEmpty);
        count++;
      } else {
        col++;
      }
    }
    return move;
  }
ถ้า method move มัน return true กลับมาก็คือเกิดการขยับหรือรวมกันเกิดขึ้นก็ให้สุ่มอันใหม่มาได้
GestureDetector buildControlDirectionButton(IconData icon, int direction) {
    return GestureDetector(
        onTap: () {
          if(!delayMode) {
            delayMode = true;
            bool move= true;
            if (direction == DIRECTION_LEFT) {
              move = moveLeft();
            } else if (direction == DIRECTION_RIGHT) {
              move = moveRight();
            } else if (direction == DIRECTION_DOWN) {
              move = moveDown();
            } else if (direction == DIRECTION_UP) {
              move = moveUp();
            }

            Future.delayed(const Duration(milliseconds: 200), () {
              setState(() {
                delayMode = false;
                if(move) {
                  randomSimpleBlockToTable();
                }
              });
            });
          }
        },
        ...
ทำป้ายแสดงคะแนน
ยังขาดเมนูสำหรับแสดงคะแนนของเกม และปุ่มเริ่มเกมใหม่ครับ
ประกาศตัแปรคะแนน
int score = 0;
สร้างแถบเมนูของเกม โดยผมจะวางไว้ด้านบนของจอ ใส่ปุ่มเริ่มเกมใหม่ไปด้วย
Container buildMenu() {
    return Container(
      padding: EdgeInsets.only(top: 36, bottom: 12, left: 16, right: 16),
      color: Color(0xffede0c8),
      child:
      Row(mainAxisAlignment: MainAxisAlignment.center,
          children: <Widget>[
            GestureDetector(onTap: () {
              //
            },
                child: Container(constraints: BoxConstraints(minWidth: 120),
                    decoration: BoxDecoration(color: Color(0xff8f7a66),
                        borderRadius: BorderRadius.circular(4)),
                    padding: EdgeInsets.all(12),
                    child: Column(children: <Widget>[
                      Text("New Game", style: TextStyle(fontSize: 22,
                          fontWeight: FontWeight.bold,
                          color: Colors.white))
                    ]))),
            Expanded(child: Container()),
            Container(constraints: BoxConstraints(minWidth: 120),
                decoration: BoxDecoration(color: Color(0xffbbada0),
                    borderRadius: BorderRadius.circular(4)),
                padding: EdgeInsets.all(4),
                child: Column(children: <Widget>[
                  Text("SCORE", style: TextStyle(fontSize: 16,
                      fontWeight: FontWeight.bold,
                      color: Colors.white)),
                  Text("$score", style: TextStyle(fontSize: 26,
                      fontWeight: FontWeight.bold,
                      color: Colors.white))
                ]))
          ]),
    );
  }
ใส่เมนูไว้ด้านบน
  @override
  Widget build(BuildContext context) {
    return Scaffold(
      body: Container(
          color: Color(0xfffbf9f3),
          child: Column(children: <Widget>[
            buildMenu(),
            Expanded(
               ...
            ),
            buildControlButton()
          ])),
    );
  }
ต่อมาก็ บวกคะแนนเพิ่ม ตอนรวมบล็อกกัน
 bool combineAllBlockToLeft(int row) {
    bool move = false;
    if (table[row][0].value == table[row][1].value &&
        table[row][0].value != BLOCK_VALUE_NONE) {
      table[row][0] = BlockUnitManager.create(table[row][0].value * 2);
      table[row][1] = BlockUnitManager.create(BLOCK_VALUE_NONE);
      score += table[row][0].value;
      move = true;
    }
    ...
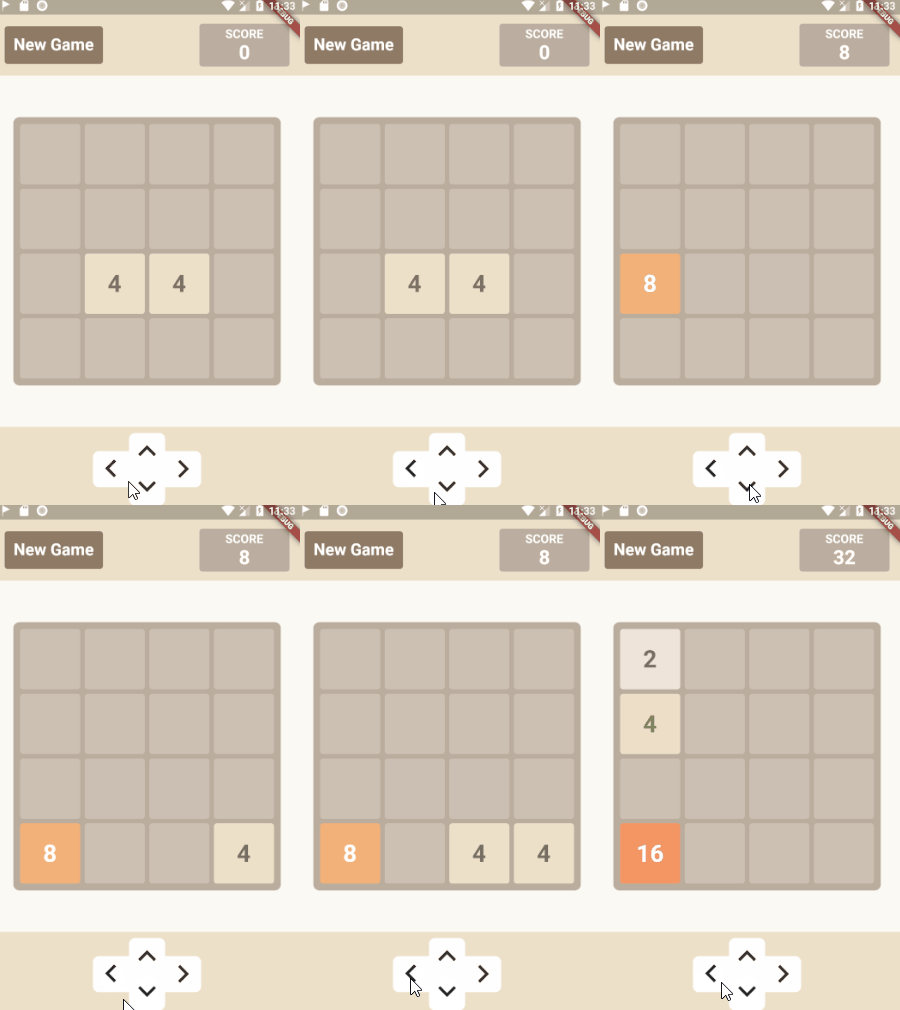
ผลลัพธ์
เริ่มเกมใหม่
ขอยุบรวม การกำหนดค่าเริ่มต้นให้เกมเป็น method initGame()
  @override
  void initState() {
    initGame();
    super.initState();
  }

  void initGame() {
    score = 0;
    initTable();
    randomSimpleBlockToTable();
    randomSimpleBlockToTable();
  }
จากนั้น restart() ก็คือ initGame()
  void restart() {
    initGame();
  }
Game over
ทำหน้าจอแสดงการจบเกม โดยจะใช้เป็น dialog ว่า Game Over แล้วมีปุ่ม restart เกมอีกครั้ง
ก่อนอื่นเตรียมหน้าจอของ dialog
 void showGameOverDialog() {
    // flutter defined function
    showDialog(
      context: context,
      builder: (BuildContext context) {
        // return object of type Dialog
        return AlertDialog(
            content: Column(mainAxisSize: MainAxisSize.min, children: <Widget>[
              Text("Game Over ):",
                  style: TextStyle(
                      fontSize: 32,
                      color: Colors.pink[800],
                      fontWeight: FontWeight.bold)),
              RaisedButton(
                padding: EdgeInsets.symmetric(horizontal: 18, vertical: 6),
                color: Color(0xff8f7a66),
                child: Text("Play again",
                    style: TextStyle(
                        fontSize: 22,
                        color: Colors.white,
                        fontWeight: FontWeight.bold)),
                onPressed: () {
                  Navigator.of(context).pop();
                  restart();
                },
              )
            ]));
      },
    );
  }
เขียน method เช็คว่า Game Over หรือยัง
วิธีการคือในตารางต้องไม่มีช่องว่าง และห้ามมีเลขเหมือนกันติดกันทั้งแนวตั้งและแนวนอน
ถ้าเข้าเงื่อนไข คือ จบเกม
  bool isGameOver() {
    for (int row = 0; row < 4; row++) {
      for (int col = 0; col < 4; col++) {
        if (table[row][col].value == BLOCK_VALUE_NONE) {
          return false;
        }
        if (col < 4 - 1) {
          if (table[row][col].value == table[row][col + 1].value) {
            return false;
          }
        }
      }
    }

    for (int col = 0; col < 4; col++) {
      for (int row = 0; row < 4; row++) {
        if (table[row][col].value == BLOCK_VALUE_NONE) {
          return false;
        }
        if (row < 4 - 1) {
          if (table[row][col].value == table[row + 1][col].value) {
            return false;
          }
        }
      }
    }

    return true;
  }
จากนั้นก็เช็คเงื่อนไข ตอนที่เรากดปุ่มเลื่อนบล็อก
  GestureDetector buildControlDirectionButton(IconData icon, int direction) {
    return GestureDetector(
        onTap: () {
          if (!delayMode) {
            ...

            Future.delayed(const Duration(milliseconds: 200), () {
              if (move) {
                delayMode = false;
                setState(() {
                  randomSimpleBlockToTable();
                  if (isGameOver()) {
                    showGameOverDialog();
                  }
                });
              } else {
                delayMode = false;
                if (isGameOver()) {
                  showGameOverDialog();
                }
              }
            });
          ...
จบแล้ว
จบแล้วจ้า นี่ก็คือทั้งหมดของเกม 2048 แบบคร่าวๆครับเขียนด้วย Flutter แบบหยาบๆ รวมๆแล้วก็สนุกดี ไม่ซับซ้อนเท่าไหร่ครับ
โค้ดบน Github
https://github.com/benznest/2048-game-flutter


 Previous Post
 Next Post